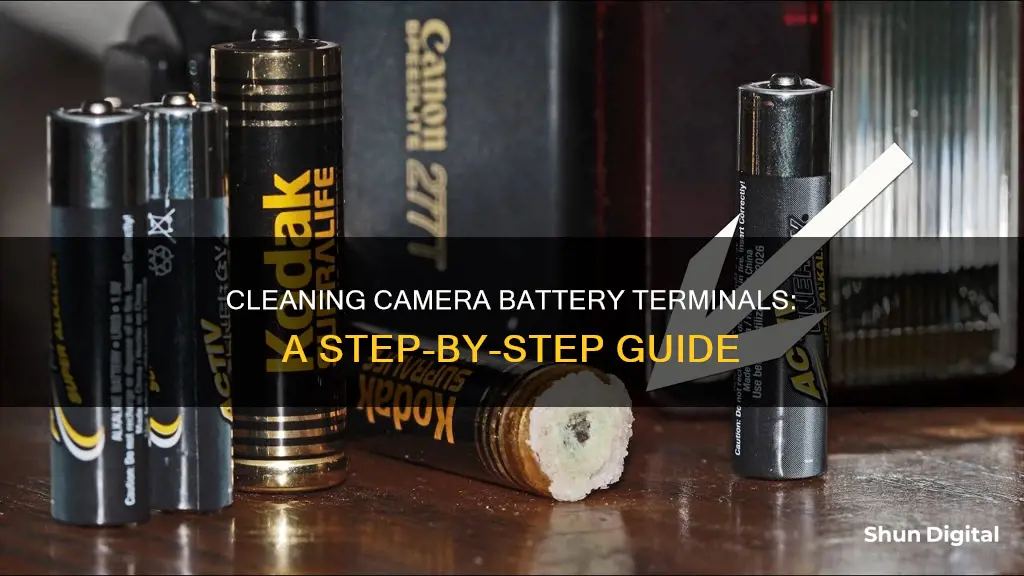
If you're a keen photographer, you'll know that camera maintenance is important. One issue that regular camera users might come across is battery terminal corrosion. This can be caused by a number of factors, including damage to the battery, manufacturing defects, or exposure to excessive heat or humidity. But don't panic—there are a few simple ways to clean your camera battery terminals and get your device working again.
| Characteristics | Values |
|---|---|
| Protective gear | Protective gloves, safety goggles or eye protection, long-sleeved clothing |
| Tools | Cotton swabs, white vinegar, lemon juice, baking soda, toothbrush, fine-grit sandpaper, pencil eraser, microfiber cloth, compressed gas, isopropyl alcohol |
| Time | 10-15 minutes |
What You'll Learn
![]()
Use white vinegar or lemon juice to neutralise corrosion
White vinegar or lemon juice can be used to clean corrosion from your camera battery terminals. These substances are effective because they introduce an acid that neutralises the base chemicals found in most household batteries.
Step 1: Prepare the substance
Pour a small amount of white vinegar or lemon juice into a cup or bowl. You won't need a lot, so the lid of the vinegar bottle or a small cup will work well.
Step 2: Apply the substance to the terminals
Take a cotton swab, Q-tip, or small toothbrush and dip it into the vinegar or lemon juice. Be careful not to oversaturate the swab to avoid getting liquid inside the electrical components of your camera. It should be damp but not dripping wet.
Step 3: Clean the terminals
Use the damp swab to wipe down the corroded areas of the battery terminals. You may hear a fizzing sound, which is normal and indicates that the vinegar or lemon juice is reacting with and neutralising the corrosion. Scrub any areas of heavy corrosion with a small piece of sandpaper, being careful not to damage the sensitive terminals.
Step 4: Dry the terminals
Once you have removed the corrosion, dry the terminals with a clean cloth or paper towel. Make sure they are completely dry before reinserting the batteries or turning on your camera.
Tips and Precautions:
- Always handle batteries with care and take appropriate safety precautions when cleaning your camera battery terminals.
- Wear protective gloves and safety goggles to protect your skin and eyes from corrosive chemicals.
- Work in a well-ventilated area to avoid inhaling fumes.
- Do not mix new and used batteries or batteries of different brands, as this can lead to performance problems.
- Always store and dispose of batteries properly to reduce the risk of corrosion and leakage.
Charging Your GE Camera: A Quick Guide
You may want to see also
![]()
Clean with a cotton swab or Q-tip
Cotton swabs or Q-tips are a great way to clean your camera battery terminals. They are gentle on the terminals and can effectively clean away corrosion. Here is a step-by-step guide on how to clean your camera battery terminals using cotton swabs or Q-tips:
Firstly, you will need to gather your materials. For this method, you will need white vinegar, cotton swabs or Q-tips, and a small cup. It is also recommended to wear protective gloves and safety goggles to shield your skin and eyes from any harmful chemicals.
Next, pour a small amount of distilled white vinegar into the cup. Dip one end of the cotton swab or Q-tip into the vinegar until it is nicely wet. Gently squeeze out any excess liquid to avoid drips.
Now, you are ready to start cleaning! Use the vinegar-soaked end of the swab to scrub the corroded areas of the battery terminals. You may hear a fizzing sound, which is normal and indicates that the vinegar is reacting with the corrosion. Be sure to get into any tight spaces or crevices where corrosion may be hiding.
If there are more extreme areas of corrosion that are caked on, you can carefully use a small piece of sandpaper to scrub them away. Fold the sandpaper in half and gently rub it on the affected areas.
After addressing the heavily corroded parts with sandpaper, go back and use your vinegar-soaked cotton swab to continue cleaning. You should see foam forming as the vinegar breaks down the corrosion. Repeat this process until your camera is completely clean and free of any residue.
Finally, allow your camera to air dry or gently wipe the terminals with a microfiber cloth. Make sure that the camera is completely dry before inserting new batteries and turning it on.
And that's it! Your camera battery terminals should now be clean and corrosion-free, ready for you to start capturing memories again.
Charging BP-511A Camera Batteries: Picking the Right Charger
You may want to see also
![]()
Use sandpaper for extreme corrosion
If you're dealing with extreme corrosion on your camera battery terminals, you can use sandpaper to scrub it down. First, take a small piece of sandpaper and fold it in half. Then, scrub the corroded areas vigorously until the corrosion is removed. For more precision, you can use a toothbrush or a battery terminal brush to scrub the terminals.
After using sandpaper, you can go back and use a cotton swab or Q-tip to clean the terminals further. You can dip the swab in vinegar or a baking soda mixture to help break down the corrosion. Continue scrubbing until your camera is completely clean.
Always be careful when cleaning your camera battery terminals, as the terminals are sensitive and can be easily damaged.
Dash Cam Power: Staying Charged and Ready
You may want to see also
![]()
Neutralise rust with baking soda
Neutralising rust with baking soda is a common home remedy for removing corrosion from battery terminals. However, it is important to note that water and electricity do not mix, so this method should be approached with caution. Here is a step-by-step guide on how to neutralise rust with baking soda when cleaning camera battery terminals:
Step 1: Disconnect the Battery
Remove the batteries from the camera and set them aside. It is important to handle batteries with care and follow proper disposal guidelines if they are leaking or damaged.
Step 2: Prepare the Baking Soda Mixture
In a small container, mix two tablespoons of baking soda with two cups of water. Stir the mixture until the baking soda is fully dissolved.
Step 3: Apply the Baking Soda Mixture
Using a cotton swab, Q-tip, or a small brush, apply the baking soda mixture to the corroded battery terminals. Make sure to cover all the affected areas generously. The baking soda will react with the acid in the corrosion, causing a fizzing or bubbling effect.
Step 4: Let the Mixture Sit
Allow the baking soda mixture to sit on the battery terminals for a few minutes. This will give the baking soda time to neutralise the acid and break down the rust or corrosion.
Step 5: Scrub the Terminals
After the mixture has stopped fizzing, use a soft brush or sandpaper to gently scrub the terminals. Be careful not to apply too much pressure, as the terminals are sensitive and can be easily damaged. Continue scrubbing until all the corrosion has been removed.
Step 6: Rinse and Dry the Terminals
Rinse the terminals with clean water to remove any remaining baking soda and corrosion residue. Then, use a clean cloth or paper towel to thoroughly dry the terminals and ensure no water is left behind.
Step 7: Reassemble and Test
Once the terminals are completely dry, you can reassemble the camera by inserting new batteries and closing the battery compartment. Test the camera to ensure it is functioning properly.
It is important to note that if the camera does not work after cleaning the battery terminals, there may be more severe damage that requires professional repair. Additionally, always prioritise safety when working with corrosive materials and batteries, and consider seeking advice from a certified technician if you are uncomfortable with any of the steps.
Camera B500 Charging: Cable or No Cable?
You may want to see also
![]()
Dry terminals to prevent short circuits
It is important to dry your camera's battery terminals after cleaning to prevent short circuits. A short circuit is when an electrical current follows a shorter, unintended pathway instead of the intended circuit. This can be dangerous and lead to sparks, fires, and damage to electrical appliances.
To dry your camera's battery terminals, simply let them air-dry. Ensure that the terminals are completely dry before inserting the batteries or cells. This will help prevent short circuits and keep your camera functioning properly.
In addition to drying terminals, there are several other ways to prevent short circuits. Firstly, use fuses or circuit breakers, which will trip during an overload or low electrical resistance, protecting the lines from shorting. Secondly, ensure your wires have good insulation to prevent exposure and short circuits. Invest in quality insulating materials like PVC, PE, or Nylon. Thirdly, keep your house secure from rats and pests that can chew on wires and expose the ends. Also, check the plugs of your appliances and replace any that are loose, old, or brittle, as these increase the chances of short circuits.
By following these steps and ensuring your terminals are dry, you can help prevent short circuits and keep your camera equipment safe and functioning properly.
Charging Cameras While Streaming: A Guide to Power Sources
You may want to see also
Frequently asked questions
It is important to protect yourself from chemical burns when cleaning your camera's battery terminals. Wear protective gloves and safety goggles to avoid skin and eye contact with the corrosive chemicals. It is also recommended to cover your work surface with newspaper and wear long-sleeved clothing to avoid any accidental spills.
You can use a few common household items to clean the corrosion from your camera's battery terminals. White vinegar or lemon juice can be used to neutralize the corrosion, followed by isopropyl alcohol to remove any residue. A toothbrush or cotton swabs can be used to apply these liquids, and a pencil eraser or microfiber cloth can be used for polishing.
To prevent corrosion, always remove batteries from your camera when you're not planning on using it for a while. Store your batteries at or below room temperature and avoid exposing them to extreme temperatures or moisture. Additionally, always insert batteries in the correct direction and avoid mixing old and new batteries or batteries of different brands.