Focusing a camera on a specific object in Blender can be achieved through various methods. One approach is to utilise the Frame Selected feature under the 3D View section in the Input tab of Blender's preferences. This allows users to map a custom shortcut key for focusing on objects. Alternatively, the . key on the numeric keypad can be used to adjust the 3D View and focus on the selected object. For laptops without a numeric keypad, the Emulate Numpad option in the Input tab can be enabled, though this may limit certain functionalities. Additionally, the Lock to Object option in the View menu can be used to achieve a similar effect. Blender also offers the ability to add depth of field to a render, allowing users to select a specific object for the camera to autofocus on.
| Characteristics | Values |
|---|---|
| How to focus on a selected object | Press "." on the numeric keypad |
| How to focus without a numeric keypad | Press "Ctrl + Scroll" or Press "Alt + Middle Mouse Button" |
| Alternative method | Use "Zoom Border" tool (Shift+B, then LMB) |
| How to focus on all objects | Press "A" twice, then "." on the numeric keypad |
| How to reset view and recenter cursor | Press "Shift+C" |
| How to focus on a specific face component of an object | Use "Lock to Object" under "View" in the right-hand toolshelf of the 3D view |
| How to adjust the focus distance | Use the "Focus Distance" setting in the "Depth of Field" tab of the "Camera Properties" |
| How to select a specific object for autofocus | Use the "Focus on Object" selector in the "Depth of Field" tab of the "Camera Properties" |
What You'll Learn
![]()
Using the Zoom Border tool
The Zoom Border tool is a handy feature in Blender that allows you to quickly zoom in on a specific area of your 3D scene. Here's a step-by-step guide on how to use it:
Step 1: Activate the Zoom Border Tool
To activate the Zoom Border tool, simply press "Shift + B" on your keyboard. This will bring up the Zoom Border interface, allowing you to define the area you want to zoom into.
Step 2: Define the Zoom Area
Once the Zoom Border tool is activated, you can define the area you want to zoom into by clicking and dragging your mouse to create a rectangle. This rectangle will determine the region that will be zoomed in on. You can adjust the size and position of the rectangle as needed to capture the desired area.
Step 3: Confirm the Zoom
After you have defined the zoom area, simply release the mouse button to confirm the zoom. The view will automatically adjust to fill the viewport with the selected region. This way, you can focus on specific objects or details within your scene without having to scroll or adjust the camera manually.
Customising the Zoom Border Tool
If you prefer a different keyboard shortcut for the Zoom Border tool, you can customise it in the "View" menu. Go to "View > Shift+B to Zoom Border" and you will be able to set a custom shortcut. Additionally, if you're using a laptop or a keyboard without a number pad, you can enable the Emulate Numpad option in the "Input" tab of the User Preferences. This will allow you to use the Zoom Border tool and other number pad-related functions with your regular keyboard keys.
The Zoom Border tool is a quick and efficient way to navigate and focus on specific areas of your 3D scene in Blender. It saves you time and effort in adjusting your camera and provides a more precise way to zoom in on the details that matter.
Charging the Wyze Outdoor Camera: A Step-by-Step Guide
You may want to see also
![]()
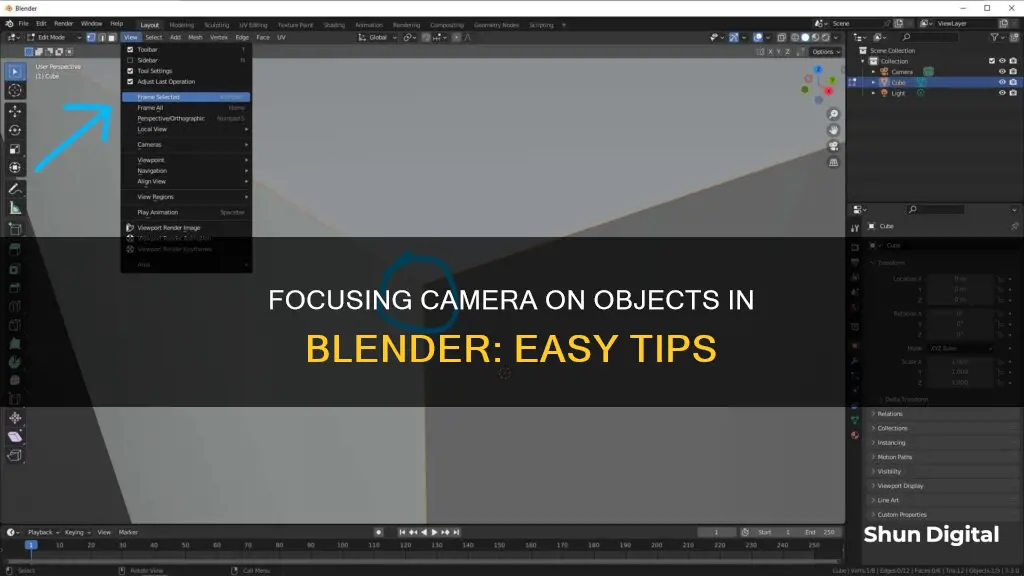
Using the View menu
To focus the camera on an object in Blender, you can use the View menu. Here's a step-by-step guide:
- Select the object you want to focus on.
- Go to the "View" menu at the top of the interface.
- Click on "Frame Selected" or "View Selected" (the exact wording may vary depending on your Blender version). Alternatively, you can right-click on "Frame Selected" and assign a custom shortcut key for this function.
- This will adjust your 3D View and centre the camera on the selected object.
If you don't have a numeric keypad and are unable to use the "." key to focus, you can still use the "View" menu as described above. This method is also useful if you want to assign a custom shortcut for focusing the camera on an object.
In addition to the "View" menu, you can also use the Lock Camera to View option in the View tab to control the position and orientation of the rendering camera. This option is particularly useful if you want to centre the camera on a specific object while in camera view.
By utilising the "View" menu and the "Lock Camera to View" option, you can easily focus your camera on a specific object in Blender, even if you don't have access to a numeric keypad.
Samy's Camera: Tax-Free Shopping Experience
You may want to see also
![]()
Adjusting the F-Stop
Understanding F-Stop:
F-Stop, also known as f-number or focal ratio, is a measure of the size of the aperture (opening) in your camera lens. It controls the amount of light that enters the camera and reaches the sensor or film. A lower f-stop value indicates a larger aperture, allowing more light to enter, while a higher f-stop value means a smaller aperture and less light transmission.
Impact on Focus and Depth of Field:
Setting Up F-Stop in Blender:
To adjust the F-Stop in Blender, follow these steps:
- Select your camera object in the 3D Viewport.
- In the Properties panel (usually on the right side of the interface), scroll down to the "Lens" section.
- Locate the "F-Stop" setting and adjust the value using the slider or by manually typing in a number.
- You can also enable "Depth of Field" in the "Camera" section to visualize the depth of field in your scene in real-time.
Real-World Camera Settings:
If you're aiming for photorealism or want to replicate the settings of a real-world camera, you can refer to online resources and charts that provide F-Stop values for various cameras and lenses. Additionally, you can use applications like "DOF Calculator" to determine the depth of field for specific camera setups.
Limitations and Workarounds:
It's important to note that the F-Stop settings in Blender may not perfectly align with real-world camera behavior due to the complex interplay of lens characteristics and lighting conditions. However, Blender's F-Stop settings provide a good approximation for most use cases.
In conclusion, adjusting the F-Stop in Blender allows you to control the focus and depth of field in your renders. Play around with different values to achieve the desired look, whether it's a soft, dreamy background or a crisp, fully focused scene. Remember that understanding the fundamentals of photography and camera settings will enhance your ability to create stunning visuals in Blender.
Charging the 808 Car Keys Micro-Camera: A Quick Guide
You may want to see also
![]()
Using the Focus on Object selector
Focusing on an object in Blender is a fundamental skill that enhances precision, efficiency, and navigation in 3D space. Here's a guide on using the "Focus on Object" selector:
Using Shortcuts:
If you have a Numpad on your keyboard, simply select the object and press "." (period) on the Numpad. This will instantly centre your view on the chosen object. This shortcut works in both \"Object Mode\" and "Edit Mode".
Using the Menu:
If you don't have a Numpad, you can use the "View" menu. Click on "View" and then select "Frame Selected" to focus on the object. Alternatively, you can use "View" > "Align View" > "View Selected".
Using the Pie Menu:
Press the backtick "`" key on your keyboard and then choose "View Selected" from the Pie Menu.
Customising Shortcuts:
You can also customise your shortcuts in Blender. Go to "File" > "Preferences" > "Input" > "3D View" > "3D View (Global)". Scroll to the bottom of the 3D View section and click "Add New". The command for the "Focus on Object" function is "view3d.view_selected".
Using the Lock Feature:
Another technique is to use the "Lock to Object" option, which keeps the selected object at the centre of your view even when navigating the scene. To do this, go to the "View" panel in the 3D viewport's properties region and check the "Lock to Object" box under the "View Lock" section.
Using Local View:
You can also use the "Local View" feature to focus on an object. First, select the object, then go to "View" > "Local View" > "Toggle Local View". This will hide all other objects and focus on your selected model. You can also use the Numpad "/" hotkey for this function.
Locking Camera to View:
To move the camera to your object, you can lock the camera to the view. Enable the "Lock Camera to View" option, found on the right side of the 3D viewport in the side panel. Then, use the Numpad "0" to align the camera to your current view.
Remember, these techniques may take some practice to master, but they will greatly improve your workflow in Blender once you become comfortable with them.
Arizona's Camera-Based Speeding Tickets: Are They Legal?
You may want to see also
![]()
Using the Lock to Object box
If you don't have a numeric keypad on your laptop, you can use the "Lock to Object" box to focus your camera on an object in Blender. Here's a step-by-step guide on how to do it:
- Select the object you want to focus on.
- Go to the View tab in the right-hand toolshelf of the 3D view.
- Find the Lock to Object box under the "View" tab.
- Enable the "Lock to Object" option by checking the box or selecting it.
- With the "Lock to Object" option enabled, your camera will now be locked to the selected object. You can move the camera around, and it will always remain focused on the chosen object.
Using the "Lock to Object" feature is a straightforward way to keep your camera focused on a specific object in Blender. This is especially useful if you want to maintain a consistent framing or composition while animating or moving the camera.
It's important to note that the "Lock to Object" option only locks the camera to the object's position. If you need to also lock the camera to the object's rotation, you might need to use additional constraints or settings, such as the Track To constraint mentioned in other sources.
Additionally, if you want to focus on a specific face or component of the object, you may need to explore other methods or adjustments, as the "Lock to Object" box locks the camera to the object's origin or centre by default.
By utilising the "Lock to Object" feature in Blender, you can easily maintain your camera's focus on a specific object, enhancing your workflow and creative possibilities within the software.
Understanding Sleep Mode on Zmodo Cameras
You may want to see also
Frequently asked questions
First, select the object you want to focus on. Then, press the "." key on your keyboard's numeric keypad. This will adjust your 3D View to focus on the selected object.
You can use the Lock to Object box under View on the right-hand toolshelf of the 3D view. Alternatively, you can change the key binding for the "View Selected" function in the Input tab of the User Preferences menu.
First, select the scene camera. Then, click on the Camera Properties tab and find the Depth of Field tab. Turn on Depth of Field and adjust the focus distance or use the Focus on Object selector to choose a specific object for the camera to focus on.