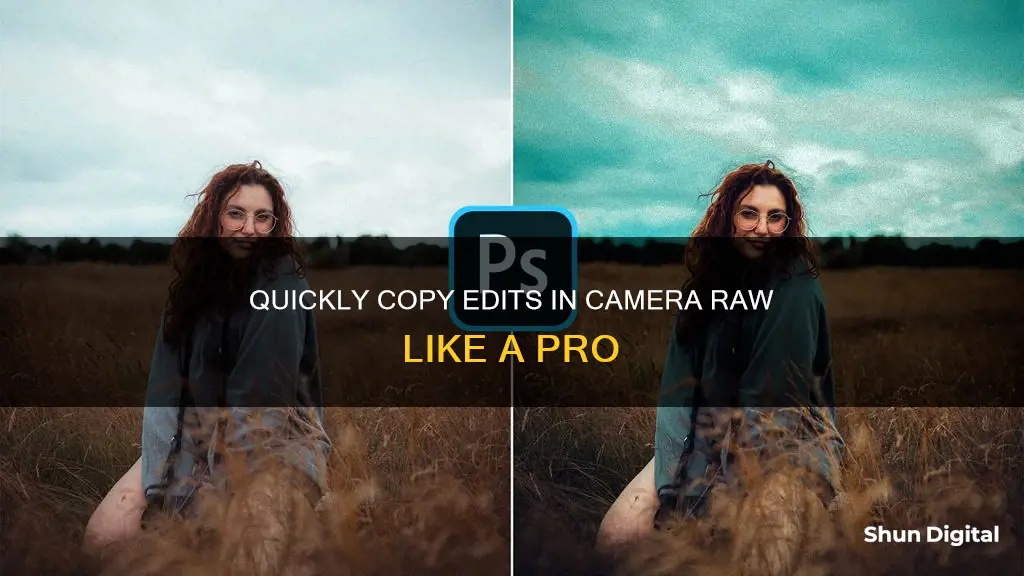
Copying and pasting edits in Camera Raw is a great way to save time when you're editing multiple photos. This can be done in Adobe Photoshop or Adobe Bridge. In Photoshop, you can copy and paste edits between layers or individual images. In Bridge, you can copy and paste edits from one image to another. Here's a step-by-step guide to help you copy and paste edits in Camera Raw.
| Characteristics | Values |
|---|---|
| Software | Adobe Photoshop CC, Adobe Bridge, Lightroom |
| File Format | Camera RAW |
| Copy Method | Right-click, Presets tab, Ctrl/Cmd + C, Shift + Ctrl/Cmd + C |
| Paste Method | Right-click, Ctrl/Cmd + V, Shift + Ctrl/Cmd + V |
What You'll Learn
![]()
Copying Camera Raw adjustments in Photoshop
Copying and pasting Camera Raw adjustments in Photoshop is a great way to edit multiple photos at once. Here's a step-by-step guide on how to do it:
Step 1: Open the Raw Images
Start by opening the raw images you want to edit in Photoshop. When you click "Open" in your file window, the Camera Raw window will automatically open.
Step 2: Edit and Select the Image
Edit one of the images as you desire. Once you're satisfied, make sure the photo is selected — when multiple photos are open, the selected photo will have a white border around its thumbnail.
Step 3: Copy the Edit Settings
Right-click or Command + click the selected image thumbnail and choose "Copy Edit Settings" from the menu. Alternatively, you can use the keyboard shortcuts Control + C (Windows) or Command + C (Mac).
Step 4: Paste the Edit Settings
Now, right-click or Command + click another image thumbnail and choose "Paste Edit Settings." You can also use the keyboard shortcuts Control + V (Windows) or Command + V (Mac) to paste. The image and its thumbnail will change to match the settings of the previously edited image.
To select and paste the settings to multiple images at once, hold Control (Windows) or Command (Mac) and click the images you want to apply the settings to, then use Control + V (Windows) or Command + V (Mac) to paste.
Copying Camera Raw Filter Between Layers
If you want to copy and paste the Camera Raw filter between layers, follow these steps:
Step 1: Convert the Image Layers
Convert the active layer to a Smart Object by going to Layer > Smart Objects > Convert to Smart Object. Repeat this process for each layer or separate image you want to copy or paste to.
Step 2: Open Camera Raw
In the Layers Panel, select the layer you want to apply the Camera Raw filter to and go to Filter > Camera Raw Filter. This will open the Camera Raw window, where you can make any desired edits to the layer. Once you're done, click "OK."
Step 3: Drag the Camera Raw Filter
Go to the Layers Panel, hold Alt (Windows) or Option (Mac), click the Camera Raw Filter, and drag it to the layer you want to paste it onto. This will copy and paste the filter to the new layer. Both layers will now have the same filters.
Additional Tips:
If you're using Adobe Bridge, you can also copy and paste Camera Raw settings from one image to another. In Bridge, select a file and choose Edit > Develop Settings > Copy Camera Raw Settings, then select another file and choose Edit > Develop Settings > Paste Camera Raw Settings.
Additionally, you can save your Camera Raw settings as a preset. With your corrected photo open in Camera Raw, click the Camera Raw Settings menu and choose "Save Settings." Name and save your preset, and it will be available in the Presets tab for any open photo.
Charging the Kidizoom Selfie Camera: A Step-by-Step Guide
You may want to see also
![]()
Saving Camera Raw settings as a preset
Method 1: Camera Raw Settings Menu
Firstly, open your corrected photo in Camera Raw. Then, choose "Save Settings" from the Camera Raw Settings menu. A dialogue box will open, where you can select the categories of settings you want to be included in your preset. You can also choose a category from the Subset menu to filter the number of checkboxes, and then recheck any boxes as needed. Click "Save" and give your preset a name, preferably one that describes its function. Keep the location as the Settings folder and click "Save" again. Your preset is now ready to be applied to other photos.
Method 2: Presets Tab
Open your edited photo in Camera Raw and click on the "Presets" tab. Then, click on the "New Preset" button. Name your preset and select the settings you want to be included. You can also choose a category from the Subset menu and adjust the settings from there. Click "OK" when you're done. Your new preset will now be available in the Presets tab for any open photo in Camera Raw.
Additional Tips
You can delete a user-saved preset by clicking on its name and then clicking the "Delete" button. Presets can be applied to a single photo via the Camera Raw Presets tab or the Apply Preset submenu in the Camera Raw Settings menu. Additionally, you can apply presets to multiple photos via Adobe Bridge.
Finding the Chevy Camaro's Battery: Location and Access
You may want to see also
![]()
Applying Camera Raw settings to multiple photos via Bridge
Adobe Bridge allows for the efficient processing of Camera Raw files without switching between applications. It also facilitates the copying of Raw settings from one file to another, which is useful when a series of images require the same adjustment.
To apply Camera Raw settings to multiple photos via Bridge, follow these steps:
Method 1 (apply a preset):
- In Bridge, Ctrl-click/Cmd-click multiple photo thumbnails (or Shift, then Shift-click a consecutive series of thumbnails).
- To apply settings, go to the Edit > Develop Settings submenu and choose a preset, or right-click a selected thumbnail and choose a preset from the Develop Settings submenu on the context menu.
- Choose additional presets, if needed.
Method 2 (copy and paste settings from a photo):
- Click the thumbnail for a photo with the desired settings, then choose Edit > Develop Settings > Copy Camera Raw Settings (Ctrl-Alt-C/ Cmd-Option-C), or right-click the selected thumbnail and choose Develop Settings > Copy Settings from the context menu.
- Click another thumbnail (or Ctrl-click/Cmd-click multiple thumbnails) to apply the settings to, then choose Edit > Develop Settings > Paste Camera Raw Settings (Ctrl-Alt-V/ Cmd-Option-V), or right-click the selected thumbnail and choose Develop Settings > Paste Settings from the context menu.
- The Paste Camera Raw Settings dialog box will open. Uncheck any settings you don’t want to paste, or choose a tab name from the Subset menu and add or remove checkmarks as needed. Click OK.
Additionally, to remove all Camera Raw settings from a selected photo thumbnail in Bridge, choose Edit > Develop Settings > Clear Settings or right-click the thumbnail and choose Develop Settings > Clear Settings from the context menu.
Gaffer's Kit: Should You Include Camera Batteries?
You may want to see also
![]()
Copying and pasting Camera Raw settings between individual images
To copy and paste Camera Raw settings between individual images, you can follow these steps:
- Open the raw images you want to edit in Photoshop.
- Edit one of the images as you would like to copy and paste to the other images.
- Ensure the edited image is selected—you should see a white border around the thumbnail of the selected photo.
- Right-click or Command + click the selected image thumbnail and select "Copy Edit Settings" or use the keyboard shortcut Control + C (Win) or Command + C (Mac).
- Right-click or Command + click another image thumbnail and select "Paste Edit Settings" or use the keyboard shortcut Control + V (Win) or Command + V (Mac).
- Repeat the process for any other images you want to apply the same settings to.
This method only works if you are working with files from Adobe Bridge or if you are opening multiple RAW files directly into Photoshop, as these processes bring up the filmstrip.
If you are using Adobe Bridge, you can also copy and paste Camera Raw settings from one image to another using the following steps:
- In Adobe Bridge, select a file and choose "Edit > Develop Settings > Copy Camera Raw Settings".
- Select one or more files and choose "Edit > Develop Settings > Paste Camera Raw Settings".
- You can also right-click (Windows) or Control-click (macOS) image files to copy and paste using the context menu.
- In the "Paste Camera Raw Settings" dialog box, choose which settings to apply.
The Power of Battery Grips: Enhancing Your Camera's Performance
You may want to see also
![]()
Applying Camera Raw settings to multiple images
To apply Camera Raw settings to multiple images, you can use Adobe Bridge, a free digital asset management app that can be installed via the Creative Cloud desktop app.
Method 1: Apply a Preset
- In Adobe Bridge, Ctrl-click/Cmd-click multiple photo thumbnails or Shift, then Shift-click a consecutive series of thumbnails to select the images you want to edit.
- Go to the Edit > Develop Settings submenu and choose a preset to apply to the selected images. You can also right-click a selected thumbnail and choose a preset from the Develop Settings submenu on the context menu.
- Choose additional presets if needed.
Method 2: Copy and Paste Settings from a Photo
- Click the thumbnail of a photo that has the desired settings, then go to Edit > Develop Settings > Copy Camera Raw Settings (Ctrl-Alt-C/ Cmd-Option-C), or right-click the selected thumbnail and choose Develop Settings > Copy Settings from the context menu.
- Click another thumbnail or Ctrl-click/Cmd-click multiple thumbnails to select the images you want to apply the settings to.
- Go to Edit > Develop Settings > Paste Camera Raw Settings (Ctrl-Alt-V/ Cmd-Option-V), or right-click the selected thumbnail(s) and choose Develop Settings > Paste Settings from the context menu.
- In the Paste Camera Raw Settings dialog box, choose which settings you want to apply or remove.
Alternatively, you can use the Filmstrip view in Camera Raw to work with multiple images. To do this, select the images you want to edit in Photoshop, then choose File > Open in Camera Raw or press Ctrl+R.
Once you have your images open in Camera Raw, you can adjust them simultaneously by pressing Ctrl + A (Mac: Command + A) to select all the images. Any adjustments made will be applied to all selected images.
Charging the Fuji X-A10: A Step-by-Step Guide
You may want to see also
Frequently asked questions
First, edit the photo inside Camera Raw. Once edited, right-click on the image and choose "Copy Edit Settings." Now select your next image, right-click, and choose "Paste Edit Settings" to paste your copied settings.
With your corrected photo open in Camera Raw, click the "Presets" tab, then click the "New Preset" button. In the "New Preset" dialog box, enter a name for the preset, and check the settings you want to be saved.
With a photo open in Camera Raw, click the "Presets" tab, then click a preset name. You can also apply a preset via the "Apply Preset" submenu on the Camera Raw Settings menu.