Copying adjustments in Camera Raw is a useful way to edit multiple photos at once. The process involves opening the raw images in Photoshop, editing one image, and then copying and pasting those adjustments to the other images. This can be done by right-clicking on the edited image and selecting Copy Edit Settings, then right-clicking on the unedited image and selecting Paste Edit Settings. Alternatively, you can use keyboard shortcuts to copy (Control + C on Windows or Command + C on Mac) and paste (Control + V on Windows or Command + V on Mac) the adjustments. This method works when working with files from Adobe Bridge or when opening multiple RAW files directly into Photoshop.
| Characteristics | Values |
|---|---|
| How to copy adjustments in Camera Raw | Open the raw images you want to edit in Photoshop; edit one image and select it; copy the edit settings; paste the edit settings onto the unedited image(s) |
| How to copy and paste Camera Raw settings from one image to another | In Bridge, select a file and choose Edit > Develop Settings > Copy Camera Raw Settings; select one or more files and choose Edit > Develop Settings > Paste Camera Raw Settings; right-click image files to copy and paste using the context menu; choose which settings to apply |
| How to apply a Camera Raw preset to a photo | With a photo open in Camera Raw, click the Presets tab, then click a preset name |
| How to apply Camera Raw settings to multiple photos via Bridge | In Bridge, Ctrl-click/Cmd-click multiple photo thumbnails; from the Edit > Develop Settings submenu, choose a preset; or right-click a selected thumbnail and choose a preset from the Develop Settings submenu on the context menu |
What You'll Learn
![]()
Copying Camera Raw settings in Adobe Bridge
Step 1: Open Your Images in Adobe Bridge
Start by opening the images you want to work with in Adobe Bridge. This software is an excellent tool for managing and editing your photos. You can use it to browse through your image collection, organize your files, and make basic adjustments.
Step 2: Edit One Image in Camera Raw
Select one of your images and open it in Camera Raw. This is Adobe's powerful raw image processing software that gives you a wide range of editing options, including exposure, white balance, and image sharpening adjustments. Make all the desired changes to this image.
Step 3: Copy the Camera Raw Settings
Now that you've edited one image, you can copy those adjustments to the other images. Right-click on the edited image in Adobe Bridge and select "Copy Camera Raw Settings" from the context menu. Alternatively, you can use the keyboard shortcut Alt+Ctrl+C (Windows) or Ctrl+Alt+C (macOS).
Step 4: Select the Destination Images
Select the images you want to apply the copied adjustments to by clicking on their thumbnails in Adobe Bridge. You can select multiple images by Ctrl-clicking/Cmd-clicking on each thumbnail. If the images are consecutive, you can also use Shift-click to select a range of images.
Step 5: Paste the Camera Raw Settings
With the destination images selected, go to the "Edit" menu and choose "Develop Settings" > "Paste Camera Raw Settings." Alternatively, you can right-click on one of the selected images and choose "Paste Camera Raw Settings" from the context menu. The keyboard shortcut for this step is Ctrl+Alt+V (Windows) or Cmd+Option+V (macOS).
Step 6: Choose Which Settings to Apply
After pasting the settings, the "Paste Camera Raw Settings" dialog box will appear. Here, you can fine-tune which adjustments you want to apply. You can choose to apply all the copied settings or be selective by checking and unchecking the boxes next to each adjustment type. Click "OK" when you're happy with your selections.
Step 7: Review and Adjust Further if Needed
Now, when you open any of the destination images in Camera Raw, you'll see that the adjustments have been applied. You can then fine-tune the adjustments for each image individually if needed.
This process is an excellent way to streamline your photo editing workflow, especially when you have a batch of images that require similar corrections. It saves you from having to adjust each image from scratch and ensures consistency across your set of photos.
Charging HD IR Camera Watches: A Step-by-Step Guide
You may want to see also
![]()
Applying Camera Raw settings to multiple photos
There are several ways to apply Camera Raw settings to multiple photos. Here are some detailed instructions:
Using Camera Raw in Photoshop:
- Open the raw images you want to edit in Photoshop.
- Edit one image as desired.
- Ensure the edited image is selected by checking for a white border around its thumbnail.
- Right-click or Command-click the selected image thumbnail and choose "Copy Edit Settings." Alternatively, use the keyboard shortcut Control + C (Win) or Command + C (Mac).
- Select the next image by right-clicking or Command-clicking, then choose "Paste Edit Settings" to apply the copied settings.
- Repeat the process for additional images as needed.
Using Adobe Bridge:
- In Adobe Bridge, select the desired raw image files.
- Right-click (Windows) or Control-click (Mac) on any of the selected images.
- Choose "Open in Camera Raw" from the menu.
- Once the images are open in Camera Raw, press Ctrl + A (Windows) or Command + A (Mac) to select all the images.
- Any adjustments made will now be applied to all selected images.
Using Keyboard Shortcuts in Lightroom:
- In Lightroom, select the settings you want to copy from one image.
- Press SHIFT+CTRL+C (Windows) or SHIFT+CMD+C (Mac) to copy the settings.
- Select the destination image or images where you want to paste the settings.
- Press SHIFT+CTRL+V (Windows) or SHIFT+CMD+V (Mac) to paste the copied settings.
Using Bridge with Camera Raw:
- Edit one image in Camera Raw as desired.
- Click "Done."
- Using Bridge, select the thumbnails of the shots you want to apply the settings to.
- Right-click and choose "Previous Conversion" from the Develop menu.
Using Keyboard Shortcuts in Bridge:
- In Bridge, select the desired raw image files.
- Press Ctrl + Alt + C (copy) and then Ctrl + Alt + V (paste) to copy and paste the Camera Raw settings.
These methods allow you to efficiently apply the same Camera Raw settings to multiple photos, streamlining your photo editing workflow.
Choosing Solar Panels for Trail Cameras
You may want to see also
![]()
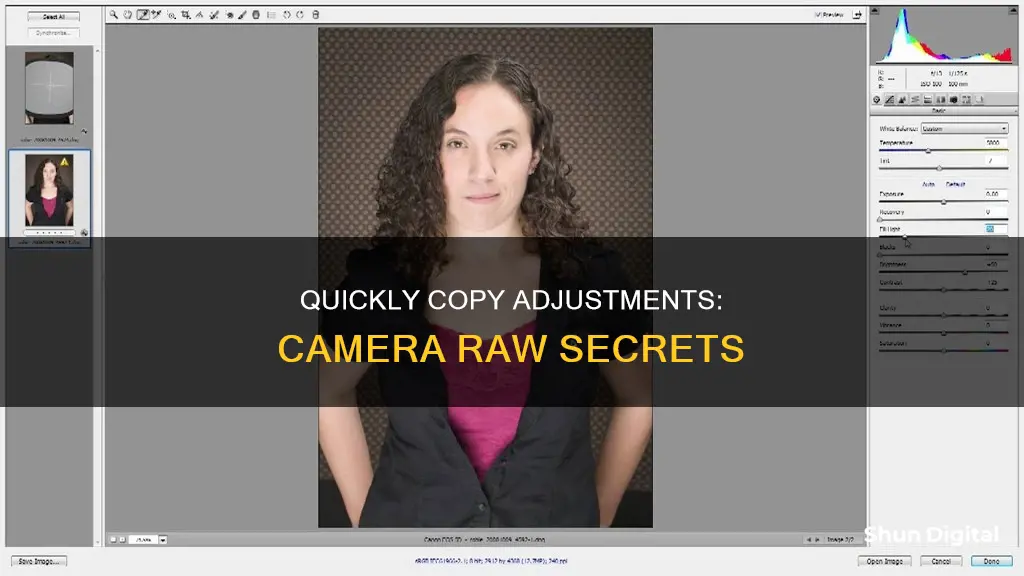
Using the Camera Raw Synchronize function
Firstly, open multiple photos into Camera Raw. They will appear as thumbnails in a panel on the left side of the dialog box. It's best to select photos that were taken under similar lighting conditions and require similar corrections.
Next, adjust one of the photos to your liking. You can make changes using the various tabs or tools available in Camera Raw, such as the Basic tab or the Presets tab.
Once you're happy with the adjustments, it's time to synchronize the settings across the other photos. Click on the thumbnails of the images you want to apply the changes to. You can either click "Select All" or hold down the "Shift" key and click to select a specific range of images.
Now, click the "Synchronize" button. This will open the Synchronize dialog box, where you can choose exactly which settings you want to apply to the selected images. Check the boxes next to the settings you want to sync, or choose a category from the Synchronize menu and then customize your selections.
Finally, click "OK" to apply the changes. Camera Raw will now apply the selected settings to all the images you chose, saving you time and effort in editing each photo individually.
This technique is especially useful when you need to make similar corrections to a batch of photos, such as correcting the white balance and exposure for multiple photos taken during the same shoot.
Battery Chargers: Are They Included With Cameras?
You may want to see also
![]()
Saving Camera Raw settings as a preset
- Open your corrected photo in Camera Raw.
- Choose "Save Settings" from the Settings menu. The Save Settings dialog box will open.
- In the Save Settings dialog box, specify which custom Camera Raw settings you want to include in your preset. You can select individual settings or choose a category (tab name) from the Subset menu to filter your options.
- Click "Save." Another Save Settings dialog box will open.
- In this dialog box, enter a descriptive name for your preset, preferably something that indicates the function of the preset.
- Keep the ".xmp" extension and the location as the Settings folder, then click "Save" again.
Your preset is now saved and can be easily accessed from the Presets tab whenever you need to apply those settings to other photos.
It is recommended to test your preset on multiple images before saving. You can do this by pasting or synchronizing the edits onto similar images to see how they look. This helps ensure that your preset is well-balanced and adaptable to a variety of images. Additionally, when naming your preset, start with the numbers "00-05" followed by any additional numbers for further organization. This ensures that your preset appears at the top of the list of presets.
Camera Battery Draining Fast? Here's Why and How to Fix It
You may want to see also
![]()
Copying and pasting Camera Raw settings between layers
To copy and paste Camera Raw adjustments in Photoshop, you need to first edit the photo inside Camera Raw. Once you are satisfied with the edits, right-click on the image and select "Copy Edit Settings". Next, select the image you want to paste the settings to, right-click, and choose "Paste Edit Settings".
- Open the raw images you want to edit in Photoshop.
- Edit one image as you want, ensuring it is selected—the thumbnail of the selected photo will have a white border around it.
- Copy the edit settings of the edited image by right-clicking or using the Command + click shortcut on the selected image thumbnail and choosing "Copy Edit Settings". You can also use the Control + C (Win) or Command + C (Mac) keyboard shortcuts.
- Paste the edit settings onto the unedited image(s) by right-clicking or using the Command + click shortcut and selecting "Paste Edit Settings". You can also use the Control + V (Win) or Command + V (Mac) keyboard shortcuts. To paste the settings onto multiple images at once, hold Control (Win) or Command (Mac) while clicking the images and then use the Control + V (Win) or Command + V (Mac) keyboard shortcuts.
To copy and paste the Camera Raw filter between layers:
- Convert the image layers to Smart Objects by going to Layer > Smart Objects > Convert to Smart Object. Repeat this for each layer or separate image.
- Open Camera Raw by going to Filter > Camera Raw Filter.
- In the Layers Panel, select the layer you want to apply the Camera Raw filter to.
- Make your desired edits in the Camera Raw window and click OK when finished.
- Go to the Layers Panel, hold Alt (Win) or Option (Mac), click the Camera Raw Filter, and drag it to the layer you want to paste it onto.
Extending Action Camera Battery Life: Tips and Tricks
You may want to see also
Frequently asked questions
To copy and paste adjustments in Camera Raw, first, edit the photo inside of Camera Raw. Once edited, right-click on the image and choose “Copy Edit Settings”. Now select your next image, right-click, and choose “Paste Edit Settings” to paste your copied settings.
In Adobe Bridge, select a file and choose Edit > Develop Settings > Copy Camera Raw Settings. Select one or more files and choose Edit > Develop Settings > Paste Camera Raw Settings.
In Bridge, select two or more photo thumbnails, preferably shot under the same lighting conditions. Double-click one of the selected thumbnails, then in the filmstrip panel on the left side of the Camera Raw dialog, click one of the thumbnails. Make the needed adjustments to the selected image, then click "Select All" at the top of the filmstrip panel or Ctrl-click/Cmd-click the thumbnails to which you want to apply corrections, then click "Synchronize".