The DJI Ronin-S is a handheld gimbal designed for DSLR and mirrorless cameras. It features a focus wheel that can be attached to either side of the grip, allowing the user to control the focus of a compatible camera. The focus wheel also has wireless connectivity and can be connected to a corresponding receiver. The Ronin-S supports a range of DSLR and mirrorless cameras from manufacturers such as Nikon, Canon, and Panasonic, with varying levels of connection and compatibility.
What You'll Learn
![]()
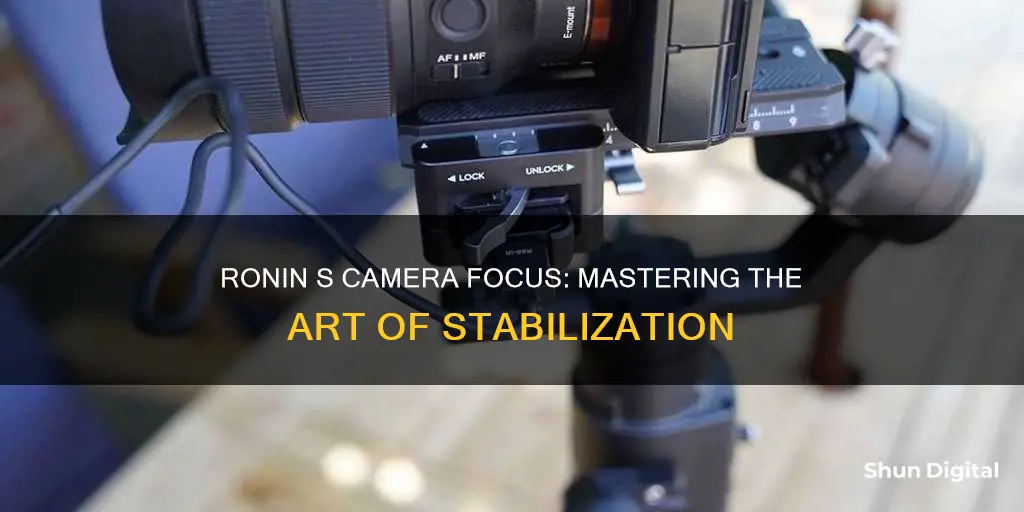
Using the Ronin-S focus wheel
The DJI Ronin-S Focus Wheel is a useful accessory for controlling the focus, iris, or zoom of a camera attached to the Ronin-S gimbal system. It mounts onto the 8-pin port of the Ronin-S handle, allowing for easy control of the camera's focus.
The focus wheel is compatible with both the Ronin-S and Ronin-SC gimbal systems and can be used with select cameras, as per the Ronin-S/SC camera compatibility list. It is worth noting that some lenses may not be supported, so it is important to check the compatibility of your lens before purchasing.
The Ronin-S Focus Wheel can be used with or without the optional remote-control receiver. When used with the receiver, it can be controlled remotely, offering even more flexibility. The focus wheel features a CAN/S-BUS selector switch that allows it to sync with DJI and third-party receivers.
In addition to the focus wheel, other accessories are available for the Ronin-S system, including the grip, multi-camera control cable, tripod, and dual handles, allowing users to create a customised setup tailored to their specific needs.
The focus wheel is a valuable tool for anyone looking to have precise control over their camera's focus, iris, or zoom functions while using the Ronin-S gimbal system. It is easy to use and can help users achieve smooth and professional-looking results.
Unlocking Camera Mode in Smash Melee: A Step-by-Step Guide
You may want to see also
![]()
How to mount the camera to the gimbal
To mount your camera to the gimbal, you will need a gimbal mounting kit. There are several options available, including the Proaim Jib/Crane Gimbal Mount Kit for DJI Ronin/M/MX and the Proaim Jib/Crane Gimbal Mount Kit for M/MX Camera Gimbals. Both kits include a mount, a quick-release adapter, and a controller mounting clamp. The main difference between the two kits is the compatibility, so be sure to choose the one that is compatible with your specific gimbal model.
Once you have the correct mounting kit, follow these steps to mount your camera to the gimbal:
- Remove the camera from your gimbal's handlebar rig. This will allow you to access the mounting area.
- Slide the camera into the universal mount. Ensure that the mount is secure and that the camera is firmly attached.
- Utilize the threaded holes on the mount to attach the quick-release adapter and secure the camera in place. The threaded holes are typically 1/4-20 and 3/8-16, which are standard sizes.
- Attach the controller clamp to the remote control of the gimbal. This will allow you to operate the gimbal hands-free.
- Adjust the camera and gimbal as needed to ensure they are balanced and function correctly together.
By following these steps and using the appropriate mounting kit, you will be able to securely mount your camera to the gimbal, enabling you to capture stable and smooth footage.
Charging Your Alto Camera: A Quick Guide
You may want to see also
![]()
Tuning the gimbal
Using the Ronin App
The Ronin mobile app offers a convenient way to tune your gimbal. After connecting your Ronin-S to the app via Bluetooth, go to the "Motor Parameters" section in the settings. From there, tap on "Auto Tune" to initiate the tuning process. The app will then configure the motor behaviour to match your specific gimbal and payload setup.
Manual Tuning
If you prefer a more hands-on approach, you can also manually tune your Ronin-S. To do this, hold down the trigger and "M" button simultaneously for about four to five seconds. The profile indicator will blink and then turn green once the tuning process is complete.
Motor Parameters
After tuning your gimbal, you can further refine its performance by adjusting the motor parameters in the Ronin app. These settings include:
- Stiffness: Adjusts the power supplied by each motor to balance the weight of your camera setup. It is recommended to leave some extra margin for each setting to ensure guaranteed stability.
- Strength: Minimises attitude error by increasing the strength of the motors. DJI suggests leaving this setting at its default value.
- Filter: Reduces high-frequency vibrations by lowering the setting, which reduces the numbness of the motor.
- Control: Assists in minimising low-frequency vibrations. If vibrations are visible, try increasing and decreasing the control setting to optimise vibration reduction.
SmoothTrack Settings
The SmoothTrack feature allows the Ronin-S to respond to your movements without manual operation. You can customise the settings for each axis (pan, tilt, and roll) with options for speed, deadband, and sensitivity. The speed setting determines how quickly the Ronin reacts to your movements, while deadband lets you set the amount of movement the Ronin will ignore. Sensitivity controls how much additional acceleration is applied when you make an extreme movement.
Additionally, you can enable the "Push" feature, which allows you to manually move the gimbal by hand. This provides even more flexibility and control over your shots.
Speeding Tickets by Camera: Moving Violations or Not?
You may want to see also
![]()
Activating the gimbal
Activating your Ronin involves a few steps. First, you need to launch the Ronin app and log into your DJI account. Then, power on the gimbal by tapping and holding the power button. Ensure that Bluetooth is turned on, and search for the Ronin-S on your phone. The password for the device will be '12345678'.
Once you've done that, go back into the app and follow the on-screen instructions to activate the gimbal. After completing the activation, double-tap the power button to engage the motors.
The final stage in setting up your Ronin-S is to complete an auto-tune with your gimbal. This can be done through the Ronin app or on the gimbal itself. In the app, select Motor Parameters in the settings and then tap Auto Tune. Alternatively, on the gimbal, hold the trigger and mode buttons simultaneously for three seconds to manually start the tuning process. The profile indicator will blink and then turn green once the process is complete.
The Evolution of Camera Lenses: Glass and Beyond
You may want to see also
![]()
Using the Ronin app
The Ronin app is used to set up and fine-tune the gimbal's performance. It can be used to adjust settings for features like SmoothTrack, motor parameters, and intelligent functions. The app is also used to run the Auto Tune function, which configures the motor behaviour.
The Ronin app is available for both iOS and Android devices. To connect the app to the Ronin-S, simply turn on Bluetooth on your device and search for the Ronin-S. The password for the device is '12345678'. Once connected, follow the on-screen instructions to activate the gimbal.
The Ronin app allows users to adjust a variety of settings, including:
- Motor Parameters: This includes settings for motor stiffness, strength, filter, and control.
- SmoothTrack: Users can enable SmoothTrack to allow the Ronin-S to respond to their movements without manual operation. Settings can be customised for each axis, including speed, deadband, and sensitivity.
- Remote Control: These settings apply to the joystick control of the Ronin-S and can be customised for motion and channels.
- General: In this section, users can choose between handheld and car mount, change the user profile, and pause the motors.
- More: This section includes options to reset the gimbal settings, perform a balance test, and calibrate the system.
The Ronin app also provides access to various shooting modes, including:
- Capture: This mode allows users to control the gimbal and camera directly from the app. Users can trigger recording, take photos, and adjust settings.
- Panorama: Users can input camera information and adjust the span of the shot, and the app takes care of the rest.
- Timelapse: Users can set camera settings like shutter speed, ISO, aperture, and white balance.
- Motionlapse: This mode includes the same settings as Timelapse, with the addition of up to five keyframes to create a motion timelapse.
- Track: Similar to Motionlapse, but with up to 10 waypoints for real-time video capturing.
Understanding Raw Image Files in Photography
You may want to see also
Frequently asked questions
First, download the DJI Ronin app for the Ronin S and Ronin 2. Then, connect the extended grip to the standard grip/battery and attach the grip to the gimbal using the dovetail mount. After that, mount the camera to the gimbal and attach any applicable connections. Finally, balance the camera.
The Ronin S features a built-in 2400 mAh battery within its grip. The battery is charged through the USB-C port on the grip and will take around two and a half hours. Continuous operation is possible if using the Ronin-S with a power bank or portable charger.
Launch the Ronin app and log into your DJI account. Then, power on the gimbal by tapping and holding the power button. Turn on the Bluetooth on your phone and search for the Ronin-S. Go into the app again and follow the on-screen instructions to activate the gimbal. Once complete, double-tap the power button to engage the motors.
Tuning can be done through the Ronin app or on the gimbal. Select the Motor Parameters in the settings in the app, then tap Auto Tune. Alternatively, hold the trigger and mode buttons on the Ronin for three seconds to manually begin the tuning process.