If your Lenovo laptop camera is not working, there are several possible reasons for this. The camera itself may not be turned on, or there could be an issue with the settings of the program you're trying to use it with. It could also be that your privacy settings are blocking the camera, or that another program is already using the camera. If none of these are the issue, it may be that your camera driver has encountered an error or that the camera is defective.
| Characteristics | Values |
|---|---|
| Camera not working | Camera is not turned on |
| Camera is disabled | |
| Out-of-date camera driver | |
| Corrupted camera driver | |
| Antivirus program blocking the camera | |
| Privacy settings blocking the camera | |
| App not recognising the camera | |
| Another program is using the camera | |
| Camera defective |
What You'll Learn
![]()
Check if the camera is turned on
If your Lenovo laptop camera is not working, there are several troubleshooting steps you can take to resolve the issue. Here are detailed instructions on how to check if your camera is turned on:
Check the physical switch:
If you have a newer model Lenovo laptop (2018 and newer), there may be a physical switch near the camera that either covers or opens the built-in camera lens. Make sure that this switch is in the "open" position to ensure the camera is not physically blocked.
Check the keyboard shortcut:
Lenovo computers often have a dedicated camera button on the keyboard, usually the F8 key, which allows you to enable or disable the camera. Look for a button with a camera icon and a strike-through. If you see this icon, it means your camera is currently disabled. Simply press the button to enable the camera.
Check the Lenovo Vantage application:
Open the Lenovo Vantage application on your computer. You may need to install it if you don't already have it. Go to Hardware Settings and scroll down to Camera Privacy Mode. Ensure that this setting is turned off, as this will disable your camera if enabled.
Check for malicious programs:
If your camera light is on, indicating it's in use, but you don't see any open programs using it, there may be a malicious program hijacking your camera. Install and run an antivirus program to scan for and remove any malicious software.
Check for hardware defects:
If none of the above steps resolve the issue, the problem may be a hardware defect with the camera itself. Contact Lenovo support for further troubleshooting and repair options. You may also consider using an external webcam if you need a temporary solution.
Simplisafe Outdoor Camera: Long-Lasting Battery Life?
You may want to see also
![]()
Check your app and privacy settings
If your Lenovo laptop camera is not working, there are several steps you can take to troubleshoot the issue. Firstly, make sure your camera is turned on. Newer Lenovo laptop models (2018 and newer) have a switch near the camera that either covers or opens the built-in camera lens. If the switch is set to cover the lens, any app that uses the camera will show a blank image. Therefore, ensure that the switch is set to open the camera lens and that your camera is not disabled.
Next, check the settings of the program you're trying to use with your Lenovo laptop's camera. Ensure that you have selected the camera in the program you're using. For example, if you're using Zoom, make sure it is set to use the camera. Your Lenovo laptop camera will likely appear as an "Integrated Camera" in the program settings. Select it as the default camera in the app if it's not already selected.
Now, let's move on to checking your app and privacy settings:
App and Privacy Settings:
Resolve Software Conflicts:
Take a look at your camera to see if there is a light indicating that it's in use. If the light is on, it means a program is currently using the camera. Remember that only one program can use the camera at a time. So, if another program is using the camera, you will need to close it before using the camera in another program.
If the program using your webcam is frozen or refuses to close, you can refer to a guide on how to force-quit a program in Windows.
Check for Malicious Programs:
If the camera is in use, and no open program appears to be using the webcam, there is a possibility that a malicious program may be hijacking the camera. In such cases, it is recommended to install and run an antivirus program on your device to detect and remove any malicious software.
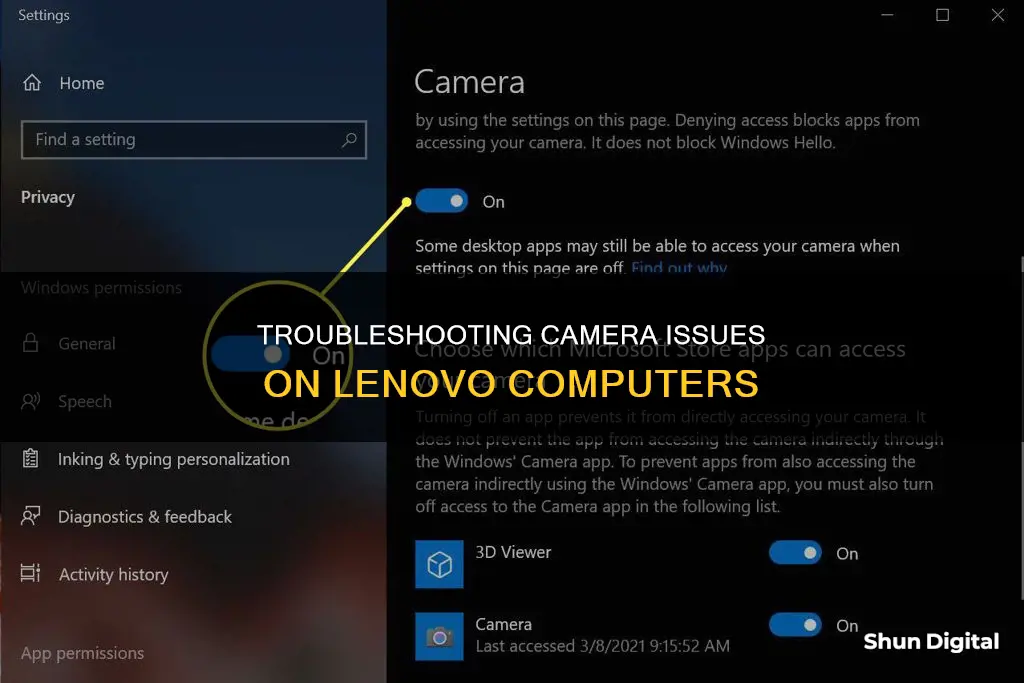
Adjust Camera Privacy Settings:
Search for "Camera Privacy Settings" in the Windows Search bar and open the first result. In the menu that opens, ensure that the "Allow apps to access your camera" toggle is turned on. Then, find the specific program you want to use with your webcam in the list below and ensure that its corresponding toggle button is also turned on.
Restart Your Laptop:
Restarting your laptop can help resolve unusual bugs or configuration issues. It will also close any software that might be using the camera in the background, freeing up the camera for use with other apps.
Check Camera Functionality:
After making the necessary adjustments to your app and privacy settings, it's a good idea to check if the camera is working. You can do this by performing a Windows Search for the Camera app and opening it. If the app detects your Lenovo laptop camera and displays an image, it confirms that the camera is functioning correctly. If the camera works here but not in your desired software, the issue likely lies with the specific program you're trying to use, and you may need to troubleshoot that particular software.
By carefully following these steps, you should be able to address any app and privacy setting-related issues that might be causing your Lenovo laptop camera to stop working.
Maximizing Camera Focus: Capturing Sharp Images
You may want to see also
![]()
Check for updates
If your Lenovo laptop camera is not working, there are several steps you can take to try and fix it. One of the key steps is to check for updates and install any that are available. This is because updates often fix known bugs or configuration issues that recent software and driver updates have resolved.
To check for updates, open Windows Update and use it to install any Windows and driver updates that are available. You should also manually check for and install driver updates. To do this, visit the Lenovo support page, hover over the PC support category, and select 'Detect Product'. This will download Lenovo Support Bridge. Install and launch the tool, then use it to scan for driver updates. Install any available updates, including those not related to the camera, and restart your laptop.
It is important to keep your software and drivers up to date to ensure that your laptop is running smoothly and that any known issues have been addressed. By installing updates, you can often fix problems with your camera and other hardware components.
In addition to checking for updates, there are several other steps you can take to troubleshoot your Lenovo laptop camera. This includes making sure your camera is turned on, checking your app and privacy settings, and resolving any software conflicts. For example, if another program is using your camera, you will need to close that program before using the camera in another app.
Outdoor Camera Options: Battery-Powered Security Solutions
You may want to see also
![]()
Check your antivirus software
If your Lenovo laptop camera is not working, it is important to check your antivirus software to ensure that your device is protected from malware and other threats. Here are some detailed instructions to help you with this process:
- Install a Reputable Antivirus Program: If you haven't already, install a trusted antivirus software on your Lenovo device. Look for antivirus software that offers comprehensive protection, such as real-time monitoring, behaviour analysis, and malware signature databases.
- Scan for Malware: Once you have installed antivirus software, initiate a full system scan to detect and remove any malicious software that may be interfering with your camera's functionality.
- Keep Your Antivirus Software Updated: Regularly update your antivirus software to ensure that it can detect and protect against emerging threats. Enable automatic updates if this feature is available in your software's settings.
- Configure Antivirus Settings: Optimize your antivirus settings to work alongside your camera application. Exclude the camera application from scans, add it to any safe lists, and ensure that necessary network communication is allowed if you are using a firewall.
- Run Boot-Time Scans: If you suspect that your device is infected with persistent malware, consider running a boot-time scan. This type of scan can help detect and remove threats that may not be found through other scanning methods.
- Protect Your Antivirus Software: Keep your antivirus software secure by enabling any available self-protection features. Additionally, practice safe browsing habits by avoiding suspicious websites and downloads that could compromise the integrity of your antivirus software.
- Password Protection: Secure your antivirus software with a strong password to prevent unauthorized access and ensure that no one can tamper with its settings.
- Regular System Scans: Schedule regular system scans to detect and remove any malware that may have bypassed real-time protection. These scans can also help uncover hidden threats and ensure the overall security of your device.
- Minimize False Positives: To avoid false positives, keep your antivirus software updated, correctly configured, and exclude trusted files or folders from scanning if they trigger false alarms.
- Consider Additional Security: Depending on your specific needs, consider implementing additional security measures. This may include using a virtual private network (VPN) when accessing sensitive data or conducting high-risk activities like online banking.
By following these steps and keeping your antivirus software up-to-date, you can help ensure that your Lenovo laptop camera is protected from malware and other potential threats. Remember to consult the documentation provided by your antivirus software for specific instructions and guidelines.
Hive Camera: Battery Operated or Not?
You may want to see also
![]()
Reinstall your camera driver
If your Lenovo laptop camera has stopped working, there are a few things you can try. Firstly, check your camera privacy settings and ensure that your camera is turned on. If your camera is not working on a newer model Lenovo laptop (2018 and newer), there may be a switch near the camera that either covers or opens the built-in camera lens. If it is closed, any app that uses the camera will show a blank image.
Secondly, check the settings of the program you are trying to use with your Lenovo laptop's camera. You may not have selected the camera in the program you are using. For example, if you are using Zoom, make sure that it is set to use the camera. A Lenovo laptop camera will likely appear as an Integrated Camera. Select it as the default camera in the app if it's not already selected.
If the above steps do not work, you may need to update or reinstall your camera driver. This problem may occur if you are using the wrong camera driver or it is out of date. You can update your camera driver manually or automatically.
To update your camera driver manually, follow these steps:
- Go to Lenovo's official website.
- Click the Support menu on the top.
- Enter the laptop model number and hit enter.
- Click Drivers & Software on the right.
- Click the Manual Update tab > Camera and Card Reader.
- Choose the latest camera driver > click the Download button. Wait for the driver download to finish.
- Double-click the setup file and follow the on-screen instructions to install the camera driver.
- Restart your computer for the changes to take effect.
If you do not have the time, patience, or skills to update the driver manually, you can do it automatically with a driver updating tool such as Advanced Driver Updater or Driver Easy. These tools will automatically recognize your system and find the correct drivers for it.
If updating your camera driver does not solve the problem, try reinstalling it. Your current camera driver may be corrupted or in conflict with Windows 10. To do this:
- On your keyboard, press the Windows logo key and R at the same time, then type devmgmt.msc into the box and press Enter.
- Double-click on either Cameras or Imaging devices to reveal your camera device.
- Right-click on your camera device and click Uninstall device.
- Click Yes to confirm the uninstall.
- Restart your computer.
- On your keyboard, press the Windows logo key and R at the same time, then type devmgmt.msc into the box and press Enter.
- Click Action > Scan for hardware changes so that Windows can reinstall the driver for your PC (this will be a generic driver).
- Check your camera and see if it’s working properly.
Charging the TG-4: Battery Power for Your Olympus Camera
You may want to see also