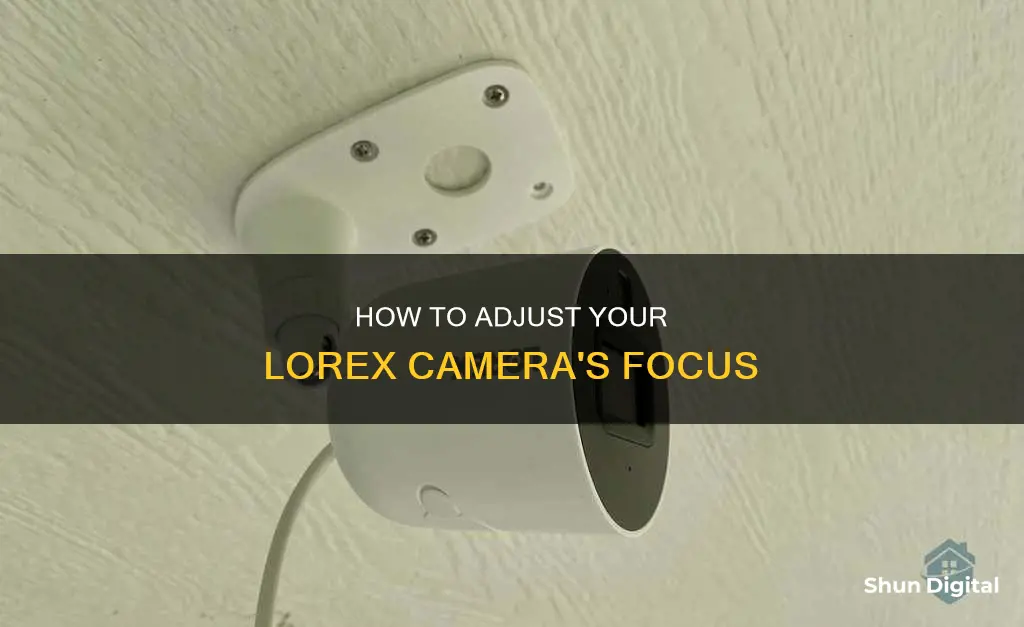
Lorex security systems and cameras are designed with a simplified installation process, allowing users to set them up independently or through recognised installation providers. Lorex offers a range of security camera systems, including doorbells, floodlights, NVR, analog, wire-free, and Wi-Fi cameras. While the specific steps for focusing a Lorex camera may vary depending on the model, some general guidelines can be provided. For instance, ensuring the lens is clean, free from moisture, and properly secured can help improve image quality. Additionally, adjusting the focus through the camera's settings or manually, depending on the type of lens, can also enhance the image clarity.
| Characteristics | Values |
|---|---|
| Camera Focus Troubleshooting | Remove the plastic sticker and periodically clean the lens with a soft cloth. Keep the lens dry and free of moisture. Ensure the mounting screws are secure. Only use the camera power adapter indoors. Try a different power outlet and ensure the camera is connected to the adapter. |
| Varifocal Camera Troubleshooting | Refer to the user manual to manually focus the camera and access the on-screen display (OSD) menu. |
| Camera Cable Troubleshooting | Check for kinks, coils, bound cables, damage, and incorrect length. Ensure cables are secured to the DVR/NVR and camera. Try using a different BNC or PoE cable. |
| Lorex Camera Focus Adjustment | Use the graphical on-screen display to navigate menus and configure settings. Right-click and select AutoFocus to adjust the zoom and focus using sliders. |
What You'll Learn
![]()
Lorex camera focus via the on-screen display
Lorex cameras can be focused using the on-screen display (OSD) menu. This can be accessed by right-clicking on the live viewing screen and selecting 'AutoFocus' from the Quick Menu.
The Quick Menu can be accessed by right-clicking during Live View. From here, you can adjust the zoom and focus settings using the sliders provided. You can also click the 'AutoFocus' button to automatically focus the camera at the current zoom level.
If you are using a Varifocal Camera, you can manually focus the camera by accessing the camera's on-screen display (OSD) menu.
It is important to note that not all Lorex cameras have auto-focus capabilities, and some may require manual adjustments to the lens to achieve the desired focus.
Additionally, factors such as lighting conditions, lens aperture, and depth of field can impact the focus and overall image quality of the camera. Adjustments to these settings can be made through the Camera Setting menu, which can be accessed through the Quick Menu.
The Ultimate Guide to Charging Your Doorbell Camera
You may want to see also
![]()
Troubleshooting a distorted camera picture
There are many reasons why your Lorex camera picture may be distorted. Here are some troubleshooting steps you can take to try and resolve the issue:
- Ensure that any plastic stickers or protective vinyl covers on the lens have been removed and that the lens is cleaned periodically using a soft cloth. Dirt, dust, or spiderwebs on the lens can affect image quality.
- Check for moisture on the lens. If moisture is an issue, consider mounting the camera in a sheltered area or adjusting the camera sunshade to prevent rain or moisture from accumulating on the lens.
- If using a bullet camera, ensure that the mounting screws are secure using the provided Allen key. Loose screws can cause the inner lens to shake and blur the image.
- Make sure the camera's power adapter is installed indoors and connected to a functional power outlet. Insufficient or unstable power can cause video feed issues. Try using a different power outlet and ensure the camera is properly connected to the power adapter.
- Check for issues with your cables, such as kinks, coils, or damage. These can cause signal bleed, create shorts, or lead to static and blurry images.
- If you are using a Varifocal Camera, refer to your camera's user manual to manually focus the camera and access the on-screen display (OSD) menu.
- If you are using a PoE (Power over Ethernet) connection, ensure you do not exceed the PoE budget of your recorder. Going over the PoE budget can result in video loss.
- If you suspect a power supply issue, swap the power supplies of the camera and the unit to determine which component is faulty.
- For specific models, such as the Lorex D871A8, issues with the resolution may cause a blank screen. To resolve this, press and hold the centre button until the screen displays an image.
- For cameras with fisheye viewing capability, launch the FLIR Cloud Client software, navigate to the Live View screen, right-click on the camera image, and select "Fisheye > View Original" to disable fisheye mode.
By following these troubleshooting steps, you should be able to resolve most distorted picture issues with your Lorex camera. If the problem persists, you may need to contact Lorex technical support for further assistance.
Choosing the Right Charger for Your Camera: A Guide
You may want to see also
![]()
Adjusting the camera's zoom and focus
Firstly, it is important to identify the type of lens your Lorex camera has. There are two types: varifocal and fixed. Varifocal lenses offer adjustable optical zoom and, consequently, also have focus control. On the other hand, fixed lenses do not allow for optical zoom adjustments and, therefore, do not need focus adjustments as they are set to the correct distance from the camera sensor during manufacturing.
If your Lorex camera has a varifocal lens, you can adjust the focus by turning the screw on the lens until you achieve the desired image quality. Keep in mind that adjusting the zoom will also require focus adjustments due to the change in focal length.
For Lorex cameras with autofocus capabilities, you can adjust the zoom and focus using the camera's on-screen display (OSD) menu. Here are the steps:
- Click on the channel where the motorized lens camera is connected.
- Right-click and select 'AutoFocus' from the menu.
- Log in to your Lorex system using your username and password.
- Adjust the zoom and focus using the sliders provided. You can also hover your mouse over the sliders and use the mouse wheel to make fine adjustments of 1% at a time.
- If you want the camera to automatically adjust the focus at the current zoom level, click the 'AutoFocus' button.
- If you need to reset the camera to its default zoom and focus levels, click the 'Reset' button.
- If someone has manually adjusted the lens controls on the camera, click 'Refresh' to update the settings shown on the system.
- Right-click to exit and save the changes you have made.
It is important to note that issues with image quality, such as distortion, blurriness, pixelation, or static, can sometimes be caused by factors like installation, cables, or environmental conditions. Ensure that you periodically clean the lens with a soft cloth, prevent moisture accumulation, and check that the camera's power adapter is installed indoors and functioning properly. Additionally, review your camera's user manual for specific instructions on manually adjusting the focus for your particular model.
AI Camera Mode: Transforming Photography with Intelligence
You may want to see also
![]()
The impact of lighting on security camera image quality
The lighting conditions in a video surveillance setting can have a significant impact on the quality of the captured footage. Lighting affects the clarity of the footage and can cause issues such as graininess, blurriness, or washed-out images, making it difficult to identify individuals or objects in the frame.
Low Light Conditions
Low light conditions can make it difficult for cameras to capture clear images, resulting in grainy or blurry footage. This is especially challenging for cameras without low-light capabilities. Adding additional lighting or using cameras with infrared (IR) lighting or night vision capabilities can help mitigate this issue. However, too much IR lighting can cause overexposure, and not all cameras have night vision.
Backlighting and Glare
Backlighting occurs when the background is brighter than the subject, causing the subject to appear dark and difficult to see. Glare, on the other hand, is caused by a direct source of light reflecting off a surface, such as a window or mirror. Both issues can obstruct important details in the footage. Adjusting the camera angle, adding a backlight to the subject, or using anti-glare coatings or window films can help address these problems.
Natural Lighting
The position of the sun creates inconsistent lighting conditions throughout the day, resulting in areas of overexposure or underexposure in the footage. A site survey can help identify these issues and determine optimal camera placement accordingly.
Camera Settings
Adjusting camera settings such as exposure, white balance, resolution, frame rate, and focus can also improve image quality. For example, adjusting the exposure can control the brightness or darkness of the footage, while the focus setting ensures that the edges of the image are sharp and clear.
Lighting Fixtures
The use of appropriate lighting fixtures is crucial for achieving high-quality video footage. Different types of lighting fixtures, such as floodlights, spotlights, wall packs, and downlights, are designed for different applications. It is important to select the right fixture based on the specific needs of the surveillance project. Additionally, the positioning and intensity of the lighting fixtures should be considered to avoid issues like glare or underexposure.
Lorex Camera Focus
Lorex security cameras offer various features to enhance image quality, such as the ability to adjust the camera's focus. Lorex cameras with varifocal lenses allow users to adjust the focus by turning a screw in the lens until the desired image is achieved. This is particularly useful when dealing with low-light conditions or backlighting issues.
Charging the Kitmesh Camera: A Quick Guide
You may want to see also
![]()
The importance of correct camera installation
Correctly installing security cameras is essential to ensure the safety of your property, family, and staff. It also helps to provide visual verification of events and valuable evidence for law enforcement. Here are some key reasons why proper camera installation is crucial:
Field of View and Lighting:
Avoid blind spots by carefully planning camera placement. Ensure that cameras are installed in well-lit areas for clearer images. Consider using infrared cameras for night vision and heat detection. Avoid positioning cameras where they face direct sunlight, as excessive light can reduce visibility and camera effectiveness.
Camera Height and Visibility:
Mount commercial-grade security cameras at a sufficient height (at least 9 feet off the ground) to prevent tampering. Decide whether cameras should be visible to act as a deterrent or discreet for covert surveillance.
Camera Angle and Positioning:
Place cameras at an appropriate distance to keep all critical areas in focus and visible. Install cameras at a downward angle, unless they are omnidirectional. Ensure that the camera's view is not obstructed by objects such as tree branches or furniture.
Camera Type and Lighting Conditions:
Consider the lighting conditions when choosing a camera. Excessive lighting can cause silhouettes, while insufficient lighting can result in unclear footage. Use security lights if necessary, but avoid pointing cameras directly at the sun.
Camera Maintenance:
Regularly maintain your cameras by checking for dirt, dust, or debris that might obstruct the view. Ensure that the camera lenses are clean and free from moisture. Periodically check the wiring and image quality to ensure proper functioning.
Camera Security:
Protect your camera system with strong passwords and regularly update them to prevent unauthorized access. Use physical barriers such as locks, fences, or gates to secure your property and deter criminals from tampering with the cameras.
Cable Management:
Protect camera cables from corrosion, water, and heat. Hide cables to make them less accessible, and use sheaths or raceways to cover power cables. Ensure that cables are securely connected and not damaged during installation.
Professional Installation:
Consider hiring professional CCTV installers to ensure correct camera placement, angle, and height. They can also advise on lighting, camera types, and other factors to ensure a safe and effective installation.
The Pentax 6x7 Camera: A Vintage Classic
You may want to see also
Frequently asked questions
If your Lorex camera has a varifocal lens, you can adjust the focus by turning the screw on the lens until the image is clear.
Fixed lenses are set to the correct distance from the camera sensor and do not usually need adjustments. However, if the lens is forced out of position, you can try turning the lens clockwise to adjust the focus.
Blurry images could be due to moisture on the lens, loose mounting screws, insufficient power, or issues with cables and installation.
Ensure there are no kinks or coils in the cables, do not bind cables together, and follow user manual guidelines for cable length and installation.
To adjust the zoom, access the Camera Toolbar by moving your mouse to the top of the channel display and clicking on the zoom icon.