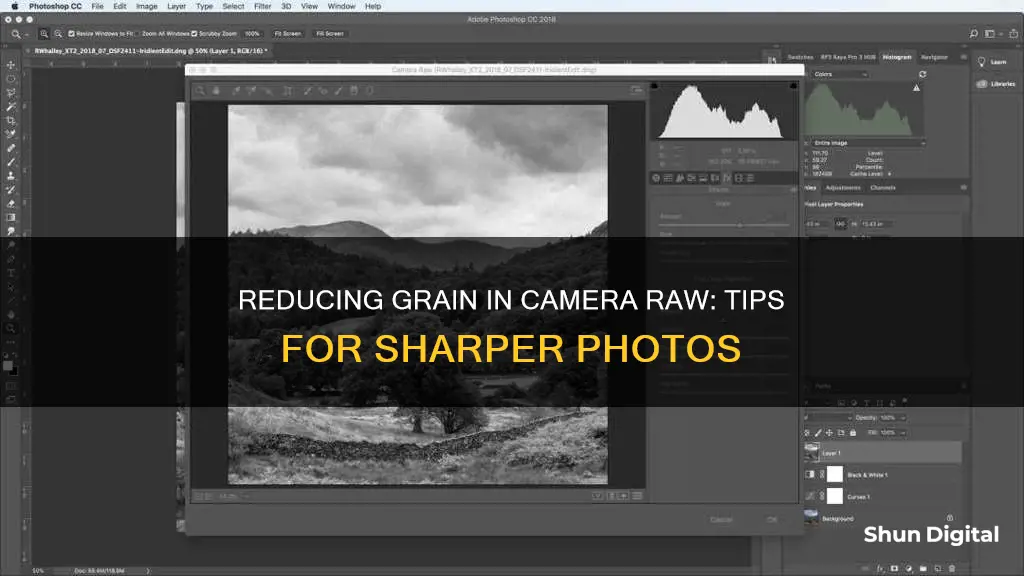
Grain in photos, or noise, is caused by pixels that do not correctly represent the colour or exposure of a scene. This can be due to shooting at a high ISO or aggressively lifting shadows in post-production. While some cameras are better at handling noise, it is almost always present to some degree. There are a few ways to reduce grain in Adobe Camera Raw, including adjusting the Luminance, Luminance Detail, and Luminance Contrast sliders.
| Characteristics | Values |
|---|---|
| Image type | RAW |
| Zoom | 100% or more |
| Luminance | Adjust slider to reduce noise |
| Luminance Detail | Adjust slider to retain detail |
| Luminance Contrast | Adjust slider to retain contrast |
| Color | Adjust slider to reduce colour noise |
| Color Detail | Adjust slider to retain colour detail |
| Color Smoothness | Adjust slider to smooth colour |
What You'll Learn
![]()
Shoot at lower ISO settings
Shooting at a lower ISO is one of the most effective ways to reduce grain in your images. ISO refers to the sensitivity of your camera's image sensor to incoming light. A lower ISO means the sensor is less sensitive to light, requiring a longer exposure to achieve the same brightness as a higher ISO setting.
Shooting at a lower ISO is preferable in well-lit environments, where a longer exposure won't result in blurry images. In low-light situations, a higher ISO may be necessary to achieve a suitable exposure without overly long shutter speeds. However, higher ISO settings introduce more noise or grain into your images, which can be unappealing.
By shooting at a lower ISO, you can minimise the amount of noise in your images. This is especially useful if you're using a camera with poor noise handling capabilities, as it will help you avoid overly grainy photos. Additionally, shooting at a lower ISO gives you more flexibility in post-processing, as you can always increase the brightness of an image that's too dark, but it's more challenging to remove noise from an image taken at a high ISO.
It's worth noting that the lowest ISO setting doesn't always provide the best results. In some cases, using an ISO that's slightly higher than the lowest available setting can result in cleaner images, as it allows for a faster shutter speed, reducing the risk of blurry images caused by camera shake or subject motion.
When deciding whether to shoot at a lower or higher ISO, consider the lighting conditions, your camera's capabilities, and your intended use of the images. If you're aiming for the sharpest, cleanest images possible, favouring a lower ISO is generally a good strategy.
Off-Brand Camera Batteries: Overheating Risk?
You may want to see also
![]()
Shoot in RAW format
Shooting in RAW format has many benefits for photographers. RAW is a file format that captures all image data recorded by the sensor when you take a photo. It is a lossless format, meaning it captures uncompressed data from your camera sensor. This results in much larger file sizes than JPEGs, but it also means you get higher-quality images.
With RAW, you can produce higher-quality images and correct problem images that would be unrecoverable if shot in JPEG format. This is because no information is compressed with RAW, so you have more data to work with when editing. You can make adjustments to your images without a significant reduction in quality. This includes adjustments to exposure, blacks, fill light, recovery, contrast, and brightness.
Another benefit of shooting in RAW is that you can easily correct dramatically over or underexposed images. This is because the RAW file format contains additional information, making it much easier to correct the image without a drastic reduction in quality. You can also recover more blown highlights and clipped shadows.
Shooting in RAW also gives you greater control over the white balance of your images. While shooting in JPEG applies a white balance to the image that can't be easily changed, shooting in RAW makes it easy to adjust the white balance because you have more data to work with.
Additionally, shooting in RAW gives you access to sharpening and noise algorithms in editing programs like Lightroom that are more powerful than those found in your camera. These algorithms are always improving, so you can revisit your RAW files in the future and take advantage of these improvements.
Finally, shooting in RAW allows for non-destructive editing. When you make adjustments to a RAW file, you are not actually changing the original data. Instead, you are creating a set of instructions for how the JPEG or TIFF version of the image should be saved. This means you never have to worry about ruining an image or accidentally saving over it, and you can always reset your adjustments and start over.
Testing Your Camera's Lithium Battery: A Simple Guide
You may want to see also
![]()
Expose correctly from the start
Exposing your film correctly is one of the most important factors in reducing grain in your images. Underexposed film will result in more grain, especially in the shadows, as there is not enough light to create a dense negative. Therefore, it is important to expose your film correctly according to the metering and lighting conditions.
When shooting film, slightly overexposing your film can help to reduce the appearance of grain. This is because overexposure allows more light to react with the smaller grains in the emulsion, filling in the spaces between larger grains. It is important to note that the amount of overexposure depends on the photographer, and colour films are generally more tolerant of overexposure than black-and-white film. It is recommended not to overexpose your film by more than one stop, as this can cause a loss of contrast and sharpness in your negatives, and dense negatives can be difficult to scan.
When shooting in low-light situations, you may be used to increasing your ISO to 800 or higher. However, a high ISO can result in more visible noise and grain in your images, especially in the shadows. Therefore, it is important to expose your image correctly to reduce the need for a high ISO.
By exposing your film correctly from the start, you can minimise the amount of grain in your images and achieve smoother and sharper results.
Testing Camera Battery Chargers: A Step-by-Step Guide
You may want to see also
![]()
Be careful when doing long exposures
Long exposure photography is a technique that involves capturing a single image over an extended period of time. It is a powerful tool that can produce breathtaking, timeless images by blurring moving elements while keeping stationary elements sharp. However, there are a few things to keep in mind when attempting long exposure shots to ensure you get the desired results.
First, it is crucial to choose the right scene for long exposure photography. The technique works best when there is a balance between elements in motion and stationary subjects. If your scene is constantly moving, the entire shot will turn into a blur, and if it lacks any motion, the image will appear sharp without the mesmerizing blur effects that long exposure captures. Landscape photography is particularly well-suited for long exposure, as it often provides a mix of movement and stillness, such as waves crashing on the shore or clouds drifting across the sky.
Second, using the correct equipment is essential for successful long exposure shots. An interchangeable-lens camera, such as a DSLR or mirrorless camera, will give you more control and flexibility over your settings. A wide-angle lens will allow you to capture a broad perspective and create a sense of depth in your images. A tripod is also non-negotiable, as it will keep your camera steady during the extended exposure times, preventing blurry shots. Additionally, a neutral density filter can be useful for controlling the amount of light that reaches the sensor, allowing you to lengthen your shutter speed without overexposing the image.
Third, it is important to set up your camera correctly for long exposure photography. Set your camera to Manual (M) or Aperture Priority (A/Av) mode and your ISO to the lowest native value. Choose an appropriate aperture value for your scene—for landscapes, between f/8 and f/11 is typically recommended. Then, pick the shutter speed based on your camera's recommendation and take a test shot. Check the histogram to determine if you've achieved the correct exposure, and adjust your settings as needed.
Finally, be mindful of the lighting conditions when attempting long exposure shots. Long exposures are easiest to accomplish in low-light conditions, such as at night or during sunrise or sunset. During the day or in bright light conditions, you will need to use a neutral density filter to avoid overexposing your images. Keep in mind that when using a dense neutral density filter, your camera's autofocus may not function properly, so it is best to compose and focus without the filter and then switch to manual focus before adding the filter back on.
Camera Battery Drain: Quick Fix Tips
You may want to see also
![]()
Use in-camera noise reduction
Grain and noise are two common issues that can affect the quality and aesthetics of your film or digital photos. While they may look similar, they are not the same thing. Grain is the result of the physical structure and chemical reaction of the film emulsion, creating tiny variations in density and colour. On the other hand, noise is the result of the electrical signal and sensor performance of the digital camera, creating random pixels of different brightness and hue.
To reduce noise, you can use in-camera noise reduction techniques. Here are some tips to help you minimise noise in your images:
- Nail the Exposure: Use your camera's histogram to achieve optimum exposure. The histogram is a graphic display of the exposure reading from your camera's light meter, averaging the luminance of the highlights, midtones, and shadows across the entire frame. When the curve peaks in the middle of the graph, the exposure is relatively well done. While this average might not always be ideal depending on your objective, it's a good starting point. You can adjust your camera settings to show the histogram in real time, allowing you to fine-tune your exposure accordingly. Remember, the closer you get to the correct exposure, the less you'll need to increase the exposure in post-processing, which can add more digital noise to your photo.
- Keep Your Camera Cool: Heat is the enemy when it comes to digital noise. The hotter your camera's sensor becomes, the more noise will be introduced into your photo. This is why long exposures, even at lower ISO settings, tend to display greater noise. To minimise heat, reduce the time your LCD screen stays active and keep your camera out of direct sunlight whenever possible. When shooting long exposures at night, give your sensor a chance to cool off by turning off your camera for a few minutes between shots.
- Use the Right ISO Setting: While a higher ISO setting will introduce more noise, using a lower ISO setting than necessary can also cause issues. Skimping on the ISO can lead to underexposure, requiring more adjustments in post-processing, which will, in turn, add more noise. The key is to use just enough ISO to achieve the best exposure without going too low. Don't be afraid to use a higher ISO if it means a significant reduction in exposure time or fewer exposure adjustments later.
- Shoot in Well-Lit Conditions: Adequate lighting can help reduce noise in your images. Shoot in locations with plenty of natural sunlight or use additional light sources when shooting indoors or in low-light conditions. Ensure there is enough light on your subject and that your scene is well-lit to minimise the need for excessive ISO adjustments.
- Use Noise Reduction Software: If you're looking for more advanced noise reduction techniques, consider using dedicated noise reduction software or plugins. Options like Neat Video, Topaz AI, and Continuum by Boris FX offer powerful tools to reduce noise and grain in your photos. These tools provide various presets and customisation options to fine-tune your results.
Remember, finding the right balance between smoothness and detail is crucial when reducing noise and grain in your images. Play around with different settings and preview the results to ensure you're achieving the desired aesthetic without sacrificing image quality.
Storing Camera Batteries: Safe Container Options
You may want to see also
Frequently asked questions
Grain, or noise, is caused by shooting long-exposure images or using a high ISO setting on your camera.
In the Detail tab, adjust the Luminance slider to reduce luminance noise (noise resulting from over- or underexposed pixels). Then, fine-tune your result with the Luminance Detail and Luminance Contrast sliders.
The Luminance slider reduces luminance noise, or noise that deals directly with the brightness of any given pixel contained in a photograph.
The Luminance Detail slider can be considered a threshold slider that stops the Luminance slider from reducing noise past a certain point.
The Luminance Contrast slider attempts to control and maintain contrast in an image. As the Luminance slider is pushed to the right and noise is removed, so is contrast.