Reducing noise in your photos can make a huge difference to their overall quality. In digital photography, noise is made up of aberrant pixels that do not correctly represent the colour or exposure of the scene. It is usually caused by shooting long-exposure images or using a high ISO setting on your camera. While there are ways to avoid noise altogether, you can also use post-processing software to reduce it. Adobe Camera Raw is one such software that can help you reduce noise in your images.
| Characteristics | Values |
|---|---|
| Type of noise | Luminance (light and dark) |
| Type of noise | Color |
| Luminance slider | Reduces luminance noise |
| Luminance Detail slider | Restores sharpness lost from using the Luminance slider |
| Luminance Contrast slider | Brings back contrast lost from using the Luminance slider |
| Color slider | Removes color noise |
| Color Detail slider | Makes the color in your noise more or less vibrant |
| Color Smoothness slider | Blurs the remaining color in your noise |
| Sharpening | Increases the sharpness of the smallest details in an image |
| Radius slider | Controls the scope of the effect of your Sharpening slider |
| Masking | Applies a greyscale mask which limits the effect of your Sharpening adjustments |
What You'll Learn
![]()
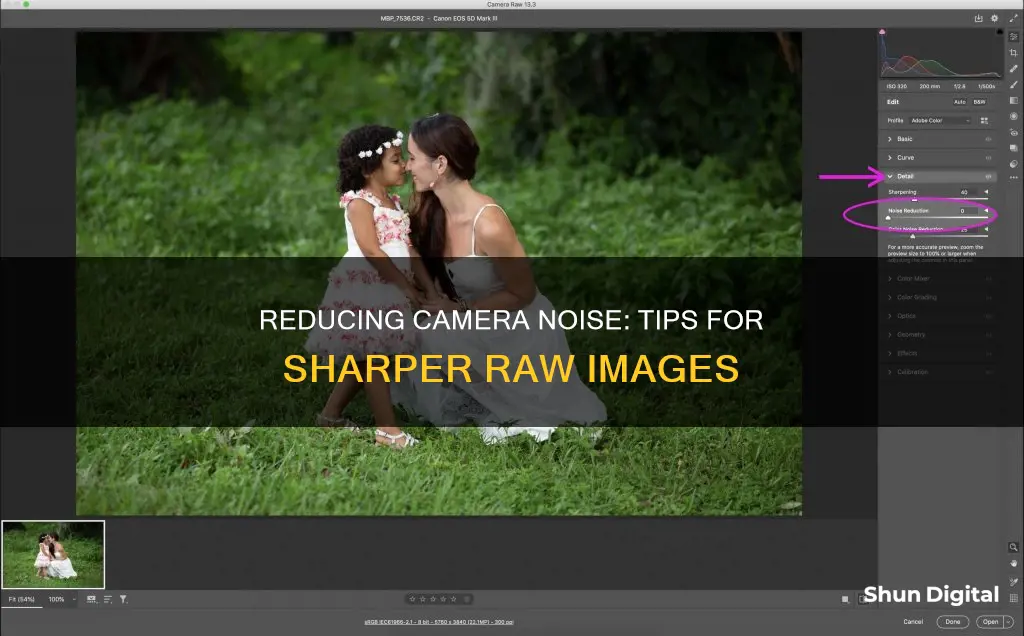
Zoom in to 100% to see noise reduction previewed
When reducing noise in Adobe Camera Raw, it is important to zoom in on the image to at least 100% to effectively preview the noise reduction. This is because, at lower zoom levels, you won't be able to see the effects of the noise reduction filter. By zooming in to 100%, you can clearly see the noise in the image and determine the right adjustments to make.
In the Detail tab, you can adjust the controls for noise reduction. First, you can adjust the edge definition by increasing the Amount value to increase sharpening. If you want cleaner images, set the Amount to a lower value. The Radius slider adjusts the size of the details that sharpening is applied to. For photos with fine details, a lower setting is recommended, while photos with larger details can use a larger radius. The Detail slider adjusts how much high-frequency information is sharpened and how much the sharpening process emphasizes edges. Lower settings primarily sharpen edges to remove blurring, while higher values make the textures in the image more pronounced.
The Noise Reduction section of the Detail tab has specific controls for reducing image noise. The Color and Color Detail sliders reduce chroma noise while preserving color detail. The Luminance Detail slider reduces luminance noise, and the Luminance Contrast slider controls the luminance noise threshold. Adjusting these sliders will help reduce the noise in the image while preserving detail and contrast.
It is important to note that all noise reduction blurs images to some extent. Therefore, it is recommended to sharpen the image after noise reduction during RAW conversion. Additionally, it is better to preserve a little noise than to blur the image substantially. Use restraint and find the right balance between noise reduction and preserving image detail.
Camera Stabilization: Power Drain or Creative Gain?
You may want to see also
![]()
Adjust luminance slider to reduce noise from over/underexposed pixels
Adjusting the luminance slider is a crucial step in reducing noise from over or underexposed pixels in your images. Luminance noise, often referred to as light and dark noise, impacts the brightness of colours in an image, causing variations in brightness and giving a grainy look to the picture.
To adjust the luminance slider in Camera Raw, first, open an image that has a digital noise issue. Press Z to access the Zoom tool and zoom in to at least 100% so that the noise is easily visible. Then, click on the Detail icon in Camera Raw (the icon with two triangles, third from the left at the top of the Panel area).
In the Detail tab, you will find the luminance slider. Drag the Luminance slider to the right to increase the intensity of noise reduction. Be careful not to drag it too far, as this can cause you to lose important details in your image. You can fine-tune the results by adjusting the Detail and Contrast sliders below the Luminance slider. The Detail slider helps to preserve finer details in the image, while the Contrast slider maintains the contrast, which can sometimes be flattened by luminance noise reduction.
It is important to note that while reducing luminance noise can help improve the overall quality of your image, it can also lead to unpleasant smoothing effects. Therefore, it is recommended to use restraint and preserve a little noise rather than blurring the image substantially. Additionally, consider sharpening your image after noise reduction to restore clarity and enhance the remaining details.
Charging Your Pixel 3: A Step-by-Step Guide
You may want to see also
![]()
Adjust colour slider to reduce colour noise
To reduce colour noise in your images, you can adjust the colour slider in Camera Raw. This can help to minimise the appearance of those annoying red and green spots or splotchy patches of colour that tend to show up in shadows.
Here's a step-by-step guide on how to do it:
- Open the image in Camera Raw: Start by opening the image that has digital noise issues in Camera Raw. This software will allow you to make adjustments to reduce the noise.
- Zoom in: Press 'Z' to access the Zoom tool and zoom in to at least 100% so that the noise is clearly visible. This will help you see the noise reduction changes you're making.
- Access the Detail tab: Click on the Detail icon in Camera Raw, which is the third icon from the left at the top of the Panel area and is identified by two triangles.
- Adjust the Colour Slider: In the Detail tab, you will find the Noise Reduction section. Here, you'll see the Colour Slider. Drag this slider to the right to reduce colour noise. Be cautious, as moving the slider too far can desaturate your overall colour and make your photo look softer.
- Fine-tune with other sliders: For further adjustments, you can play around with the Luminance slider and the Luminance Detail, Luminance Contrast, and Colour Detail sliders. These can help refine the noise reduction process and improve the overall quality of your image.
- Compare before and after: It's always a good idea to compare the original image with the noise-reduced version. Toggle between the two to ensure that you've achieved the desired level of noise reduction without compromising the image's quality.
Remember, while noise reduction can improve your images, too much of it can also lead to a loss of detail and texture. Always strike a balance and exercise restraint to ensure your photos retain their natural look.
Charging Your USB Spy Camera: A Quick Guide
You may want to see also
![]()
Use in-camera noise reduction for long exposures
Long Exposure Noise Reduction (LENR) is a feature available on most DSLRs and mirrorless cameras that can help reduce noise in your images. This feature is especially useful when shooting with long exposure times, as it can help remove "hot pixels" or "amp noise" caused by the sensor heating up during long exposures. Here are some instructions on how to use in-camera noise reduction for long exposures:
- Check if your camera has the LENR feature. This option is usually found in the settings or shooting menu of your camera.
- Enable the LENR feature. Depending on your camera model, you may have different settings options, such as "Auto" or "On". Refer to your camera's manual to understand the specific settings available on your device.
- Consider the trade-off between noise reduction and shooting time. When LENR is enabled, the camera will take a second exposure of the same duration as the original image to measure the noise. This means that your shot-to-shot wait time is doubled. Therefore, use this feature only when you can afford the extra time, such as in situations with consistent lighting conditions.
- Experiment with different ISO levels. In some cases, using LENR at higher ISO settings may result in more noise. Try testing your camera at various ISO levels to determine the optimal settings for your specific device.
- Compare the results with manual noise reduction techniques. While LENR can be effective, it may not always provide the desired outcome. Compare the results with manual dark frame subtraction or noise reduction software to determine the best approach for your workflow.
Uncover the Brand Behind Wall Charger Spy Cameras
You may want to see also
![]()
Shoot in RAW format to avoid baked-in noise
Shooting in RAW format is a great way to avoid baked-in noise and retain the most flexibility in post-processing. RAW footage is the plain, unprocessed data from your camera sensor, which gives you a lot of headroom to push and pull your footage in post-production, allowing you to correct errors made during shooting and shape the look and feel of your images.
When you shoot in other formats, such as H.264, the camera processes what the sensor ingests into a compressed format, losing sensor data in the process. This compression can result in a loss of bit depth (colour information) and can also bake in ISO and Kelvin (white balance) data, limiting your ability to make changes in post-production.
With RAW, you capture all the data from the sensor, giving you a wider range of tonal values to work with. For example, uncompressed video usually comes in at 10-bit, providing 1024 possible tonal values, while 12-bit RAW offers 4,096 possible values. This gives you much more flexibility in adjusting exposure and colour in post-processing without compromising image quality.
Additionally, shooting in RAW allows you to change the ISO and white balance settings after the fact, which can be extremely useful if you need to make corrections or want to experiment with different looks. It's like having a digital version of a film negative, where you can always go back and reprocess the footage to achieve a different aesthetic.
While shooting in RAW does result in larger file sizes and requires more storage space, there are ways to manage this, such as using compressed RAW formats or shooting in lower resolutions. The benefits of shooting in RAW far outweigh the costs, especially if you're looking to have more control over the final look of your images.
In summary, shooting in RAW format gives you access to the raw sensor data, avoiding baked-in noise and providing you with a wealth of information to work with in post-processing. This gives you the creative freedom to shape your images according to your artistic vision, making it a powerful tool for any photographer or filmmaker.
Attaching Camera Battery Pack: A Step-by-Step Guide
You may want to see also
Frequently asked questions
First, open your image in Camera Raw and zoom in to at least 100% so that the noise is easily visible. Then, click on the Detail icon in Camera Raw. Adjust the Luminance slider to reduce luminance noise, and the Color slider to reduce color noise.
Luminance noise is noise resulting from over- or underexposed pixels. Adjusting the Luminance slider will reduce the noise but may also reduce the overall sharpness of your image.
Color noise is the second type of noise that appears in underexposed shadow areas. It is often visible as green and magenta blotches. Removing color noise can leave a more grainy texture in your image that is more aesthetically appealing.