Dust inside your camera lens is a common issue, and it's important to know how to address it to ensure your equipment remains in good condition. While it may be tempting to attempt a DIY fix, it's generally recommended to seek professional assistance or contact the manufacturer for guidance on cleaning the lens interior. Disassembling the lens yourself can void the warranty and lead to difficulties in reassembling it. However, if you choose to clean the lens yourself, it's crucial to proceed with caution and use appropriate tools like air blowers, brushes, and lens-cleaning solutions.
| Characteristics | Values |
|---|---|
| What to do when you see dust inside your camera | Don't panic, it's normal. Ask yourself: "Is dust affecting my ability to compose?" and "Can the dust be seen in my images?". If the answer to these questions is "no", ignore it. |
| How does dust enter the camera? | Your camera attracts dust from the inside out, especially when changing lenses. The only way to truly avoid dust is to shoot in an airtight, vacuumed room or put a protective suit on your camera. |
| How to check for dust in your images | Shoot a white surface in a well-lit environment, with settings including ISO 50-100, aperture priority, matrix metering mode, and exposure compensation – 0. Alternatively, use Lightroom's "Visualize Spots" feature to locate dust spots. |
| How to clean dust inside the lens | Use a blower, brush, lens cleaning solution, cotton swabs, or a microfiber cloth. For dust inside the lens, contact the manufacturer or take it to a camera shop or authorised service centre. |
| What not to do | Don't blow on the lens with your mouth, clean the lens often, use random materials and solutions, apply too much pressure, or clean the lens contacts. |
What You'll Learn
![]()
Use a blower or brush to blow off or wipe away dust
To clean dust inside a camera lens, it is recommended that you take it to a professional technician to avoid causing damage. However, if you are confident in your abilities and have the necessary tools, you can do it yourself. Here is a step-by-step guide on how to use a blower or brush to blow off or wipe away the dust inside your camera lens:
Step 1: Prepare the Necessary Tools and Workspace
- Ensure you have a clean and well-lit workspace.
- Gather the required tools: a compressed air blower, lens cleaning solution, a soft brush (preferably made of camel or goat hair), and a microfiber lens cleaning cloth.
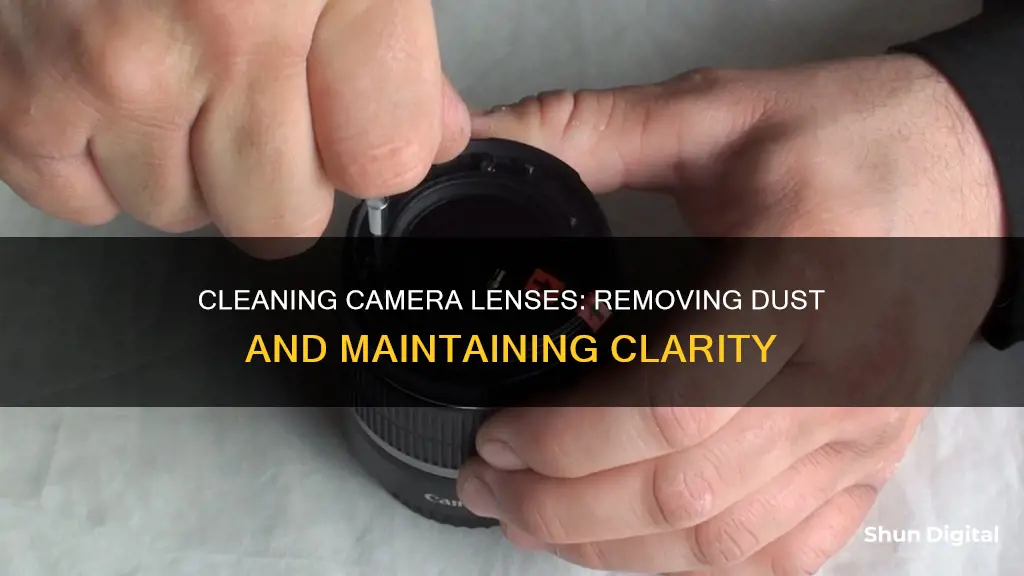
Step 2: Remove the Front Protective Ring and Clean It
- Put on protective gloves to avoid leaving fingerprints on the lens.
- Gently lift and remove the front protective ring using a flat-head screwdriver or a credit card.
- Use the compressed air blower to blow away any dry dust from the inner surface of the ring.
- Clean the ring with a moistened cotton swab and an optical cleaning solution. Ensure you remove any residue.
Step 3: Disassemble and Clean the Front Element
- Unscrew and remove the front element of the lens using a lens spanner wrench or other appropriate tools. Be careful not to damage the lens during this process.
- Place the front element on a lined napkin and cover the resulting hole with a lens cap.
- Use a soft brush to gently brush off any dust from the front element.
- For small stains or grease spots, use a microfiber cloth and lens cleaning solution on specialised wipes, being careful not to touch the internal elements of the lens.
Step 4: Clean the Inner Elements
- Zoom in to get closer to the inner lens elements.
- Use a soft brush or a Lenspen to wipe away any remaining dust from the glass.
- Finish the cleaning process by using the blower to ensure no dust remains.
- Return the focus to its original position and carefully reassemble the lens components.
Step 5: Remove the Rear Lens if Necessary
- If there is dust on the rear lens or between the rear elements, you may need to remove it for cleaning.
- Unscrew and gently lift the rear element.
- Use the blower to get rid of the dust on the rear lens and the next lens element inside.
- Be careful not to touch any internal parts or elements of the lens with your fingers or the blower.
- Reassemble the lens, being careful not to overtighten the screws. If the screws are marked with different colours, return them to their precise locations.
It is important to note that cleaning your camera lens internally can be a delicate process. Always be gentle and avoid applying too much pressure when cleaning. Additionally, make sure to follow any specific instructions provided by the lens manufacturer.
Camera Lenses in China: Cheaper or Expensive?
You may want to see also
![]()
Use lens cleaning solution on a lens cleaning tissue to remove smudges
It is important to keep your camera lens clean to ensure you get the best image quality. Dust and smudges on the rear element of your lens will have the most dramatic impact on image quality because of the way that light is focused through the back of the lens.
Lens-cleaning solutions are designed to remove oil left by fingerprints and watermarks left by rain. They are made with alcohol or are alcohol-free. Alcohol-based solutions can impact the lens coating on vintage lenses, so it is important to check that the solution you are using is suitable for your lens.
Lens cleaning tissues are made with a tight weave of fibres that don't fragment, so they are ideal for removing smudges without leaving fibres on your lens.
To remove smudges from your lens, follow these steps:
- Before applying any liquid to your lens, use a blower or soft-bristled brush to remove any dust and dirt.
- Apply a few drops of lens-cleaning solution to a lens tissue or cleaning cloth.
- Using a circular motion, gently wipe the lens surface, working from the centre outwards, to remove oil, fingerprints, and grime.
- Use a clean, dry lens tissue or microfiber cloth to wipe away any remaining moisture.
- Inspect the surface to ensure that you have removed all smudges. If necessary, repeat the process.
Lens Compatibility: EF-S Cameras and EF Lenses
You may want to see also
![]()
Use a microfiber cloth to remove minor spots and smudges
Microfiber cloths are a popular choice for cleaning camera lenses. They are effective at removing minor spots and smudges, but it is important to ensure that the cloth itself is clean before use. Here are some tips for using a microfiber cloth to clean your camera lens:
- Make sure the microfiber cloth is clean. Wash it if necessary, but avoid using fabric softener as this may leave streaks on the lens and damage the lens coating.
- Before using the microfiber cloth, remove as much dust and dirt as possible from the lens using a blower or soft-bristled brush.
- Apply a small amount of lens cleaning solution to the microfiber cloth. Avoid putting too much liquid on the cloth, as excess fluid can flow inside the camera and damage the optics.
- Starting from the outer part of the lens, wipe in a circular motion towards the centre. This will help to gently remove fingerprints, oil, smudges, dirt, and dust.
- When wiping, apply gentle pressure and work from the centre outwards. This will help to avoid streaking and move debris away from the centre of the lens.
- Microfiber cloths can be used multiple times, but be sure to keep them clean and free of dust or dirt to avoid scratching the lens.
- If you are using a microfiber cloth while in the field and don't have access to lens cleaning solution, you can gently breathe on the lens to add moisture before wiping. However, avoid excessive breathing as this can cause a build-up of saliva on the lens.
Thailand Camera Gear: Are Lenses a Bargain?
You may want to see also
![]()
Use cotton swabs to clean the grooves on the lens body
Cotton swabs are a great tool for cleaning your camera lens as they can get into the grooves on the lens body and other tight spots that a rag or scrub brush can't reach. They are also gentle enough to clean delicate parts without causing damage.
When using cotton swabs to clean your camera lens, it is important to use the right type of swab and technique. Use cotton swabs with tightly twisted heads, as these will be less likely to leave fibres on the lens. Dip the swab in a lens cleaning solution rather than applying it directly to the lens, to prevent liquid droplets from dripping into the lens barrel. Wipe the lens gently, using concentric circles starting from the centre, and avoid applying too much pressure.
In addition to cotton swabs, you can also use a blower, brush, lens cleaning solution, microfiber cloth, or lens pen to clean your camera lens. Remember to always handle your lens with care during the cleaning process to avoid damage.
Mastering the Art of Pronouncing Camera Lens Names
You may want to see also
![]()
Use a UV filter to protect your lens from dust
A UV filter is a glass filter that attaches to the front of your camera lens. While they used to be necessary for film photography, they are now used to protect lenses from dust, scratches, and other small environmental hazards.
UV filters are accessible and easily cleaned. However, shooting with a filter can slightly distort the image and affect contrast. The rear lens element is less susceptible to dust because it is not accessible to the environment when installed.
The basic idea is that if you drop your lens, you break your UV filter instead. It is much easier and cheaper to replace a filter than repair a lens. However, the glass in UV filters is weaker than the glass used in the front element of lenses, so the filters break from drops that don't damage a lens.
UV filters can also cause lens flare or ghosting in images when shooting a scene with a bright light source. They block a small percentage of the light that passes through them, reducing sharpness and contrast very slightly.
Despite the cons, many photographers still use UV filters to protect their lenses. If you are shooting in environments with dust, salt, or water particles in the air, a UV filter is a good idea.
APS-C Lenses: Universal Fit for All Cameras?
You may want to see also
Frequently asked questions
A visual inspection of the lens front will often reveal large dust particles behind the first lens element. Make sure that the front is thoroughly cleaned beforehand and any protective filters are removed. Look straight, then inspect the lens at an angle and you might see some dust behind the front glass element.
If the dust is affecting your images, you should contact the manufacturer's technical department and ask if your lens can be disassembled. If yes, find a reputable service centre and ask for the cost of cleaning. If the cost is high, you may be better off buying a new lens.
The only way to truly avoid getting dust in your camera is to shoot inside an airtight, vacuumed room or put a protective suit on the camera. Alternatively, you can use a UV filter to protect your lens from dust.