Charging your camera is important to ensure that it's ready to capture moments whenever you need it. In this article, we will discuss the best ways to charge your Sony A6000 camera.
| Characteristics | Values |
|---|---|
| Charging method | USB cable, AC adapter, separate battery charger |
| Charging time | 2 hours, up to 4 hours when charging from a computer |
| Battery indicator | Battery icon in the top-left corner of the screen turns yellow when charging |
| Charging cable | Micro USB cable |
| Charging port | USB port on the side of the camera |
| Charging light | Light turns green when fully charged |
| Battery type | NP-FW50 Lithium-Ion rechargeable battery |
| Charging while shooting | Not possible |
What You'll Learn
![]()
Charging with a USB cable
Charging your Sony A6000 camera with a USB cable is a straightforward process. Here is a detailed guide on how to do it:
Firstly, locate the small door on the side of your camera. This door provides access to the USB and mini-HDMI ports. Open this door to reveal the ports. Ensure that your camera is turned off before proceeding.
Now, simply take any Micro-USB cable and plug it into the USB port. You can use the Micro-USB cable provided by Sony or any other standard Micro-USB cable. It is worth noting that some users have reported faster charging with certain cables, so you may want to test different cables if charging speed is a concern for you. Additionally, always check the voltage and current output of the power source before connecting to avoid any potential issues.
Once the Micro-USB cable is connected to the camera, plug the other end into a power source. This can be a power adapter, a computer, or even a power bank. However, keep in mind that the camera cannot be used while it is charging via USB. The charging time is approximately 310 minutes when using the AC adapter provided by Sony.
To check the charging status, refer to the charge lamp on the camera. A lit lamp indicates that the battery is charging, while an unlit lamp shows that charging is finished. If the lamp is flashing, it means there is a charging error or that charging has been paused temporarily due to the camera being outside the proper temperature range (below 10°C or above 30°C).
It is important to use only genuine Sony brand battery packs and adapters to ensure optimal performance and safety. Additionally, make sure to keep the terminal section of the battery clean by wiping off any dust or dirt with a soft cloth.
By following these steps, you can conveniently charge your Sony A6000 camera using a USB cable.
Charging Your Fuji X-S1: A Quick Guide
You may want to see also
![]()
Charging with an AC adapter
Charging your Sony A6000 camera with an AC adapter is a straightforward process. Here's a detailed guide on how to do it:
Firstly, ensure that your camera is turned off. This is important as you don't want the camera to be on while it's charging. Then, insert the battery pack into the camera. The battery pack is what will be charged using the AC adapter.
Now, take the micro USB cable and connect one end to the camera. The USB port for the camera is located behind a small door on the side of the camera. Once connected, take the other end of the micro USB cable and connect it to the AC adapter.
Finally, plug the AC adapter into a wall outlet or wall socket. The camera should now be charging. The charge lamp on the camera will be lit to indicate that it is charging. The charging time for a full charge is approximately 310 minutes when using the AC adapter.
It is important to note that the recommended charging temperature is between 10°C to 30°C (50ºF to 86ºF). If the temperature is outside this range, the charge lamp on the camera may flash, indicating that charging is temporarily paused.
Additionally, always use genuine Sony brand battery packs, micro USB cables, and AC adapters to ensure compatibility and safety.
You can purchase Sony A6000 AC adapters and charging kits from online retailers, such as Amazon. These kits typically include the AC adapter and a micro USB cable. Some kits may also include additional accessories, such as spare battery packs.
By following these steps and using the appropriate equipment, you can safely and effectively charge your Sony A6000 camera using an AC adapter.
Olympus Pen Camera Battery: Charging Time Explained
You may want to see also
![]()
Using a separate battery charger
Choosing a Charger
First, you'll need to select an appropriate battery charger. Sony offers an official charger, but it tends to be quite pricey. Alternatively, you can explore more affordable options, such as the Wasabi brand pack, which includes two batteries and a charger. This option is not only cheaper but also provides you with extra batteries, ensuring you always have a fully charged backup ready to go.
Charging Process
Once you've acquired your separate battery charger, the charging process is straightforward. Take the battery out of your Sony A6000 camera and insert it into the charger. Then, connect the charger to a power source, typically by plugging it into a wall outlet. Some chargers may also offer the option to connect via a USB cable to a computer or power bank.
Charging Time
The charging time for your Sony A6000 battery will vary depending on the charger you use and the battery's condition. On average, it takes around two hours to fully charge the battery. However, this duration may be shorter or longer depending on factors such as the charger's output and the battery's remaining capacity. Always refer to the instructions provided with your charger for specific charging times.
Charging Indicators
Most battery chargers will have some form of charging indicator to let you know the status of the charging process. This could be in the form of a light that changes colour or a series of lights that indicate the battery's charge level. For example, a red light may indicate that the battery is charging, while a green light shows that it's fully charged. Refer to your charger's instructions to understand the specific indicators on your device.
Battery Care
To ensure the longevity of your Sony A6000's battery, it's important to follow some basic care guidelines. Avoid overcharging the battery by removing it from the charger as soon as it's fully charged. Additionally, try to store the battery in a cool, dry place, as extreme temperatures can shorten its lifespan. It's also recommended to charge the battery regularly, ideally after each use, to maintain optimal performance.
Charging Vintage Camera Gear: 1990s Battery Revival
You may want to see also
![]()
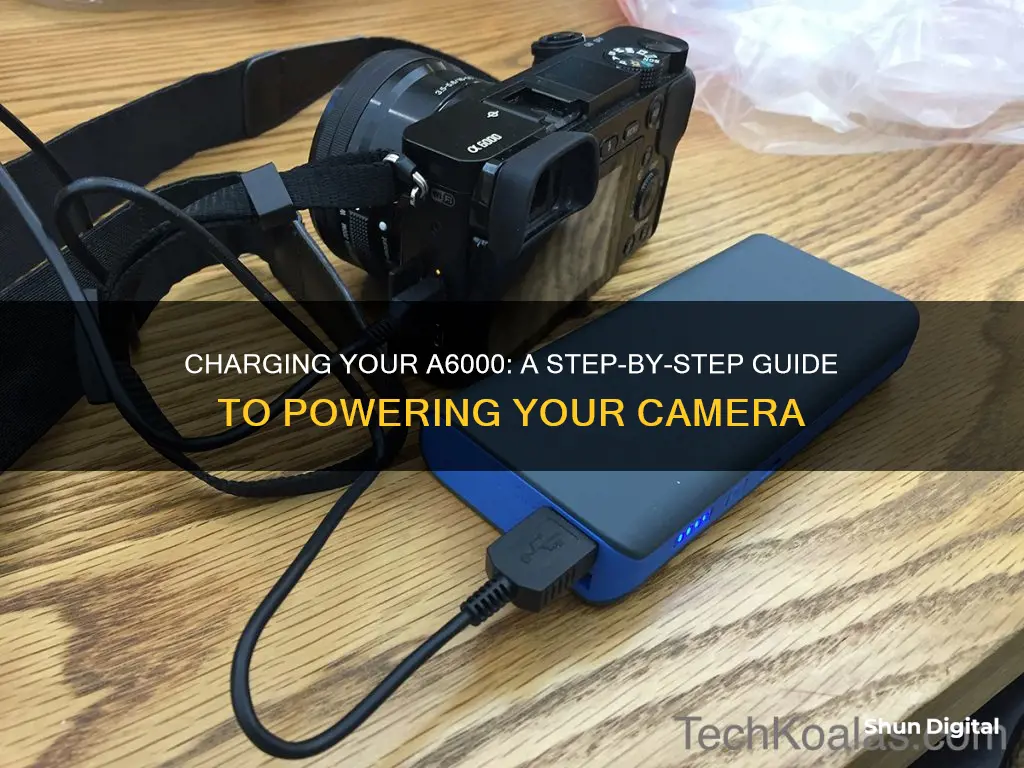
Charging with a power bank
The Sony A6000 camera can be charged via USB, like a smartphone. This means that you can use a power bank to charge the camera, which is useful for outdoor activities such as extended hikes.
One option is to buy a Cygnett ChargeUp Pro Powerbank 11000mAh, which can be used to charge the camera as well as other mobile devices. It has a 2.1A output port, which means the A6000 battery recharges faster than with the provided wall charger. In 30 minutes of charging, the battery level went up from 33% to 77%.
Another option is to buy a Xiaomi power bank, which one user describes as working "like a miracle". In half an hour, it charged their camera from 30% to full.
An Anker power bank is another option, which can be purchased from Amazon. One user says it has a "highly rated" 2A output, which charges the camera very fast.
When using a power bank, it is recommended to tie the camera and power bank together to prevent the cord from wiggling out.
Note that the camera cannot be used while charging.
SpyPoint Camera Plans: What's the Cost of Each Camera?
You may want to see also
![]()
Charging with a computer
Charging your Sony A6000 camera using a computer is a simple process. Here is a step-by-step guide on how to do it:
Firstly, locate the small door on the side of your camera. This door gives you access to the USB and mini-HDMI ports. Open this door to reveal the ports. It is worth noting that you cannot use the camera while it is charging via USB.
Next, take your Micro-USB cable and plug it into the USB port. Ensure that the cable is inserted securely and correctly.
Now, connect the other end of the Micro-USB cable to your computer. It is recommended to use a computer that is connected to a power source, as charging via a computer may take longer than other methods. If you are using a laptop, ensure that it is plugged in, as charging will drain the laptop's battery.
Once the camera is connected to the computer, it should start charging automatically. You will see the battery icon in the top-left corner of the camera's screen turn yellow, indicating that it is charging.
It is important to note that you should not turn on/off or restart the computer, or wake it from sleep mode while it is connected to the camera. Doing so may cause a malfunction. Always disconnect the camera before performing any of these actions on your computer. Additionally, the camera may not operate correctly if other USB devices are being used simultaneously.
The charging time will vary depending on the power source and other factors such as battery level and condition. Charging via a computer will usually take longer than using an AC adapter. On average, it takes around two hours to fully charge the Sony A6000, but it may take up to four hours when charged via a computer.
You can also use the Sony PlayMemories Home software to charge your camera. Simply connect your camera to the computer with the Micro-USB cable and launch the PlayMemories Home software. The software will then begin charging your camera.
Remember to follow the safety precautions outlined in your camera's manual and always use genuine Sony brand battery packs, Micro-USB cables, and AC adapters.
Spy Cameras: How Long Does the Charge Last?
You may want to see also
Frequently asked questions
There are several ways to charge your Sony A6000 camera. You can use the USB cable that came with the camera, an AC adapter, or a separate battery charger. If you're using the USB cable, connect it to your camera and then to a power source. The battery icon in the top-left corner of the screen will turn yellow when charging. The AC adapter plugs into the wall and has a USB port to connect to your camera. The separate battery charger connects to the AC adapter, which is then plugged into the wall.
No, the camera will not function as a camera if it is plugged into a USB power source. The manual states to "turn off the camera when connecting the camera to a wall outlet".
The charging time varies depending on the power source and the remaining battery capacity. On average, it takes around two hours to fully charge the camera.