If the camera lens on your Samsung Galaxy Note 8 is cracked, scratched, or broken, you can replace it yourself or get it fixed by a professional repair service. To do it yourself, you can purchase a replacement lens online and follow a step-by-step guide or video tutorial. The process involves heating the glass panel to remove the adhesive and the old lens, cleaning the camera area, and dropping the new lens into place without applying excessive pressure. Alternatively, you can take your phone to a repair shop, where a technician will fix the camera lens for you.
| Characteristics | Values |
|---|---|
| Device | Samsung Galaxy Note 8 |
| Camera Type | Rear camera |
| Camera Lens | Glass |
| Camera Lens Condition | Broken, cracked, or scratched |
| Camera Issues | Pictures come out wrong with a weird glare |
| Camera Replacement Part | Brand new, non-refurbished, factory-tested |
| Camera Replacement Tools | Free pry tool strip, plastic opening tool, adhesive strip |
| Camera Replacement Guides | Free Samsung Galaxy Note 8 repair guide, step-by-step repair video |
| Camera Replacement Troubleshooting | Check memory card, perform a soft reset, update software |
| Camera Replacement Services | CPR Cell Phone Repair, Fixez.com, Bonafide Hardware, Repairs Universe, Samsung Repair |
| Camera Replacement Cost | Varies by service provider |
What You'll Learn
![]()
Troubleshooting tips before replacing the lens
Check the memory card: Ensure that your memory card is inserted correctly. Remove the memory card and re-insert it carefully, ensuring it is in the right position. Once done, test the camera again.
Perform a soft reset: This process restarts your phone without disrupting or erasing any content. To soft reset, press and hold the power and home keys simultaneously. If your phone is not on the home screen, you may need to do this twice. When the Samsung logo appears, release the power and home keys.
Update your software: Check if your device is running on the latest software. If you recently installed a new app before the camera issue, try uninstalling that app to see if it was causing the problem.
If you have tried the above suggestions and your camera still does not work, then it is best to consult a professional repair service to examine your device.
Microscopic Dust: A Camera Lens Issue?
You may want to see also
![]()
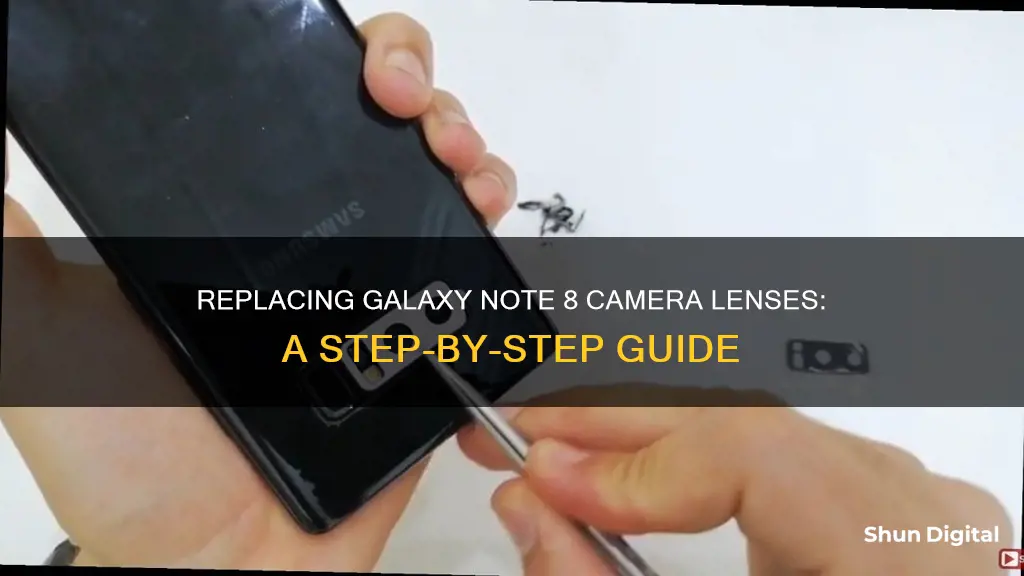
Removing the old lens
To remove the old lens from your Samsung Galaxy Note 8, you will need to heat the glass panel. Using a hairdryer, gently heat the area to ensure that the adhesive becomes pliable. This will make it easier to remove the lens without damaging the surrounding components.
Once the adhesive is soft enough, use a tool such as tweezers to carefully lift and remove the glass. Be gentle and take your time with this step to avoid cracking the glass further and possibly damaging the camera. Remove the glass piece by piece until it is all gone.
After removing the glass, you will need to clean the area and remove any remaining adhesive. Ensure that the camera area is free of debris and residue before installing the new lens. Use a soft, lint-free cloth to wipe the area clean and prepare it for the replacement lens.
It is important to note that you should not use excessive force during this process. Avoid applying too much pressure when removing the old lens or installing the new one, as this could damage the camera or the new lens. Take your time and work carefully to ensure a successful repair.
Lens and Camera Compatibility: Are Lenses Camera-Specific?
You may want to see also
![]()
Cleaning the camera area
To clean the camera area of your Samsung Galaxy Note 8, start by powering down your device and unplugging it from any power sources. Remove any covers, cases, or accessories.
A lint-free, soft microfiber cleaning cloth is ideal for cleaning your device. You can also use a camera lens cleaning cloth. These cloths are gentle and will not damage your device.
Gently wipe the front and back of your device with the microfiber cloth. Do not apply too much pressure.
You should avoid getting excess moisture onto your device. However, you may dampen the corner of the microfiber cloth with a small amount of distilled water.
You can also use a disinfectant, such as a hypochlorous acid-based solution (containing 50-80ppm) or an alcohol-based solution (containing more than 70% ethanol or isopropyl alcohol). Do not apply these liquid solutions directly to your device; carefully apply them to a microfiber cloth instead.
Avoid using cans of compressed air, as they may damage the surface of your device.
If your Galaxy Note 8 has an S-Pen, do not use compressed air to clean the port as this can blow debris to the deep end of the slot. Instead, try using a damp Q-tip or an air can duster.
Understanding Camera Lenses: Describing the Basics
You may want to see also
![]()
Dropping in the new lens
Now that you've removed the damaged lens, it's time to install the new one. This process is relatively straightforward and can be done in just a few steps. Here's a detailed guide on how to do it:
Prepare the new lens: It's important to ensure that the new lens is clean and free of any fingerprint marks. This is crucial, as fingerprints or smudges on the lens can affect the performance of the camera. Carefully inspect the new lens and use a soft, lint-free cloth to wipe it clean if necessary.
Get ready for installation: Before you begin, gather all the necessary tools and materials, including the new lens, a hairdryer or heat gun, tweezers, and adhesive (if it didn't come with the new lens). Have some cotton swabs or a soft cloth ready to clean the camera area if needed.
Heat the adhesive: Using the hairdryer or heat gun, gently heat the adhesive around the camera area. This will soften the adhesive, making it easier to remove any remaining pieces of the old lens and prepare the area for the new one. Be careful not to overheat the adhesive, as you don't want to damage any nearby components.
Remove any remaining adhesive: Once the adhesive is soft enough, use the tweezers to carefully remove any leftover pieces of the old lens and adhesive from the camera area. Take your time with this step to ensure that the area is completely clear and clean.
Install the new lens: With the camera area prepared, it's now time to drop in the new lens. Gently place the new lens into the camera area, being careful not to apply too much pressure. Excessive force can damage the new lens or other nearby components.
Secure the lens in place: If your new lens came with adhesive, carefully apply it according to the manufacturer's instructions. Ensure that the adhesive is evenly distributed and that the lens is securely attached. If your new lens didn't come with adhesive, you may need to purchase a suitable adhesive separately.
Test the camera: Once the new lens is in place and the adhesive has dried or cured, it's time to test the camera. Take a few test photos and videos to ensure that the new lens is functioning properly and that there are no issues with image quality or performance.
By following these steps, you can successfully replace the camera lens on your Galaxy Note 8. Remember to be gentle and take your time during the process to avoid any damage to your device.
Camera Lenses: Weatherproof or Not?
You may want to see also
![]()
Seeking professional repair services
If you're looking to replace the camera lens on your Galaxy Note 8, it's important to consider seeking professional repair services. Here are some reasons why:
- Technical Expertise: Smartphone camera repair requires a certain level of technical knowledge and expertise. Professional technicians at repair centres like CPR Cell Phone Repair are knowledgeable and experienced in dealing with various phone models, including the Galaxy Note 8. They can accurately diagnose the issue and provide a suitable solution.
- Specialized Tools: Replacing a camera lens may require specialized tools that you might not have access to. Repair centres are well-equipped with the necessary tools and resources to perform the job efficiently. This includes tools for opening the phone, removing the old lens, and installing the new one without causing any damage to the device.
- Quality Assurance: When you entrust your phone to a professional repair service, you can expect a certain level of quality assurance. Reputable repair centres often provide warranties or guarantees on their work, giving you peace of mind that the repair will be done correctly and that you're covered in case any issues arise after the repair.
- Safety: Attempting to replace the camera lens on your own may void your phone's warranty. Professional repair services, on the other hand, adhere to safety protocols and use genuine replacement parts, ensuring that your device remains covered under the manufacturer's warranty. They also follow industry-standard practices to protect your data and personal information during the repair process.
- Convenience: Repair centres offer a convenient and hassle-free option. They typically have multiple locations, making it easy for you to find a nearby store. Additionally, many repair centres offer same-day service, so you don't have to be without your phone for an extended period.
- Comprehensive Services: Professional repair services often go beyond just fixing the camera lens. They can also assist with other issues your phone may have, such as screen repairs, battery replacements, or software-related problems. This saves you the trouble of having to find different solutions for various phone-related issues.
- Cost-Effectiveness: While there might be a cost associated with professional repair services, it can often be more cost-effective in the long run. They can source high-quality replacement parts at competitive prices, and their expertise helps ensure that the repair is done right the first time, reducing the risk of further issues or additional repairs.
While DIY repairs may seem appealing due to their potential cost savings, seeking professional repair services for your Galaxy Note 8 camera lens replacement offers numerous benefits, including technical expertise, specialized tools, quality assurance, safety, convenience, comprehensive services, and cost-effectiveness. Remember to research and choose a reputable and trusted repair centre to ensure a satisfactory experience.
Understanding Camera and Lens Lifespan by Shot Count
You may want to see also
Frequently asked questions
If your lens is broken, cracked, or scratched, you may need to replace it. You can check by taking a few pictures and seeing if they come out wrong or with a weird glare.
You can either take your phone to a professional repair service or replace the lens yourself. If you want to replace it yourself, you can follow YouTuber JerryRigEverything's step-by-step guide, which involves heating the glass panel, removing the glass and adhesive, cleaning the camera area, and dropping the replacement lens into place.
You can buy a replacement lens for your Samsung Galaxy Note 8 from websites such as Amazon, Fixez.com, and Repairs Universe.
You will need a hairdryer and tweezers. Some replacement lenses come with a free plastic opening tool and adhesive strip.
The cost of a replacement lens for a Samsung Galaxy Note 8 varies depending on the seller. On Amazon, replacement lenses are currently unavailable, but they were previously sold for around $8. Fixez.com and Repairs Universe do not list their prices.