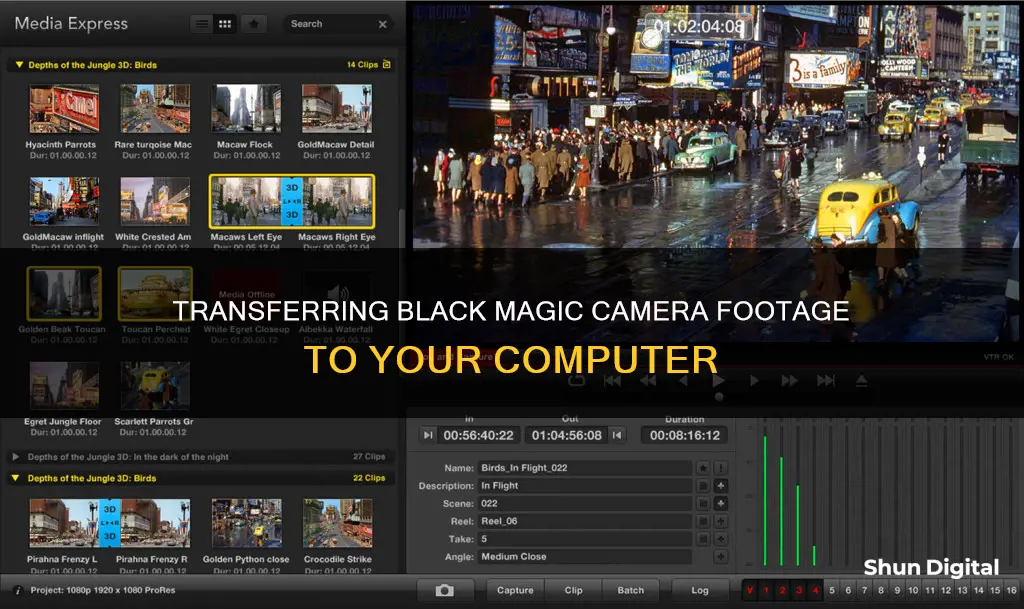
There are several ways to transfer footage from a Blackmagic camera to a computer. One way is to use an SD card reader to transfer the files from the SD card to a computer. Another method is to connect the camera directly to the computer using a cord, although this method may be slower than using an SD card reader. Additionally, when using a Blackmagic camera, it is possible to record directly to Blackmagic Cloud Storage, allowing for collaboration with editors worldwide.
| Characteristics | Values |
|---|---|
| Transfer footage from Blackmagic Camera to Computer | Use an SD card reader |
| SD card type | Sandisk Extreme Pro |
| Transfer software | Davinci Resolve's Clone Tool |
| Transfer files to | Drive, internal HDD, or Raid |
| Card reader type | USB 3.0 |
| Shooting format | Apple ProRes 422HQ |
What You'll Learn
![]()
Importing Black Magic Pocket Camera footage into Final Cut Pro X
Firstly, it is important to note that Final Cut Pro X does not support Blackmagic RAW files. However, you can record your footage in ProRes, which is an Apple-developed codec that works seamlessly with Final Cut Pro X. The Black Magic Pocket Camera offers various ProRes formats, including ProRes 422 HQ, ProRes 422, ProRes 422 LT, and ProRes 422 Proxy. Choose the format that best suits your needs and ensure your camera is set to record in that format.
Once you have your footage recorded in the desired ProRes format, you can begin the import process in Final Cut Pro X. Connect your camera or the storage media containing your footage to your computer. Open Final Cut Pro X and navigate to the "Import" menu. From there, browse to the location of your footage files and select the clips you want to import. You can either import individual clips or entire folders of footage.
After selecting your clips, Final Cut Pro X will initiate the import process. Depending on the size of your footage and the speed of your connection, this process can take some time. Once the import is complete, you will be able to access your Black Magic Pocket Camera footage directly within Final Cut Pro X.
Now that your footage is imported, you can start editing. Final Cut Pro X provides a range of powerful editing tools to craft your video. You can trim clips, add transitions, apply effects, and more. The program also offers features like multicam editing and proxy media, which can be especially useful when working with large or high-resolution files.
Remember, if you plan to convert your footage to proxy media for easier editing, it is recommended to do so within Final Cut Pro X. This ensures that your original footage remains intact, and you can always switch back to the original/optimized media when you're done editing.
In summary, importing Black Magic Pocket Camera footage into Final Cut Pro X involves recording in a compatible format, such as ProRes, connecting your media to your computer, and using the "Import" function in Final Cut Pro X to bring your footage into the editing software. From there, you can utilize the program's robust editing capabilities to bring your creative vision to life.
Avoid Traffic Camera Tickets: Tips for Drivers
You may want to see also
![]()
Using a card reader to transfer footage
To transfer footage from your Blackmagic camera to your computer using a card reader, first take out the SD card from your camera and insert it into the card reader. Then, plug the card reader into your computer.
If you're using a Mac, you should be able to access the SD card's contents by opening the card reader's drive. If you're using a PC, you may need to install additional software to read the card, as PCs don't recognise the Mac formatting used by Blackmagic cameras. You can try HFS Explorer or MacDrive to access the files on a PC.
Once you've accessed the SD card's contents, you can copy the video files to your computer. Video files are large, so this may take some time.
It's recommended to use the DaVinci Resolve Clone Tool to transfer the files, as this performs a checksum to ensure that everything copied correctly.
Surveillance at Lot E Lax: Are You Being Watched?
You may want to see also
![]()
Recording to Blackmagic Cloud
To record to Blackmagic Cloud, you will first need to create a Blackmagic ID. This can be done by tapping on Blackmagic Cloud in the media tab of the Blackmagic Camera app and registering on their website. Once you have created your ID, you can log in and set up your project library. You will then be able to select this project library to sync your recordings directly from the app to Blackmagic Cloud Storage.
There are three workflows you can use when recording to Blackmagic Cloud:
- Record to Device Storage: You can record to your device and then export your clips to an external drive. This frees up storage space on your device and allows you to share your files with other users globally.
- Record into DaVinci Resolve: After logging into Blackmagic Cloud, select a DaVinci Resolve project. The media will automatically upload and sync to all project members after each recording or while recording on an iPhone.
- Upload Selected Clips: Record your footage to your device, and then manually select which clips you want to upload via Blackmagic Cloud when you have a network connection.
When shooting with Blackmagic Camera, the video you capture can be instantly uploaded as a proxy file, followed by the camera originals, and saved to Blackmagic Cloud Storage. This allows you to start editing quickly using your proxies, speeding up your workflow.
Keep Camera Batteries Warm for Winter Photography
You may want to see also
![]()
Syncing media from Blackmagic Camera into DaVinci Resolve
Syncing media from Blackmagic Cameras into DaVinci Resolve is a seamless process, especially with the recent updates to the software. Here is a step-by-step guide on how to achieve this:
Firstly, ensure you have the latest version of DaVinci Resolve installed, as the syncing process has been improved with recent updates, including the Public Beta 4 update. This update introduced the Live Sync feature, allowing users to sync their Blackmagic cameras with DaVinci Resolve while recording.
To begin, log into your Blackmagic Cloud account and select a DaVinci Resolve project. You can then start recording on your Blackmagic Camera, and the media will automatically upload and sync to the chosen project. This is a quick process, allowing editors to access the footage in real-time.
The Live Sync feature creates H.264 proxies, which are stored in a bin in Resolve. These proxies are also synced to the Blackmagic Cloud and can be forwarded to other Resolve workstations. This enables collaboration with editors worldwide, who can access the footage and start editing and grading using the proxies, speeding up the overall workflow.
Additionally, DaVinci Resolve 19 introduces the Blackmagic Proxy Generator App, which simplifies the proxy workflow. It automatically creates and manages proxies from camera originals, allowing you to switch between the camera original footage and proxies with a single click.
With these recent updates, syncing media from Blackmagic Cameras into DaVinci Resolve has become a seamless and efficient process, facilitating collaboration and speeding up editing workflows.
Selecting Camera Landscapes: Camera Raw Tips
You may want to see also
![]()
Shooting in RAW vs shooting in ProRes
To transfer footage from your Blackmagic camera to your computer, you can take out the Extreme Pro card and insert it into a card reader that's connected to your computer. Alternatively, you can record to an SD card using a monitor that also records (e.g. Blackmagic Video Assist) and then insert the SD card into a card reader.
Now, here's an in-depth look at shooting in RAW vs. ProRes:
Shooting in RAW vs. ProRes has been a topic of discussion in the cinematography industry. Both formats have their advantages and are suitable for different situations.
Apple ProRes is a video file format, commonly known as a "codec", that was developed by Apple in 2007. It is an intra-frame codec, which means that every frame is saved, and compression is applied within each frame to reduce the overall data rate. ProRes is a 10-bit codec, which offers a wider colour range and reduces colour banding. It is often used in cinema cameras or Netflix-approved cameras by videographers who want to colour grade their work quickly. ProRes also comes in two main formats: 4:4:4 and 4:2:2, with sub-categories like ProRes 4444XQ, the highest-quality version.
On the other hand, RAW video recording captures the entire data from a camera's sensor, including all red, green, and blue channels. The process of converting RAW data into viewable footage is called debayering, which happens automatically if you're not shooting in RAW. RAW allows for greater control over the final image, such as colour grading, changing ISO, and highlight roll-off. It gives you more flexibility in post-production but requires more time and computing power.
When deciding between shooting in RAW or ProRes, consider your workflow, editing station, and camera capabilities. RAW provides more control and flexibility in post-production, but ProRes is easier to work with, produces high-quality images, and is more suitable for tight schedules and simpler post-production workflows. Budgeting and workflow are also important considerations, as RAW files take up more storage space and time for processing.
In conclusion, both formats have their advantages, and the best choice depends on your specific needs and requirements. If you require the highest image quality and have the time for post-production, RAW is a great option. However, if you work with tight schedules and prefer simpler workflows, ProRes might be more suitable. Ultimately, both codecs can produce outstanding visuals.
Olympus Camera Battery: How Long Does It Last?
You may want to see also
Frequently asked questions
You can import footage from a Black Magic camera by removing the SD card and inserting it into a card reader connected to your computer.
No, there is no other way to transfer footage.
You can record to an SD card in the recorder, but you will still need to remove the SD card and insert it into a card reader to transfer the files to your computer.
It is recommended to use the DaVinci Resolve Clone Tool to transfer large video files as it performs a checksum to ensure that everything is copied correctly.