Camera lenses are often attached by screwing them on, and the image detail is adjusted by slightly moving and tilting the camera. However, this almost guarantees that the camera system does not look perfectly perpendicular to the object, which can lead to inaccuracies in the measurement and problems in tracking the tools.
The alignment of a camera lens can be adjusted by calibrating the lens. This is a simple process and can be done by the photographer themselves. However, if the focus troubles are completely erratic, then the camera and lens will need to be sent to a professional service centre.
| Characteristics | Values |
|---|---|
| Camera Mounting | The camera is screwed on and the image detail is adjusted by slightly moving and tilting the camera. |
| Camera Alignment | A mirror can be used to check if the camera is mounted vertically. A self-generated hair cross or reference point can be used to check if the camera is aligned. |
| Camera Mounting Brackets | XY-slides, turntables, pan/tilt units or ball heads can be used for finer adjustment than a simple camera mount. |
| Lens Calibration | This is required when the lens doesn't focus exactly where it should. It can be done using a specific camera setting or by physically adjusting the lens. |
| Lens Calibration Tools | Commercial tools such as a lens aligner or calibration software can be used. There are also free tools and methods available. |
| Lens Alignment | The lens can be adjusted by slightly unscrewing screws and using a tool to nudge the rear group into alignment. |
What You'll Learn
![]()
Camera vs Lens Calibration
Lens calibration is the process of fine-tuning the autofocus system of your camera to ensure accurate and precise focus. It corrects any miscommunication between the autofocus of the camera and the lens. Essentially, you are matching the lens to the camera's autofocus chip so that they are both seeing the same thing.
You need to calibrate only if and when you notice that your camera's autofocus isn't producing a clear photo with a certain lens. It can depend on how much wear your equipment gets. But for some, this may occur about every six months to two years for each camera and lens combination.
Calibration Process
The calibration process involves taking a series of photos in a controlled way, so you can see exactly how your focus is off. You can then correct it using your camera settings. If the intended subject of your image is blurry, that means your camera is either back-focusing or front-focusing. A back focus is when the focus falls slightly behind the subject, and a front focus is when the focus falls slightly in front of it.
Lens calibration uses a specific camera setting to fine-tune the autofocus operation of the lens without changing anything on the actual lens. However, manufacturers can also physically recalibrate a lens, but this should only be done by them as it involves disassembling and reassembling the lens.
Calibration works through a setting in your camera that allows compensation for either back-focus or front-focus. This compensation can be performed in small incremental steps, allowing for precise fine-tuning of the autofocus system. Negative numbers compensate for back focus, while positive numbers compensate for front focus problems.
Calibration Tools
There are a number of free and commercial tools available for calibrating lenses. A free method involves printing a series of lines on a piece of paper and taking pictures at a 45-degree angle. Another free method is to use a set of batteries or a cheap lens calibration tool. Commercial tools include lens aligners and calibration software.
Calibration Steps
- Set up your camera in a well-lit environment and use a tripod to avoid camera shake.
- Use autofocus and take a photo so that the middle of your calibration chart is in focus.
- Compare your shot with how it looked in the viewfinder.
- Open your camera's autofocus settings and fine-tune your focus.
- Continue to take test shots and adjust your correction amount until your centre focus point is crisp both in your viewfinder and in your final image.
Camera Brand Differences
Different camera brands have different names for the autofocus micro-adjustment tool. For example, Nikon cameras refer to it as "AF fine-tune", while Sony and Canon cameras typically use the term "AF micro-adjustment".
Camera Lenses: Are Their Filters Universal?
You may want to see also
![]()
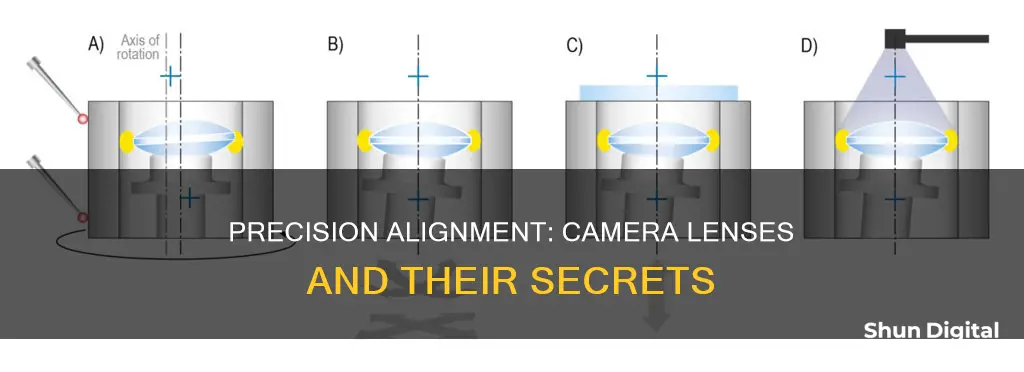
Passive vs Active Alignment
Passive alignment is the most common and simplest method for aligning camera lenses. It relies on manufacturing tolerances, with each component needing to be tightly toleranced in relation to the others. Shims are used to centre the lenses within the mounting hardware. This method is more costly due to the inherent tolerances of the optics and mechanics, and is typically used for looser centration requirements (above 0.1mm) and higher-volume production runs.
Passive alignment is a time-consuming process that can be prone to human error, leading to decreased precision in the final results. It may be adequate for low-quality, mass-produced lenses but is not suitable for more complex assemblies where quality is imperative.
Active alignment, on the other hand, is a more precise method that uses lasers and imaging to control the positioning of elements during assembly. This process involves mechanically positioning camera lens components in real time as products are being assembled, ensuring high levels of precision and accuracy in the final images.
While active alignment takes more time, it does not require the individual components to be as tightly toleranced. Mechanical errors can be corrected by adjusting the components individually, allowing for a higher degree of fine-tuning. This method is ideal for systems requiring centration below 0.1mm and can be the most cost-effective solution for assemblies that demand a high degree of precision.
The sophisticated machinery used in active alignment allows for tight control of optical properties, reduced variability in image quality, consistent focus across the entire image range, customisable focal distance, reduced waste, and increased manufacturing yield. However, it does require a significant tooling investment.
In summary, passive alignment is a simpler and more cost-effective method for high-volume production runs with looser centration requirements, while active alignment is a more precise and flexible method that is ideal for assemblies requiring a higher degree of centration and precision. The choice between the two depends on factors such as individual component costs, the degree of centration required, and production volumes.
Lens and Camera Compatibility: Are Lenses Camera-Specific?
You may want to see also
![]()
Lens Calibration Tools
Lens calibration is an important process to ensure that your camera and lens are properly aligned and focused, producing sharp images. While some photographers might find it frustrating to spend a lot of money on camera equipment only to discover that they cannot get anything in focus, it is often a simple calibration issue that can be fixed using various tools and methods.
DIY Method
One free method involves printing a series of lines on a piece of paper and setting up your camera at a 45-degree angle to take pictures. However, this method can be unreliable and may not work well with high-resolution cameras.
Monitor Screen with Test Chart Image
Another option is to use your monitor screen in conjunction with a test chart image. While this method can be more convenient, it may also be problematic for accurate testing.
Commercial Tools
For more reliable and precise results, you can invest in commercial lens calibration tools such as:
- Lens Aligners: These tools provide a more precise way to calibrate your lenses and work with any camera/lens combination. However, they require time for manual adjustments and fine-tuning.
- Vello LENS-2020 Lens Calibration Tool: This tool can be quickly set up on a tripod and features a two-way bubble level for levelling. It helps to test auto-focus accuracy and correct front-or back-focusing issues. It also includes a gray card for white balancing and folds flat for easy storage.
- Datacolor SpyderLensCal: This compact and lightweight tool unfolds into a base, a focus target, and a calibration scale. It has a tripod insert and an integrated level for precise setup. The focus target has a sharp, high-contrast design for optimal focusing and autoexposure. The calibration scale provides detailed measurements to fine-tune your lens calibration.
Software Calibration Tools
If you're looking for a more automated solution, software calibration tools like Reikan FoCal offer an automated or semi-automated calibration process with high precision. However, they can be costly and may only work with specific camera models.
Olympus 4/3 Camera Lenses: Discontinuation and What's Next
You may want to see also
![]()
Lens Calibration Steps
Step 1: Identify Focus Problems
First, you need to identify whether there is a focus problem. Advanced DSLR users will usually know right away when there is a focus problem, but it is often the end user's fault or an issue with camera technique that causes soft images.
Step 2: Calibrate Your Camera/Lens
There are several methods for calibrating your camera and lens. You can use a calibrator or regular ruler, or you can adjust your autofocus with a ruler.
Option 1: Calibrate with a Regular Calibrator
Set your camera on a tripod or a flat surface. Ensure that both the camera and ruler are level and exactly perpendicular at the same height. Place the focus pyramid on a level surface a few feet from your lens. Set the lens to the widest aperture to get the shallowest depth of field. While using the viewfinder, autofocus on the crosshair at the centre of the ruler and take a photo.
Option 2: Calibrate with a Ruler
Place a white poster board on a low table or the floor. Draw a horizontal line in the middle with a pen or pencil using your ruler. Choose a number in the middle of your ruler and align it with the line. Mount your camera on a tripod and point it down towards the board. Look through your viewfinder and ensure that the ruler and the line are in the frame. Set your camera to Aperture Priority mode and choose your widest aperture. During this process, do not turn on your Live View. Use your autofocus and target the middle of the line on the poster board, then take a picture.
Step 3: Inspect the Photo
After taking a photo, inspect it to see if focusing is accurate. You can do this by tethering your camera to your computer and reviewing the image on a larger screen. Zoom into the image to better examine the details.
Step 4: Fix the Focus Problem
If focusing is accurate, the lens calibration chart's zero should be the image's sharpest point. If any number above zero is sharper, your lens is back-focusing, and if any number below zero is sharper, you have a front-focus issue. Correct your lens for sharp focus using the autofocus micro-adjustment parameters on your camera body. Adjust until you can get the sharpest picture at zero on the ruler.
Step 5: Repeat as Needed
Calibration may vary by distance, so you may need to repeat the calibration process at different distances. Additionally, if you have multiple cameras and lenses, you will need to fine-tune autofocus for each camera and lens combination.
Understanding Cameras: Convergent Lenses and Their Uses
You may want to see also
![]()
Camera Calibration Distance
The distance at which you calibrate your camera can have an impact on the calibration result. It is important to use a distance that will enable the lens to work well for a variety of distances, not just the one picked for calibration. For example, a 50mm f/1.4 lens at 4 feet might require a -5 adjustment, but moving the lens to 6 feet might require a different adjustment of -8. Therefore, it is recommended to calibrate lenses at the distance at which you will use them.
The target distance does not need to be measured exactly; a minimum recommended distance is usually provided. If you wish to measure the distance precisely, you should do so from the camera sensor, which is typically marked on top of the camera.
When calibrating a zoom lens, it is worth treating each end of the zoom range as different prime lenses.
The accuracy of camera calibration depends on a variety of factors, including the number of views or images used, the angles and distances from which these images are taken, the size and quality of the calibration target, and the lighting conditions.
Calibration Process
The calibration process involves identifying focus problems, calibrating the camera/lens, and then verifying if the calibrated setup works reliably at different distances.
To identify focus issues, you can use tools like LensAlign or another lens alignment chart, which can help determine if there is a problem with back-focus or front-focus.
For manual calibration, you should set up the lens alignment tool and camera on a tripod, level the camera, and place the camera at the appropriate distance based on the focal length of the lens. You will then need to adjust the autofocus setting on your camera and take a series of pictures, analysing each image to determine if any adjustments are required.
For automated calibration, you will need to connect your camera to a computer and use specialised software, such as Reikan FoCal, to guide you through the process. This software can also help identify the aperture that yields the sharpest image for your lens.
Best Practices for Camera Calibration
- Choose the right size calibration target—large enough to properly constrain parameters, preferably covering approximately half of the total area when viewed fronto-parallel in the camera images.
- Perform calibration at the approximate working distance of your intended application, and ensure the camera is focused at this distance.
- Use a calibration target with a high feature count, such as fine patterns, especially for cameras above 3MPx and with controlled lighting conditions.
- Collect images from different areas and tilts, aiming for even coverage of the entire image area.
- Use good lighting conditions—diffuse lighting is preferable to strong point sources, which can cause uneven illumination and affect feature detection.
- Have enough observations—calibration should be performed on at least 6 observations (images) of the calibration target.
- Consider using uniquely coded targets, such as CharuCo boards, which allow for data collection from the edges of the camera sensor and lens.
- Ensure proper mounting of the calibration target and camera to minimise distortion and bowing in larger targets.
- Remove bad observations by inspecting reprojection errors and excluding outliers before recalibrating.
Lens Quality Impact: Does Better Glass Mean Better Photos?
You may want to see also
Frequently asked questions
If you notice that your images are blurry, your lenses might need alignment. You can test this by manually focusing on a point light and slowly moving the focus away. On a good lens, the centre of the defocus circle should be in the centre of the point. If the point being defocused is near or at the edge of the defocus circle, your lens may be misaligned.
Calibrating your lenses is a simple process. First, set up your camera on a tripod 20 feet away from a tree. Ensure the autofocus is on and the lens aperture is wide open, then take a photo. Zoom in on the photo and inspect the transition from foreground to background to see where perfect focus lies. Adjust focus accordingly and repeat until the centre line is perfectly in focus.
Yes, you can align your camera lenses yourself. However, if the focus is completely erratic, you should send your camera/lens to a professional service centre.