If you're looking to copy the Camera Raw plugin for CS4, you'll need to first download the installer for the Camera Raw plug-in. The plug-in is compatible with various Adobe applications, including Photoshop, After Effects, and Bridge. Once you have the installer, you can follow the installation instructions provided by Adobe, which involve quitting all Adobe applications, unzipping the downloaded file, running the installer, and then restarting your Adobe applications.
For the manual installation of the Camera Raw plug-in in Windows, you'll need to unzip the file, exit Photoshop, execute the CameraProfiles.exe file, and then navigate to the specific folder locations for either the 32-bit or 64-bit plugin version. It's important to keep these two versions separate to avoid confusion, as they have the same filename.
| Characteristics | Values |
|---|---|
| File formats | .NEF, .CR2, .CRW, .XMP |
| File extensions | Varies depending on camera manufacturer |
| File size | 12MB, 7MB |
| File type | ZIP, SIT |
| File path | Varies depending on OS and bit rate |
| Compatible software | Adobe Photoshop CS4, Adobe Bridge |
| Plugin name | CameraRaw.8bi |
What You'll Learn
![]()
Install the Camera Raw plug-in
To install the Camera Raw plug-in, you must first download the appropriate file for your operating system.
Windows
- Quit all Adobe applications.
- Double-click the downloaded .zip file to unzip it. Windows might unzip the file for you.
- Double-click the resulting .exe file to start the installer.
- Follow the onscreen instructions.
- Restart your Adobe applications.
MacOS
- Quit all Adobe applications.
- Click the downloaded .dmg file. In the case of Camera Raw 10.5, double-click the .zip file to unzip it.
- Double-click the .pkg file to start the installer.
- Follow the onscreen instructions.
- Restart your Adobe applications.
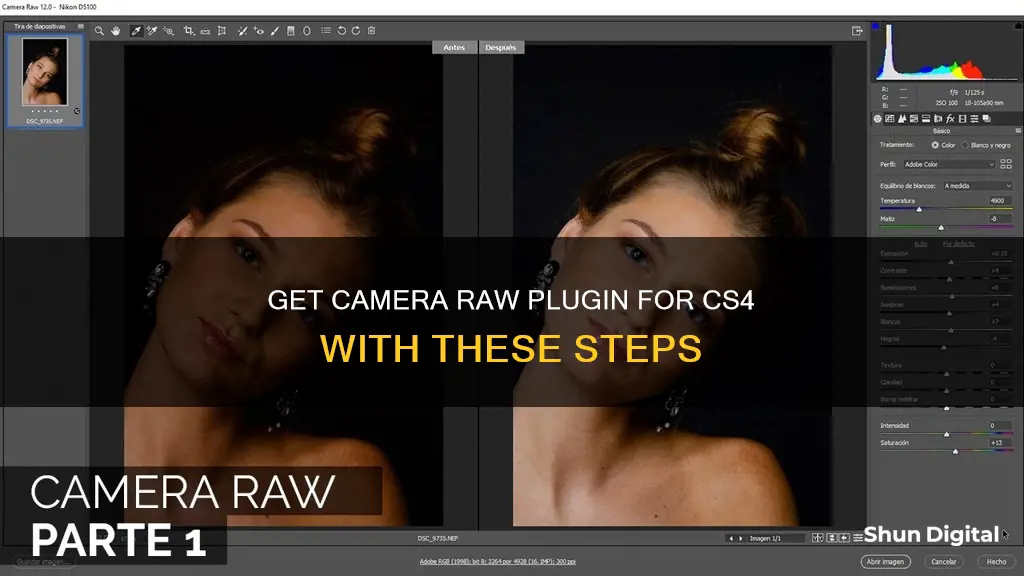
Using Camera Raw from Photoshop CS4
If you are using Photoshop CS4, you will need to install the last supported Camera Raw plug-in version, which is 5.7. There are separate 32-bit and 64-bit versions of the plug-in, which can be downloaded from the Adobe website. Once you have downloaded and unzipped the file, follow these steps:
- Make sure you exit Photoshop.
- Execute the CameraProfiles.exe in the unzipped, newly-created folder "Camera_Raw_5_7". Follow the program's instructions.
- Using Windows File Explorer, navigate to the 64-bit folder at the following path: C:\Program Files\Common Files\Adobe\Plug-Ins\CS4\File Formats. If this folder does not exist, create it manually.
- If there is an older version of the 64-bit Camera Raw plug-in ("Camera Raw.8bi") in this directory, move it to another folder for safekeeping.
- Copy the newly-created file from the "Camera_Raw_5_7\win64" folder into the "File Formats" folder.
- Repeat this process for the 32-bit plug-in, using the following path: C:\Program Files (x86)\Common Files\Adobe\Plug-Ins\CS4\File Formats.
Gaffer's Kit: Should You Include Camera Batteries?
You may want to see also
![]()
Update Camera Raw plug-in
Updating the Camera Raw plug-in for Photoshop CS4 can be a little complicated, but it's definitely possible. Here's a step-by-step guide on how to do it:
First, it's important to note that this process is for Windows users only. If you're using a Mac, the process might be different.
To update the Camera Raw plug-in, you'll need to download the Camera Raw 5.7 plug-in from the Adobe website. Here's the direct link:
Http://download.adobe.com/pub/adobe/photoshop/cameraraw/win/5.x/Camera_Raw_5_7.zip
Once you've downloaded the file, you'll need to unzip it. Make sure that you have exited Photoshop before proceeding.
Inside the unzipped folder, you'll find a file called "CameraProfiles.exe". Execute this file and follow the program's instructions.
Now, you'll need to navigate to the correct folder using Windows File Explorer. For the 64-bit plug-in, go to:
C:\Program Files\Common Files\Adobe\Plug-Ins\CS4\File Formats
If this folder doesn't exist on your computer, you'll need to create it manually.
If there is an existing "Camera Raw.8bi" file in this directory, move it to a different folder for safekeeping. This is an older version of the plug-in.
Now, copy the new "Camera Raw.8bi" file from the "Camera_Raw_5_7\win64" folder and paste it into the "File Formats" folder mentioned above.
For the 32-bit plug-in, repeat the same process but navigate to the following folder:
C:\Program Files (x86)\Common Files\Adobe\Plug-Ins\CS4\File Formats
Again, if there is an existing "Camera Raw.8bi" file, move it to a different folder. Then, copy the new "Camera Raw.8bi" file from the "Camera_Raw_5_7" folder and paste it into the "File Formats" folder.
That's it! You've now updated the Camera Raw plug-in for Photoshop CS4. Keep in mind that Adobe stopped supporting this plug-in after version 5.7, so you won't receive any further updates.
Additionally, if you want to use raw-format photos in Photoshop CS4, you'll need to first convert them into the Adobe "generic" DNG (Digital Negative) format using the Adobe DNG Converter program. This is because the Camera Raw plug-in for CS4 only supports DNG files up to version 5.7.
Latest Adobe Camera Raw: Unlocking Raw Power
You may want to see also
![]()
Convert raw images to DNG format
To convert raw images to DNG format, you can use the Adobe DNG Converter, which is available for both Windows and macOS. This free program allows you to convert camera-specific raw files to a more universal DNG raw file format, which is still considered a raw format but is more widely supported by other photo editors.
The DNG Converter offers backward compatibility for older versions of Photoshop, Lightroom, Bridge, After Effects, and Photoshop Elements. It also allows you to batch-convert your raw files, saving you time and effort.
- Download the latest DNG Converter for your operating system from the official Adobe website.
- Open the downloaded file and double-click the DNG Converter executable file.
- Follow the onscreen instructions to install the DNG Converter.
- Launch the DNG Converter by double-clicking its icon or dragging and dropping images onto the converter icon.
- Select the folder of images you want to convert to DNG.
- Choose the location where you want to save the converted DNG files.
- Select a naming pattern for the new DNG files, such as adding serial numbers or letters to the file name.
- Specify additional settings for the DNG file names, such as the starting serial number and the file extension (uppercase or lowercase).
- If needed, change the compatibility preferences to ensure the DNG files are compatible with older software versions.
- Click "Convert" to initiate the conversion process.
Additionally, if you use Lightroom, you can convert raw files to DNG after importing them. Here's how:
- Press the "G" key to ensure you're in the Library module, arranging your images in a grid view.
- Select all the photos you want to convert to DNG.
- Go to "Library" in the menu bar and choose "Convert Photos to DNG."
- A dialogue box will appear with various options:
- Only convert raw files: Lightroom will only convert native camera raw files to DNG.
- Delete originals after successful conversion: This option saves storage space but is optional.
- File extension: Choose between uppercase or lowercase extension, which is purely cosmetic.
- Compatibility: Select the latest version unless you have old legacy software that requires an earlier version.
- JPEG Preview: Choose the size of the embedded preview file, keeping in mind that "Full Size" will increase conversion time.
- Embed Fast Load Data: This option allows images to load faster in the Develop module but slightly increases file size.
- Use Lossy Compression: This reduces file size but may result in a slight loss of quality. Consider your future plans for the file before deciding.
- Embed Original Raw File: This option is not recommended as it increases storage load without providing any benefits.
Click "OK" to start the conversion process and wait for it to complete.
By following these steps, you can efficiently convert your raw images to DNG format, ensuring compatibility and flexibility in your photo editing workflow.
Charging the Fujifilm XP80: A Step-by-Step Guide
You may want to see also
![]()
Install Adobe DNG converter
To install the Adobe DNG Converter, follow these steps:
- Download the latest version of the Adobe DNG Converter for your operating system. You can find the appropriate download links on the official Adobe website.
- Once the download is complete, open the file and locate the DNG Converter executable file. Double-click on this file to begin the installation process.
- Follow the on-screen instructions to proceed with the installation.
- After the installation is complete, you can launch the DNG Converter by double-clicking on its icon. Alternatively, you can drag and drop individual images or a folder of images directly onto the Adobe DNG Converter icon to initiate the conversion process automatically.
- Select the folder containing the images you wish to convert to DNG format.
- Choose the location where you want to save the converted DNG files.
- Specify the naming pattern and additional settings for the new DNG files. For example, you can choose to add serial numbers or letters to the file names.
- If needed, adjust the compatibility preferences by clicking on the "Change Preferences" option in the Preferences section of the DNG Converter dialog box.
- Finally, click on the "Convert" button to initiate the conversion process. Your original raw files will remain unmodified, and the new DNG files will be saved in your specified location.
By following these steps, you can successfully install and utilize the Adobe DNG Converter to convert camera-specific raw files into a more universal DNG raw file format, ensuring compatibility with various Adobe applications and taking advantage of the benefits offered by the DNG format.
Sharpening RAW Files: In-Camera vs Post-Processing
You may want to see also
![]()
Copy Camera Raw.8bi file
To copy the Camera Raw.8bi file, you will need to download the appropriate version of the Camera Raw plug-in for your Adobe application.
For Windows, you will need to:
- Exit all Adobe applications.
- Double-click the downloaded .zip file to unzip it.
- Double-click the resulting .exe file to start the installer.
- Follow the on-screen instructions.
- Restart your Adobe applications.
For macOS, the process is similar:
- Quit all Adobe applications.
- Click the downloaded .dmg file. For Camera Raw 10.5, double-click the .zip file to unzip it.
- Double-click the .pkg file to start the installer.
- Follow the on-screen instructions.
- Restart your Adobe applications.
Once you have installed the Camera Raw plug-in, you can copy the Camera Raw.8bi file to the appropriate location. For Photoshop CS2 and Adobe Creative Suite 2, the file path is:
> C:\Program Files\Common Files\Adobe\Plug-Ins\CS2\File Formats
For Photoshop CS5, the file path is:
> C:\Program Files\Adobe\Adobe Photoshop CS5\Plug-ins\File Formats
For Photoshop CS4, the file path for the 64-bit version is:
> C:\Program Files\Common Files\Adobe\Plug-Ins\CS4\File Formats
For the 32-bit version, the file path is:
> C:\Program Files (x86)\Common Files\Adobe\Plug-Ins\CS4\File Formats
Make sure to keep separate folders for the 32-bit and 64-bit versions of the Camera Raw.8bi file, as they have the same name.
Camera Battery Drain: Which Device Kills It Faster?
You may want to see also
Frequently asked questions
C:\Program Files\Common Files\Adobe\Plug-Ins\CS4\File Formats
C:\Program Files (x86)\Common Files\Adobe\Plug-Ins\Photoshop?\File Formats
Library> Application Support> Adobe> Plug-Ins> CS5> File Formats: Camera raw.plugin
You can download the Camera Raw V5.7 plugin from the following link: http://download.adobe.com/pub/adobe/photoshop/cameraraw/win/5.x/Camera_Raw_5_7.zip