The Camera Raw plug-in for Adobe Photoshop is a powerful tool for photographers, allowing them to work with raw digital negatives and achieve their desired results with greater artistic control and flexibility. It is frequently updated to support more cameras and include new features. This plug-in is a must-have for professional photographers as it provides fast and easy access to raw image formats from leading cameras. With its regular updates, it has become an essential tool for photographers wanting to experiment with different cameras and formats while retaining the original files.
| Characteristics | Values |
|---|---|
| Installation on Windows | 1. Exit all Adobe applications. 2. Double-click the downloaded .zip file to unzip it. 3. Double-click the resulting .exe file to start the installer. 4. Follow the on-screen instructions. 5. Restart your Adobe applications. |
| Installation on macOS | 1. Exit all Adobe applications. 2. Click the downloaded .dmg file. 3. Double-click the .pkg file to start the installer. 4. Follow the on-screen instructions. 5. Restart your Adobe applications. |
| Installation location on Windows | C: \ Users \ UserName \ App Data \ Roaming \ Adobe \ CameraRaw \ Settings |
| Installation location on macOS | User / Library / Application Support / Adobe / Camera Raw / Settings |
| Version check on Windows | Go to Help > About plug-in > Camera Raw |
| Version check on macOS | Go to Adobe Photoshop Elements 2023 Editor > About plug-in > Camera Raw |
What You'll Learn
![]()
How to install the Camera Raw plug-in on Windows
To install the Camera Raw plug-in on Windows, follow these steps:
Firstly, ensure that you have downloaded the correct installer for your version of Windows. You can find the latest installer on the Adobe website. Once you have downloaded the installer, follow these steps:
- Quit all Adobe applications.
- Double-click the downloaded .zip file to unzip it. If you are using Windows, the file may unzip automatically.
- Double-click the resulting .exe file to start the installer.
- Follow the onscreen instructions to complete the installation.
- Restart your Adobe applications.
If you are using an older version of Adobe applications, you may need to use an older version of the Camera Raw installer. You can find links to older installers on the Adobe support page.
For Photoshop Elements, you can also install the Camera Raw plug-in by going to "Help > Install Camera Raw" or "File > Open in Camera Raw".
Charging the 808 Camera: Long First Charge Needed?
You may want to see also
![]()
How to install the Camera Raw plug-in on macOS
To install the Camera Raw plug-in on macOS, follow these steps:
- Ensure you have the latest version of Photoshop. If not, download and install it from the Adobe website.
- Download the Camera Raw plug-in from the Adobe website. The file will be in a ".zip" format.
- Exit all Adobe applications.
- Double-click the downloaded .dmg file. If you're using Camera Raw 10.5, double-click the .zip file to unzip it first.
- Double-click the .pkg file to launch the installer.
- Follow the on-screen instructions to complete the installation.
- Restart your Adobe applications.
Now, you can access the Camera Raw interface and start editing your raw images!
Camera Battery Charging: How Long Does It Take?
You may want to see also
![]()
How to use Camera Raw presets in Photoshop
To use Camera Raw presets in Photoshop, you will first need to install them.
Installing Camera Raw presets on a Mac:
- Open a new Finder window and go to "UserName > Library > Application Support > Adobe > Camera Raw > Settings", and leave this window open. (If the 'Library' folder is not visible, you can access it by following the steps in this Adobe article: hold the Option key down while selecting the "Go" menu in the Finder.)
- Go to the location where you unzipped your presets and open the ACR presets folder, usually named 'Photoshop - Adobe Camera Raw (ACR) Presets'.
- Select the desired preset folder(s) containing the XMP file(s) and press Command+C to copy them.
- Go back to the window where you opened the 'Settings' folder and hit Command+V to paste the folder(s) inside.
- Start Photoshop and the presets are ready for use.
Installing Camera Raw presets on a PC:
- Navigate to the following location on your computer: "C:\Users\UserName\AppData\Roaming\Adobe\CameraRaw\Settings" and leave this window open.
- Go to the location where you unzipped your presets and open the ACR presets folder, usually named 'Photoshop - Adobe Camera Raw (ACR) Presets'.
- Select the desired preset folder(s) containing the XMP file(s) and press CTRL+C to copy them.
- Go back to the window where you opened the 'Settings' folder and hit CTRL+V to paste the folder(s) inside.
- Start Photoshop and the presets are ready for use.
Using Camera Raw presets in Photoshop:
- Open your image in Photoshop.
- Click on "Filter" and choose "Camera Raw Filter".
- Click "Import Profiles & Presets".
- Select the ZIP file and click "Import".
- Repeat the process for any additional presets.
- Select the "Presets" tab in ACR at the upper right corner (Slider icon).
- Your recently installed ACR Presets will show up in folders underneath.
- Select the Preset you want to edit your image with.
- To apply the effect, click "OK".
Note: If you use a RAW image, ACR will open automatically. If you use a JPG or TIF file, select "Filter" and then "Camera Raw Filter".
Capturing Moments: 6Ti Cannon Battery Shots
You may want to see also
![]()
How to install Camera Raw presets in Photoshop
To install Camera Raw presets in Photoshop, you must first ensure you have Photoshop CS6 or higher, as earlier versions do not support the use of presets.
Next, download and unzip the presets, which will likely be in a .zip file format. You should then place them in the following locations, depending on your operating system:
Mac
User /Library /Application Support /Adobe /Camera Raw /Settings
Windows
- C:Users-[user name]/AppData/Roaming/Adobe/CameraRaw/Settings
- C: \ Documents and Settings \ User \ Application Data \ Adobe \ CameraRaw \ Settings
Note that only the .xmp files should be copied into the 'Settings' folder, as folders are not supported in Camera Raw.
Finding the 'Settings' Folder on a Mac
If you are using a Mac, the Library menu may be hidden. To reveal it, hold the Option key while selecting the "Go" menu in the Finder. If you still cannot find the 'Settings' folder, save a file within ACR and search for it on your computer. Once found, create a shortcut to the 'Settings' folder for easy access.
Installing the Presets
- Open your image in Photoshop.
- Click on 'Filter' and select 'Camera Raw Filter'.
- Click on the right side of the Basic menu (this may appear as a green circle). Then, choose 'Load Settings'.
- Choose the .xmp file from the downloaded and unzipped folder and click 'Load'.
- Click 'OK' to apply the effect.
Samy's Camera and Texas Sales Tax: What's the Deal?
You may want to see also
![]()
How to add Camera Raw Filter in Adobe Photoshop
Adobe Photoshop's Camera Raw Filter is a powerful tool that allows you to access the features of Adobe Camera Raw (ACR) within your Photoshop workflow. This means you can make adjustments within ACR at any point during your workflow, rather than only during the RAW processing stage.
- Open your desired image in Photoshop.
- Duplicate the image layer and convert the duplicate into a Smart Object. This will allow you to re-edit the adjustments made by the Camera Raw Filter in the future.
- Access the Camera Raw Filter by going to the Filter menu and selecting Filter > Camera Raw Filter. You can also access it by pressing Ctrl+Shift+A on Windows or Cmd+Shift+A on Mac.
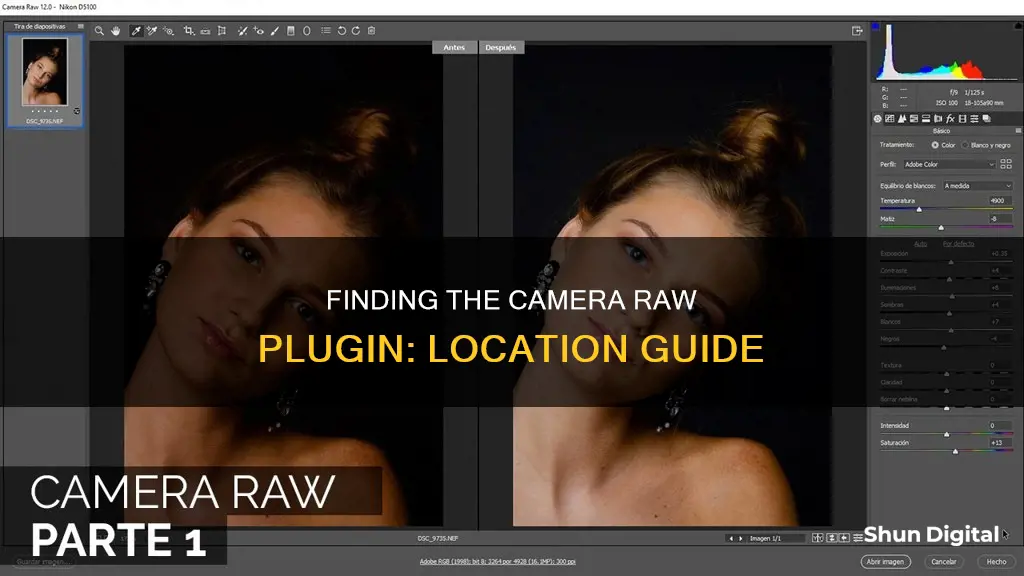
- The Camera Raw interface will appear. Here, you can make various adjustments to your image, such as white balance, temperature, exposure, shadows, highlights, and more.
- Make your desired adjustments. Users familiar with Adobe Camera Raw will recognise the interface, while Lightroom users may need a moment to familiarise themselves with the tools.
- When you are finished making adjustments, click "OK" to apply the changes and return to the Photoshop interface.
It is important to note that the Camera Raw Filter only works with RGB and grayscale images. If you are working with CMYK, LAB, or indexed colour images, you will need to convert them to RGB or grayscale before applying the Camera Raw Filter.
Additionally, the Camera Raw Filter lacks certain functionalities, such as the Crop and Rotate tools, which are available in ACR. Therefore, it is best to get your image as close to perfect as possible during the RAW processing stage to make the most of the Camera Raw Filter.
Recovering RAW Camera Files on V20: A Step-by-Step Guide
You may want to see also
Frequently asked questions
To locate the Camera Raw plugin on a Windows PC, go to "C:\Users\UserName\AppData\Roaming\Adobe\CameraRaw\Settings".
To locate the Camera Raw plugin on a Mac, go to "UserName > Library > Application Support > Adobe > Camera Raw > Settings".
To install the Camera Raw plugin, follow these steps:
- Exit all Adobe applications.
- Download the appropriate file for your operating system.
- Double-click the downloaded file to start the installer.
- Follow the on-screen instructions.
- Restart your Adobe applications.