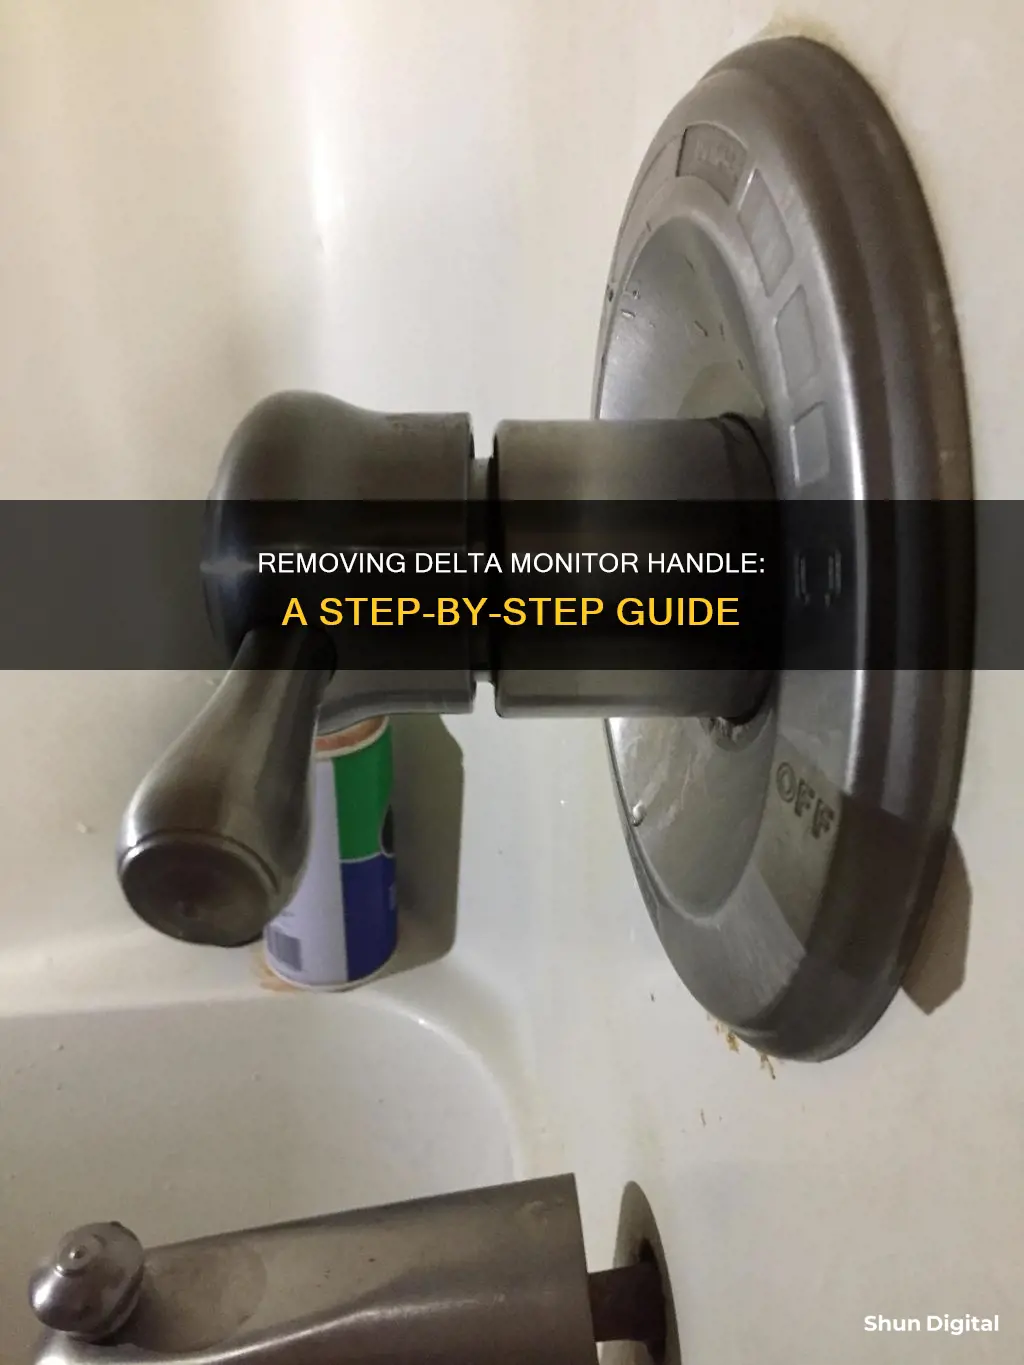
Removing a Delta Monitor handle can be challenging and may take over an hour. Before you begin, ensure you have the necessary tools and replacement parts. Start by shutting off the water supply at its main source. Next, remove the set screw lever handle with an Allen wrench. If the set screw is stripped, you may need to drill it out. Then, remove the temperature control handle and pull off the screw carefully. If your handle has a faceplate, you may need to unscrew and remove it first to access the handle screws. Once the handle is removed, you can proceed with further repairs or maintenance.
What You'll Learn

Remove the set screw lever handle
Removing a Delta Monitor handle can be a tricky task, especially if the set screw is involved. Here is a detailed guide to help you through the process:
Locate the Set Screw:
The set screw is usually located directly under the lever on a lever-style handle, which is common on most single-handle Delta faucets. You may need to crouch down to get a better view and find it. On some Delta kitchen faucets, the set screw is located on the side of the handle cover, facing the back wall when the faucet is turned off.
Use the Correct Allen Key:
Delta faucets often come with 3/32-inch hex screws, so a standard 1/8-inch Allen key may not fit. You will need an Allen key of the correct size to turn the set screw. Try a folding set of metric Allen keys, which may include a 2.5-millimetre key that should fit.
Loosen the Set Screw:
Insert the Allen key into the set screw and try to loosen it. If it's too tight, apply some WD-40 or a similar lubricant and wait for a few minutes before trying again. Be careful not to strip the screw head or break the Allen key by applying too much force.
Remove the Handle:
Once the set screw is loosened, you can try to remove the handle. This may require some effort. Rock the handle back and forth while also pulling it outwards. If it's stuck, you can try using a handle pulling tool or applying gentle heat to the top of the handle where the spindle is located.
Deal with a Stuck Handle:
If the handle is still stuck, there could be corrosion or calcium buildup. Try using a rust softener like CLR and letting it sit for about 20 minutes to loosen any corrosion. You can also try drilling out the set screw, but be careful not to damage the handle or the cartridge. As a last resort, you can use a hacksaw to cut through the handle, but this should be done carefully to avoid damaging the cartridge.
Remember to turn off the water supply before attempting any repairs and always be gentle to avoid causing further damage. Good luck with your repair project!
Powering Your LCD Monitor with a Power Bank
You may want to see also

Unscrew the face plate
Unscrewing the face plate is the first step to removing a Delta shower handle. This is because, sometimes, the screws that secure the handle are behind the face plate.
To begin, you will need to locate the set screw on the handle. This will be in a recess somewhere on the handle. To access the screw, you may first need to remove the lever. Once you have located the set screw, insert the appropriately-sized Allen wrench into the hole and wiggle it back and forth to ensure it is seated into the set screw. If the wrench moves without resistance, it is too big, so select a smaller size.
Now, loosen the set screw and remove the handle. You can then grip the chrome collar and pull it straight back while twisting to remove it.
With the handle and collar removed, you should now be able to see the face plate screws. Unscrew these and remove the face plate.
With the face plate removed, you will now be able to access the handle screws. Unscrew these and you will be able to remove the handle, bonnet, and sleeve from the valve stem.
Repairing an Asus 24" Monitor: A Step-by-Step Guide
You may want to see also

Remove the cartridge
Now that the water supply is shut off and the handle has been removed, it's time to take out the cartridge. This part may require some force, but be careful not to damage the surrounding components.
First, identify the type of cartridge in your Delta Monitor handle. There are two common types: one with a threaded bonnet and one with a bonnet or trim sleeve. If you're not sure, check your handle's manual or search for your handle's model online.
For a cartridge with a threaded bonnet, firmly grasp the handle and turn the bonnet counter-clockwise. You may need channel-lock pliers to get a good grip. Once the bonnet is removed, you can pull out the cartridge.
If your cartridge has a bonnet or trim sleeve, use channel-lock pliers to slide the bonnet or sleeve off. Again, this may require some force due to the accumulation of sediments. Be sure to put the stop cap back in the same position.
With the bonnet or sleeve removed, you should now be able to access the cartridge. Grip the top of the cartridge securely with channel-lock pliers and pull it straight back towards you. You may need to wiggle it gently up and down while applying steady pressure. If it's stuck, try using tongue-and-groove pliers or needle-nose pliers to remove it.
Once the cartridge is out, set it aside, and we can move on to installing the new one.
Tips:
- If the cartridge is difficult to remove, try using a handle-pulling tool or a cartridge-removal tool. You can find these at your local hardware store or online.
- If the cartridge is stuck due to corrosion, try using a rust softener like CLR. Pour it into the handle hole and let it sit for about 20 minutes to loosen the corrosion.
- If the set screw is stripped, you may need to drill it out. This will require a drill and a drill bit that is the appropriate size for the screw. Be careful not to damage the surrounding handle or cartridge.
Disassembling LG LCD Monitors: A Step-by-Step Guide
You may want to see also

Reassemble the faucet
Once you have identified and fixed the problem with your Delta Monitor shower faucet, it is time to reassemble the various parts. Here is a detailed guide to help you through the reassembly process:
It is important to put all the parts back in the correct order to avoid confusion and ensure a proper fit. Start by replacing the trim sleeve or orderly covering. This is the chrome collar or chrome housing that you carefully pulled and twisted to detach earlier. Make sure it is securely in place.
Next, replace the bonnet. The bonnet is the part you removed using a star screwdriver or, in some cases, tongue and groove pliers. Ensure it is tightened by hand. Do not overtighten or use excessive force, as this may deform the bonnet.
After the bonnet is in place, put back the stop limit. This is the small cap at the base of the handle that you removed at the beginning of the disassembly process. Ensure it is in the same position as before, usually facing left.
Now, replace the temperature control knob. This is the part that allows you to adjust the water temperature. Secure it in place by tightening the screw properly.
Finally, conduct a test of your Delta Monitor shower faucet. Turn on the water supply and leave the faucet open to relieve any pressure. Place the temperature handle in the hot and cold positions to check the water temperature. Ensure there are no leaks, and check the water pressure. If everything is functioning correctly, flush the showerhead to remove any debris that may have accumulated during the repair process.
Additional Tips:
- Before reinstalling the valve cartridge assembly, note the position of the stop on the cap and ensure it is put back in the same position.
- After reinstallation, always turn on the valve so that cold water runs first to avoid scalding.
- Regularly inspect and maintain your Delta Monitor shower faucet, especially if your water supply contains high levels of contaminants like lime, rust, or minerals.
- For any parts that you need to replace, always order exact replacement parts to avoid problems.
Monitor Sizes Compared: Nesting Screens for the Perfect Setup
You may want to see also

Use a handle pulling tool
If your Delta Monitor handle is stuck, you may need to use a handle-pulling tool. This is a tool specifically designed to remove handles and can be useful if your handle is stuck due to corrosion or other damage.
To use a handle-pulling tool, follow these steps:
- Purchase or rent a handle-pulling tool from your local hardware store.
- If your handle has a set screw, try to loosen it first with an Allen wrench. If the screw is stripped or corroded, you may need to drill it out.
- If there is no set screw or you are unable to remove it, proceed to using the handle-pulling tool.
- Follow the instructions for your specific tool, but generally, you will need to attach the tool to the handle and then apply force to pull the handle off.
- Be careful not to use too much force, as you could damage the valve or surrounding area. If you are worried about damage, consider using a mallet to gently hit the handle in different directions while also pulling on it. This can help loosen any corrosion or buildup without causing breakage.
- If the handle still does not come off, you may need to cut it off. Use a hacksaw to carefully cut through the handle, being careful not to damage the underlying valve or cartridge.
- Once the handle is removed, you can proceed with your maintenance or repairs.
Remember to shut off the water supply before attempting any repairs and always use the appropriate tools to avoid causing further damage.
Nissan Rogue Sport: Blind Spot Monitor Location
You may want to see also
Frequently asked questions
First, shut off the water supply. Then, remove the set screw lever handle with an Allen wrench. Remove the small cap at the base of the handle, then the temperature control handle, and then carefully pull off the screw.
You can try to drill it out. If that doesn't work, you may need to cut the handle and the brass spline off the cartridge to access the screws behind it.
Unscrew the faceplate first. Then you can pull off the handle and faceplate together, and then unscrew the handle.


