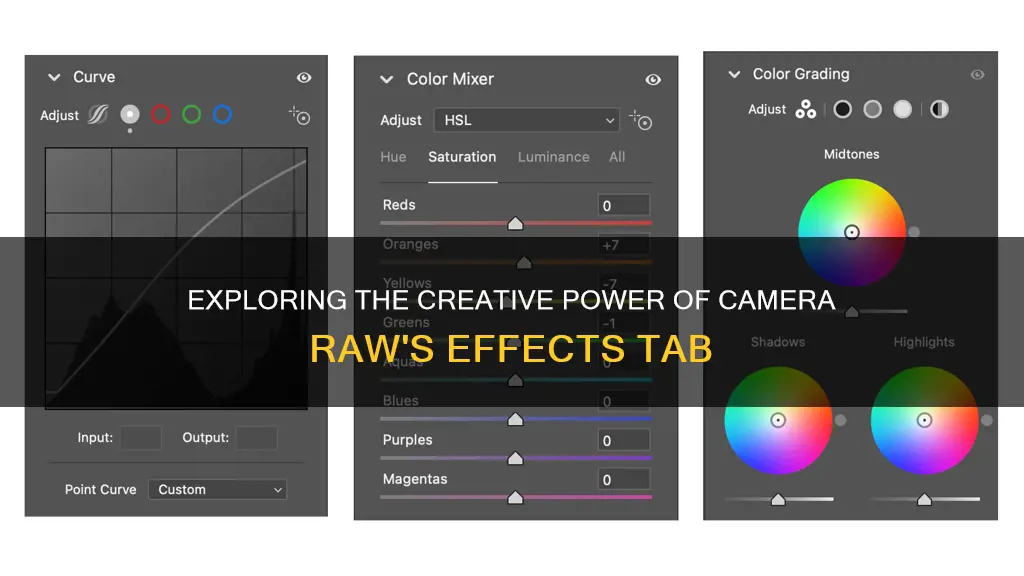
The Effects tab in Camera Raw allows you to add a grainy texture to your photos, as well as apply a light or dark vignette. The Grain controls let you simulate the effect of high film speed in traditional photography, where the faster the film speed, the larger and more apparent the grain. You can also adjust the size of the grain particles and make the grain more or less uniform. The Post Crop Vignetting controls let you apply a light or dark vignette to your photo, which will automatically adjust if you crop the image.
| Characteristics | Values |
|---|---|
| Add grain texture | Amount: 50 |
| Size: 80 | |
| Roughness: 50 | |
| Apply light or dark vignette | Style: Highlight Priority |
| Amount: Negative value for dark vignette, positive value for light vignette | |
| Midpoint: Adjust to expand the vignette inward or outward | |
| Roundness: Adjust to make the vignette shape more oval or more like a rounded rectangle | |
| Feather: Adjust to control the softness of the transition to the non-vignetted areas | |
| Highlights: Adjust to control the brightness of the highlights within the vignette area |
What You'll Learn
![]()
Simulate grainy texture
The Effects tab in Camera Raw has a Grain section with controls that allow you to simulate film grain for a stylistic effect reminiscent of particular film stocks. This can also be used to mask enlargement artefacts when making large prints.
To add a grain texture to a photo, click the Effects tab and double-click the Hand tool to fit the image in the preview. Choose a photo that won't suffer aesthetically when its details lose definition. This could be an image with soft, muted colours and details that don't need to stay crisp.
Under Grain, choose an Amount value of around 50 to make the grain noticeable. The Amount slider controls how much grain is added to the photo.
To emulate the fine grain of a slow film speed or the coarser grain of a fast film speed, adjust the Size value. The Size slider controls the size of the grain particles. When this value is greater than 25, a small degree of blurring is also applied, helping to blend the grain with the image.
Lower the Roughness value below 50 to produce a more uniform grain, or raise it to produce an uneven, coarse grain. The Roughness slider controls the regularity of the grain.
Check the grain at varying zoom levels to ensure that the character appears as desired.
Charging the Panasonic Lumix: How Long Does It Take?
You may want to see also
![]()
Add a vignette to a photo
Vignettes are a simple yet effective way to draw a viewer's focus to the centre of an image and make the subject stand out. The word vignette comes from the root word "vine", which means a decorative border on a page. In photography, this translates to a border around the edge of the image, caused by a reduction of light from the centre of the image, or a light fall-off.
There are several ways to add a vignette to a photo using Adobe Camera Raw. One way is to go to the Effects panel, found on the right-hand side, and adjust the slider to control the strength of the vignette. You can also adjust the size of the midpoint and how round and soft you want the vignette to be.
Another way to add a vignette is by using the Lens Correction tab. Here, you can find the lens vignetting slider under the lens correction tab. Move the sliders to add or remove vignettes according to your taste.
Additionally, you can use the radial filter tool to add a dark or light vignette. On the adjustments panel, specify where you want the vignette added—inside or outside the radius—and then adjust the exposure to lighten or darken the vignette.
If you prefer to work in Adobe Photoshop, there are also a few methods to add a vignette. One way is to use the Lens Correction Filter. First, open the image and check that the image is unlocked. Then, convert the image to a Smart Layer to give you more control and flexibility over edits. Navigate to Layer in the drop-down menu and select Smart Objects > Convert to Smart Object. Once the layer is converted, navigate to Filter > Camera Raw Filter. The image will now be displayed in the Camera Raw Window, and you can select the Vignette Slider from the Edit Panel to adjust the vignette effect.
Another method in Photoshop is to use a Curves Adjustment Layer. Open the image and ensure it is unlocked. Head to the Toolbar and click on the Marquee Tool, choosing either the Elliptical Marquee Tool for a round vignette or the Rectangle Marquee Tool for a rectangular vignette. Select the area you want to apply the vignette to and then invert the selection area. Go to Select > Modify > Feather to adjust the blending between the background layer and the subject. Create a Curves Adjustment Layer and click on the Curve in the Adjustment Layer Window to darken or lighten the edges of the photo.
Remember, the addition of a vignette is a matter of personal taste and will depend on your photography style and the type of image you are editing. Vignettes can enhance or ruin an image, so it's important to be gentle and sparing when adding them.
Charging Multiple Camera Batteries: Efficient Methods to Explore
You may want to see also
![]()
Fine-tune a specific tonal range
The Effects tab in Camera Raw allows you to fine-tune a specific tonal range in your image. This can be done by adjusting the tone curve in the Curve panel of the Edit panel.
The Curve panel allows you to make adjustments to the tonal range values of your image. The horizontal axis represents the original tonal range values, with shadows on the far left, followed by darks, lights, and highlights. The vertical axis represents the changed tonal range values, with black at the bottom and gradually changing to white at the top.
To fine-tune a specific tonal range, click on the curve at the position on the horizontal axis that corresponds to the tonal range you want to adjust. Drag the curve upward to lighten the colours or downward to darken them.
You can also adjust the Parametric Curve, which is a simple tone editing curve that restricts tonal adjustments to prevent abnormal tones. To do this, click on the "Click to edit Parametric Curve" button and adjust the dots on the black and white gradient bar to modify the tonal ranges.
Additionally, you can use the Point Curve to gain more precise control over the tone curves. Click on the "Click to edit Point Curve" button and select a preset or adjust the curve manually by adding up to 16 points.
By utilising these tools, you can make specific tonal adjustments to your image, fine-tuning it to your desired effect.
The Best Camera Grip Battery Options and Their Lifespans
You may want to see also
![]()
Apply capture sharpening
Capture sharpening is a tool that helps recover details lost due to in-camera blurring, which can be caused by diffraction, the anti-aliasing filter, or other sources of Gaussian-type blur. It is applied to the raw file immediately after demosaicing and modifies the data in linear gamma to limit halo generation. This means that it will only work on raw files.
Even though you can get excellent results with the default settings, it is not meant to be the only tool used for sharpening. Rather, it should be considered a necessary first step to improve the distinction between noise and details before the image is processed by other tools further down the line. It can be used in conjunction with other sharpening methods such as the Unsharp Mask or RL Deconvolution. The combination of sharpening tools depends on what you are trying to achieve and what is acceptable in terms of artifacts.
The purpose of this tool is to reduce blurring by trying to automatically guess the radius needed to counteract the effect. You can also choose to adjust the radius yourself, keeping in mind that if the value is too low, there will not be enough sharpening, and if it is too high, it will lead to strong haloing on the edges. The default radius is usually spot on, but there may be scenarios where you need to be extra careful to avoid noise and over-sharpening. For example, when an image is going to be processed in programs designed for focus stacking, astronomical images, super-resolution images, etc. In these cases, it may be better to turn off the auto-radius calculation and manually set the radius to a lower value to avoid artifacts.
The Sharpening controls on the Detail tab adjust edge definition in the image. The Adjustment Brush tool and Graduated Filter tool use the Radius, Detail, and Masking values when local sharpening is applied. The Radius slider determines the size of the details that sharpening is applied to. Photos with fine details generally need a lower setting, while photos with larger details can use a larger radius. Using too large a radius generally results in unnatural-looking results.
The Detail slider determines how much of the edge areas are affected by sharpening. You will apply lower amounts of Detail if your photo is slightly blurred and higher amounts if you want to bring out texture and detail. The amount of Detail you apply depends on the subject you are sharpening.
Charging Your Roku Doorbell Camera: A Step-by-Step Guide
You may want to see also
![]()
Reduce unwanted noise
When it comes to reducing unwanted noise in your images, Adobe Camera Raw has a few features that can help. The Detail tab is where you'll find the Noise Reduction section, which includes controls for minimising image noise, or the extraneous visible artefacts that can degrade image quality.
Image noise comes in two types: luminance (grayscale) noise, which makes an image look grainy, and chroma (colour) noise, which appears as coloured artefacts. Both types of noise are more likely to occur when shooting in low-light conditions with a high ISO setting, or when using less sophisticated digital cameras.
To reduce luminance noise, use the Luminance slider. This will lessen the noise but will also soften your photo, so use it sparingly. The Luminance Detail slider can then be used to restore some of the lost sharpness.
To reduce chroma noise, use the Color and Color Detail sliders. This will decrease coloured artefacts while preserving colour detail. The Color Detail slider can also be used to make the colour in your noise more or less vibrant, while the Color Smoothness slider blurs any remaining colour noise. However, be aware that these adjustments may reduce the overall saturation of your image.
For a more precise edit, zoom in on your preview image to at least 100% so you can clearly see the noise you're trying to reduce.
Simplesafe Camera Costs: Monthly Fees or One-Time Payment?
You may want to see also
Frequently asked questions
The Effects tab in Camera Raw is used to add special effects to your photos, such as a grainy texture or a light or dark vignette.
To add a grain effect, go to the Effects tab and adjust the Grain controls. Choose an Amount value of around 50 for a noticeable grain. You can also adjust the Size and Roughness values to emulate the grain of slow or fast film.
To add a vignette, go to the Effects tab and use the Post Crop Vignetting controls. Choose a negative Amount value for a dark vignette or a positive value for a light vignette. You can also adjust the Midpoint, Roundness, Feather, and Highlights values to fine-tune the effect.
Other tabs in Camera Raw include Basic, Tone Curve, Detail, HSL/Grayscale, Split Toning, Lens Corrections, Camera Calibration, Presets, and Snapshots.
The Effects tab is best used for specialty corrections or enhancements. For most adjustments, it is recommended to use the first four tabs: Basic, Tone Curve, Detail, and HSL/Grayscale.