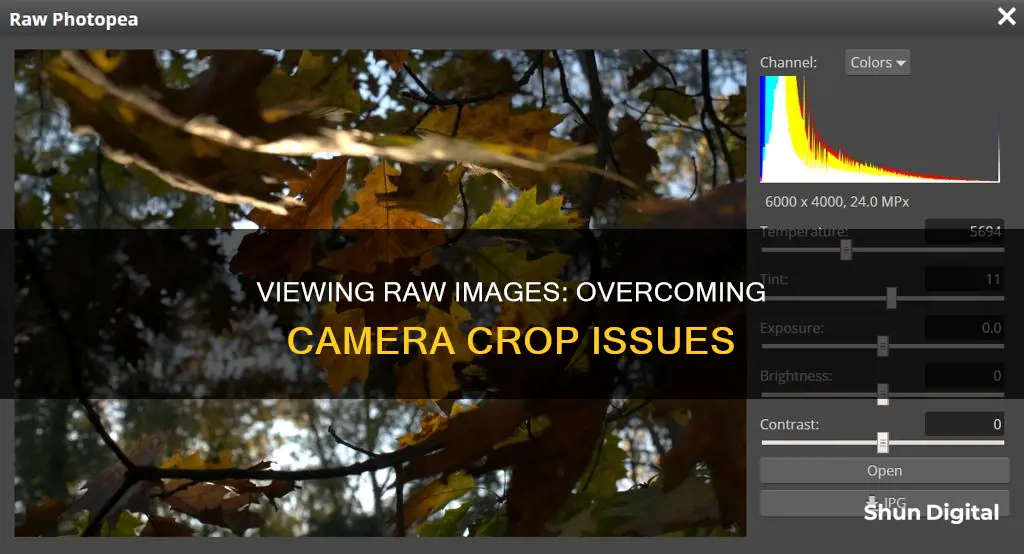
Opening a raw image file without camera crop info can be done in Adobe Camera Raw. This is a plug-in for Adobe Photoshop and After Effects that allows users to import and work with camera raw files. It is also possible to edit JPEG and TIFF images in Camera Raw, but these are typically already processed by the camera.
To open a raw image file without camera crop info, you can use the following methods:
- In Photoshop, go to Edit/Photoshop > Preferences > File Handling. Check Prefer Adobe Camera Raw for Supported Raw Files and click OK.
- In Bridge, choose Edit/Adobe Bridge CC > Camera Raw Preferences. Choose Automatically Open JPEGs with Settings from the JPEG menu.
- If you shoot digital TIFF photos, choose Automatically Open TIFFs with Settings from the TIFF menu.
- Double-click the raw file thumbnail in Bridge.
- Click the thumbnail and press Ctrl-R/Cmd-R, or click the Open in Camera Raw button on the Bridge toolbar.
- Right-click the photo and choose Open in Camera Raw.
| Characteristics | Values |
|---|---|
| File type | RAW, JPEG, TIFF |
| Software | Adobe Camera Raw, Lightroom, Photoshop, After Effects, Epson-7000 viewer |
| Image size | 16 x 9, 4:3 |
| File format | PSD, TIFF, JPEG, DNG, CR2, PNG, PBM |
What You'll Learn
![]()
Using the Develop Module in Lightroom
The Develop Module in Lightroom is where you can edit your photos. It is split into sections, with panels on the left and right, and the Content Window in the middle, where the photo you are working on is displayed.
The panels on the left let you select photos, preview them at various stages of editing, and apply global presets. The right-hand panels contain most of the tools for processing raw files. The tools below the work area provide various functions, from toggling between before-and-after views to turning on soft proofing.
The first panel on the right is the Basic Panel, where all your photo editing should begin. Here, you can adjust the white balance, tonal scale, and colour saturation of a photo, including texture, clarity, and vibrance. The Tone Curve panel allows you to fine-tune your tonal adjustments, and the Color Mixer panel contains tools for making colour adjustments.
The Detail panel lets you adjust the sharpness and reduce noise, while the Lens Corrections panel lets you correct perspective distortions caused by the camera lens. The Effects panel lets you apply a vignette to a cropped photo and add a film-grain effect.
The tools in the tool strip let you fix red-eye, remove dust and spots, crop and straighten photos, and adjust specific areas of a photo.
Charging Waterproof Camera Batteries: Pentax Edition
You may want to see also
![]()
Opening a RAW file in Photoshop
Step 1: Check Your Photoshop Version
Before attempting to open a RAW file, ensure that your version of Photoshop supports your camera model. Adobe periodically releases new versions of the Camera Raw plug-in that add support for new camera models. Check the "Supported Cameras" list for your camera model. If your camera is not listed, you may need to update Photoshop or the Camera Raw plug-in.
Step 2: Install the Camera Raw Plug-in
If your camera is supported but you still cannot open the RAW file, ensure that the Camera Raw plug-in is installed. When you install Photoshop, a version of the Camera Raw plug-in is automatically installed. However, if you are using an older version of Photoshop, you may need to install the latest compatible version of the plug-in. You can find and install the plug-in from the Adobe website.
Step 3: Reset Photoshop Preferences
In some cases, the issue may be related to corrupted preferences. Try resetting the Camera Raw preferences by holding down the Command key (on macOS) or Ctrl key (on Windows) and selecting Photoshop > Preferences > Camera Raw. Click "Yes" when asked if you want to delete the Camera Raw preferences.
Step 4: Uncheck "Use Graphics Processor"
If you are still unable to open the RAW file, try unchecking the "Use Graphics Processor" option in Photoshop's preferences. Go to Preferences > Camera Raw and uncheck the box. If this does not resolve the issue, you may also need to reset the preferences on quit and then restart Photoshop.
Step 5: Update Photoshop and Camera Raw
If the above steps do not work, make sure that both Photoshop and the Camera Raw plug-in are up to date. Go to the Help menu in Photoshop and choose "Updates" to check for and install any available updates. It is recommended to do this for both Photoshop and Bridge.
Step 6: Convert RAW Files to DNG Format
If you have updated Photoshop and still cannot open the RAW files, it may be because your camera is too new for your Photoshop version. In this case, you have a few options:
- Upgrade Photoshop to the latest version.
- Convert your RAW files to DNG (Digital Negative) format, which can be opened by any version of Photoshop. The DNG converter is a free download from Adobe.
- Use the software that came with your camera to open and edit the RAW files.
By following these steps, you should be able to open and work with RAW files in Photoshop.
Target's Camera Battery Options: What You Need to Know
You may want to see also
![]()
Using the Camera Raw Filter in Photoshop
The Camera Raw Filter in Photoshop is a powerful tool that offers access to the features of Adobe Camera Raw (ACR) in your Photoshop workflow. It allows you to use the functions of the ACR interface within Photoshop, giving you more flexibility in your editing process.
To access the Camera Raw Filter, simply go to the Filter menu in Photoshop and select "Camera Raw Filter". Before doing this, it is recommended to stamp all the layers by pressing Ctrl/Cmd+Shift+Alt/Opt+E, which will combine all your layers into a new layer to work from.
While the Camera Raw Filter is a great tool, it does have some limitations. For example, you will lose some functionality of the white balance adjustment as you are not working from a RAW file. Additionally, the Crop and Rotate tools that are normally available when working on RAW files are not present in the Camera Raw Filter.
The Camera Raw Filter is particularly useful for fine-tuning adjustments after RAW processing, making tricky adjustments that are difficult to do in Photoshop's main interface, applying local adjustments to specific parts of the image, adding vignettes, and making final tweaks before finishing your image.
- Fine-tune adjustments: You can use the Camera Raw Filter to make further adjustments to your image after processing it in RAW. This is useful if you want to make changes without affecting your original work.
- Make tricky adjustments: The Camera Raw Filter provides access to certain tools that are not available or are more difficult to use in Photoshop, such as the Clarity tool and the Highlights, Whites, Darks, and Blacks sliders for global contrast adjustments.
- Apply local adjustments: You can use the Camera Raw Radial filter to make targeted adjustments to specific areas of your image, such as brightening or darkening a particular part of the photo.
- Add vignettes: The Vignette tool in the Camera Raw Filter is easy, fast, and intuitive to use, allowing you to create subtle or extreme vignettes in just a few seconds.
- Make final tweaks: After you've finished editing your image in Photoshop, you can use the Camera Raw Filter to make any small tweaks or adjustments to enhance your image further.
When using the Camera Raw Filter, it is recommended to create a duplicate layer and convert it into a Smart Object before applying the filter. This will allow you to go back and adjust the parameters of the filter later on if needed.
Overall, the Camera Raw Filter in Photoshop is a valuable tool for photographers and editors, providing access to a range of powerful features and adjustments that can enhance your images and streamline your workflow.
Action Camera Batteries: Are They Interchangeable?
You may want to see also
![]()
Using the Filmstrip view in Camera Raw
The Filmstrip view in Camera Raw is a useful feature when you want to work on multiple images at once. It allows you to see thumbnails of the images you are working on so that you can scroll through them quickly.
To access the Filmstrip view, you must have selected multiple raw images to be opened into Photoshop. If you are using Bridge, you can open multiple images from there into ACR and the Filmstrip should appear.
Once you have the Filmstrip view, you can apply ACR adjustments to the images as a group. To do this, simply highlight multiple thumbnails.
If you are only working on one image, the Filmstrip will not appear.
You can hide the Filmstrip view by clicking on the frame between the filmstrip and the preview window. When you see the double-headed arrow, drag it to the left until the Filmstrip disappears. Alternatively, you can double-click on that bar to hide the Filmstrip.
- Click and hold the Filmstrip icon to show filenames, ratings, and colour labels, as well as choose the orientation of the Filmstrip. You can also use the shortcut Command + Shift + F (Mac) or Control + Shift + F (Windows) to toggle the orientation.
- Position your cursor at the top of the Filmstrip and drag to resize it.
- Tap the Delete key to mark an image for deletion.
- Position your cursor over a thumbnail and click the More icon (three dots) to access additional options, or Control-click (Mac) or right-click (Windows) on a thumbnail to access the context-sensitive menu.
- With the Filmstrip view, you can copy and paste edit settings between images. First, select the edited image in the Filmstrip and use the shortcut Command + C (Mac) or Control + C (Windows). Then, move to the next image and use the shortcut Command + V (Mac) or Control + V (Windows) to paste the settings.
Camera Battery Explosions: How Common Are They?
You may want to see also
![]()
Editing a Smart Object in Photoshop
Smart Objects in Photoshop are layers that contain image data from raster or vector images. They allow you to perform non-destructive editing, meaning you can scale, rotate, skew, distort, or warp a layer without losing the original image data or quality.
Creating Smart Objects
Smart Objects can be created from one or more Photoshop layers, from Illustrator artwork, or from a file.
Editing Smart Objects
To edit a Smart Object, you can double-click on its thumbnail in the Layers panel, or go to "Layer" > "Smart Objects" > "Edit Contents" in the Menu Bar. This will open the Smart Object in its own separate document, where you can make changes. Once you save and close this document, your Smart Object will update to reflect your edits.
Replacing Smart Object Contents
You can also replace the contents of a Smart Object with a new image. Go to "Layer" > "Smart Objects" > "Replace Contents", select your new image, and it will replace the original image in the Smart Object.
Resizing Smart Objects
To resize a Smart Object, click on its preview thumbnail in the Layers panel to select it, then go to "Edit" > "Free Transform" in the Menu Bar. Press and hold Shift on your keyboard, then click and drag any of the corner handles to resize the image within the frame.
Using Adjustment Layers
Smart Objects can also be edited using adjustment layers, such as Black & White or Photo Filter, which can be applied in the same way you would in a normal document.
Linked Smart Objects
Linked Smart Objects are referenced from an external image file. If the source image file changes, the Linked Smart Object will update to reflect those changes.
Smart Doorbell Camera Options Without Monthly Fees
You may want to see also
Frequently asked questions
Go to Edit/Photoshop > Preferences > File Handling. Check "Prefer Adobe Camera Raw for Supported Raw Files" and click OK.
In Bridge, choose Edit/Adobe Bridge CC > Camera Raw Preferences. Choose "Automatically Open [file type] with Settings" for the relevant file type.
Press Shift + Ctrl + A (Windows) or Shift + Cmd + A (macOS). Then, from the top toolbar, click Filter and select Camera Raw Filter.
In Bridge, click the thumbnail of the photo you want to open, then click the "Open in Camera Raw" button or press Ctrl-R/Cmd-R.