If you want to record your Nintendo Switch gameplay, there are a few different methods you can use. The Nintendo Switch has a built-in video recorder that allows you to record up to 30 seconds of gameplay. To use this method, simply press and hold the capture button (a square button with a circular indent) on the left Joy-Con while playing a compatible game. However, if you want to record longer videos, you will need to use an external video capture device or a capture card connected to a computer. This method requires additional hardware and software, but it will allow you to record your gameplay for an extended period without any time restrictions.
| Characteristics | Values |
|---|---|
| Nintendo Switch Recording Time Limit | 30 seconds |
| Nintendo Switch Recording Method | Built-in tool or mirroring Switch game on PC with a capture card |
| Nintendo Switch Recording Software | EaseUS RecExperts |
| Nintendo Switch Recording Quality | 720P, 1080P, and 4K |
| Nintendo Switch Recording Controls | Press and hold the Capture Button on the left Joy-Con |
| Nintendo Switch Recording Output | Videos can be saved in Album and shared on social media or sent to a smartphone |
| Nintendo Switch and HDCP | Supported, but only when certain apps are active |
What You'll Learn

Using a capture card
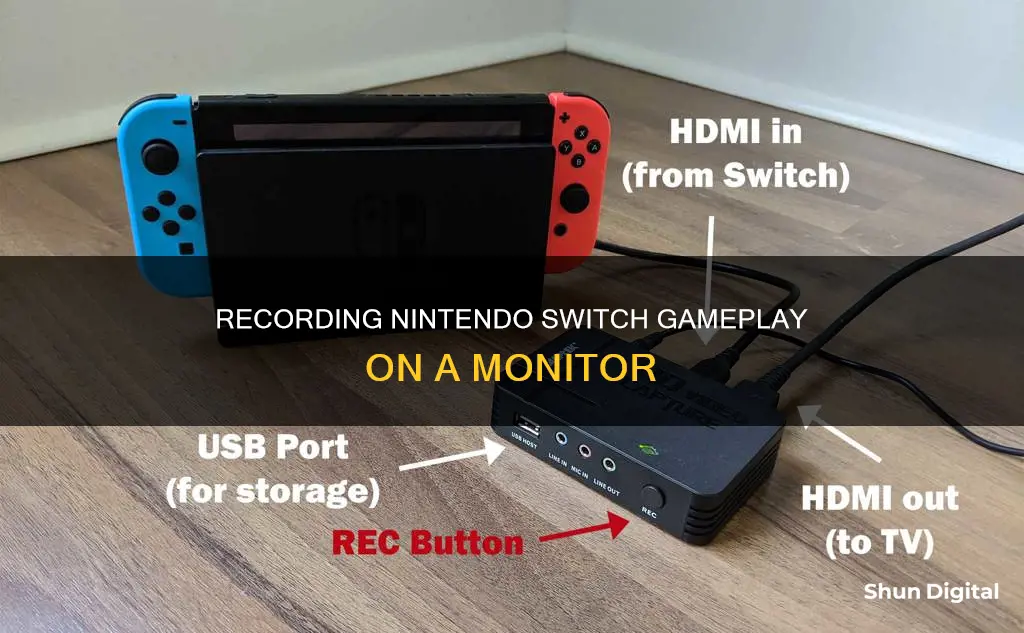
If you want to record your Nintendo Switch gameplay, you will need to invest in a capture card. This is because the Nintendo Switch's in-built sharing feature only allows you to send out a 30-second recording in low resolution. With a capture card, you can broadcast your gameplay to a device that can then record it.
The Elgato HD60 S Capture Card is one of the most commonly used capture cards on the market. It retails at USD $180 and comes with its own free editing software. The card has two HDMI cables, one connecting to your Nintendo Switch, and the other to your TV or monitor, and a USB cable that connects directly to your PC for video recording and editing.
- Prepare the capture card and HDMI cables.
- Plug one end of an HDMI cable into the HDMI OUT port on the Switch, and insert the other end of the cable into the HDMI IN port of the capture card.
- Connect your computer to the capture card. The output ports should be connected to the PC, and the input port to the Switch.
- Install the capture card's associated software on your PC and launch the application.
- Start your gameplay on the Nintendo Switch.
- Activate the recording feature on your capture card.
- Your gameplay will now be captured by your device or sent to your computer for recording or broadcast.
It is important to note that this method only works with the original Nintendo Switch. The Switch Lite cannot output video in any way, so there is no way to use an external video capture device with that version of the console.
Monitor Impact on Oculus Rift Performance: What's the Verdict?
You may want to see also

Recording Nintendo Switch gameplay on PC
Recording your Nintendo Switch gameplay on PC is possible, but it requires a few extra steps and some additional hardware. The built-in screen recorder on the Nintendo Switch only allows for 30 seconds of gameplay to be recorded, so you will need to use an external video capture device or a capture card connected to your computer if you want to record longer videos.
Using a Capture Card
To record your Nintendo Switch gameplay on PC using a capture card, you will need the following:
- A Nintendo Switch device
- A Nintendo Switch Dock
- HDMI cables to connect the capture card
- A Windows PC with a screen recorder installed (e.g. EaseUS RecExperts)
First, prepare your capture card and HDMI cables. Plug one end of an HDMI cable into the HDMI OUT port on the Switch, and connect the other end to the HDMI IN port of the capture card. Connect your computer to the capture card as well. Make sure the output ports are connected to the PC, and the input port is connected to the Switch.
Now, launch the gameplay that you want to record on your Nintendo Switch. Then, open your screen recorder software on your PC and start recording.
Using the Built-in Tool
If you don't want to invest in a capture card, you can use the Nintendo Switch's built-in gameplay capturing tool. This method is free and convenient, but it is limited to 30-second recordings.
To use this method, simply start your gameplay on the Nintendo Switch and press and hold down the Capture Button on the left Joy-Con. The Capture Button is a square button with a circular indent in the middle. Once you're done recording, you can view the captured video in the Album.
Tips for Recording
- If you're using a USB capture card, it's recommended to do a test run first to ensure that your settings are correct and there are no display issues.
- If you want to include microphone audio in your recording, consider using Virtual Audio Cables to set up OBS to record only game audio while you hear both game audio and group chat audio.
- If you want to record group chat audio, it's better to have your friends record their audio locally and send it to you to avoid any compression issues.
Monitoring Mutual Fund Performance: A Comprehensive Guide
You may want to see also

Using the built-in tool
The Nintendo Switch's built-in video recorder is a convenient way to record your gameplay without any additional hardware or software. Here's a step-by-step guide on how to use the built-in tool to record your Nintendo Switch gameplay when plugged into a monitor:
Step 1: Start Your Gameplay
Turn on your Nintendo Switch and launch the game you want to record. Ensure your Switch is plugged into your monitor to view the gameplay on a larger screen.
Step 2: Locate and Press the Capture Button
On the left Joy-Con, locate the Capture Button. It's usually a square button with an indented circle, located under the directional pad. Alternatively, on the Switch Pro controller, it's opposite the home button.
Step 3: Hold the Capture Button to Start Recording
Press and hold the Capture Button to initiate the recording. You don't need to hold it for the entire 30-second duration. A quick tap takes a screenshot, while holding it down records a video.
Step 4: Monitor the Recording Process
A spinning saving icon will appear on the screen during the recording. A "saving" message will also be displayed in the upper-left corner. Once the recording is complete, a new message with a play icon will confirm that the clip has been saved successfully.
Step 5: View and Manage Your Recordings
To view and manage your recorded clips, go to the Album on your Nintendo Switch home screen. Your clips will be grouped with your screenshots, but you can identify them by the "30s" label in the lower-right corner of the thumbnail. You can filter your library to view only clips by pressing Y and selecting "Videos Only" from the dropdown menu.
Step 6: Edit and Trim Your Clips
If you want to edit your clips, open a clip, and press A while viewing it. This will allow you to trim the clip by moving the bar frame by frame, removing any unwanted portions. You can also extract screenshots from within the clip using the edit function.
Step 7: Share Your Clips
You can easily share your recorded clips on social media platforms like Twitter and Facebook. Simply select the clip, press A, and then choose the "Post" option. Connect your social media accounts, and you'll be able to upload and share your gameplay moments with your followers. You can even add a comment to your post.
It's important to note that the built-in recorder has a limitation of recording up to 30 seconds of gameplay. If you wish to record longer sessions, you may need to consider using a capture card or third-party software solutions.
Removing Delta Monitor Shower Control: A Step-by-Step Guide
You may want to see also

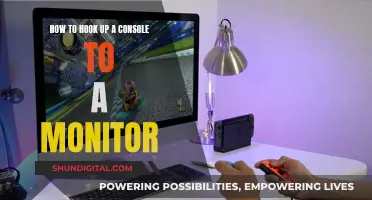
Connecting to a monitor or TV
To connect your Nintendo Switch to a TV or monitor, you will need the following:
- Your Nintendo Switch console
- A Nintendo Switch dock
- A Nintendo Switch AC Adapter (model no. HAC-002)
- An HDMI cable
Once you have gathered these items, follow these steps:
- Open the back cover of the Nintendo Switch dock.
- Connect the USB Type-C plug from the Nintendo Switch AC adapter into the top terminal of the dock labelled "AC ADAPTER", then connect the other end of the AC adapter to a wall outlet.
- Connect one end of the HDMI cable into the bottom terminal of the dock labelled "HDMI OUT", then connect the other end into an HDMI port on your television or monitor.
- Close the back cover of the Nintendo Switch dock.
- Remove the left and right Joy-Con controllers from the console. If the Joy-Con controllers were not previously attached to the console, they must first be registered to the console in order to be used as wireless controllers.
- Position the console so that the console screen faces in the same direction as the front panel on the dock, then insert the console into the dock.
- Turn on your TV or monitor and select the correct HDMI input. You should now see your Nintendo Switch's display on the screen.
Note that the Nintendo Switch Lite does not support TV mode and cannot be connected to a TV or monitor.
Removing Unmonitored MySQL Instances: A Comprehensive Guide
You may want to see also

Trimming and editing gameplay footage
To edit your saved gameplay video, follow these steps:
- On the HOME Menu, select "Album" > "All Screenshots and Videos."
- Choose the video you wish to edit by pressing A to open it.
- Press A again to access the options menu.
- Select "Trim" from the following options: Post, Send to Smartphone, Trim, Copy, and Delete.
- Use the d-pad to select the start and endpoints of the video.
- Save the trimmed video. This will be saved as a new video, separate from the original.
You can also save a screenshot from a saved gameplay video. To do this:
- On the HOME Menu, select "Album" > "All Screenshots and Videos."
- Choose the video you wish to edit by pressing A to open it.
- Pause the video by pressing Y.
- Select "Editing and Posting" > "Save as Screenshot."
Where is My Philips Monitor Serial Number?
You may want to see also
Frequently asked questions
You can record your gameplay by pressing and holding the capture button on the left Joy-Con. This will record the last 30 seconds of gameplay.
Recording gameplay for more than 30 seconds requires external hardware. You will need a capture card or a third-party screen recorder.
You will need a capture card and HDMI cables. Plug one end of an HDMI cable into the HDMI OUT port on the Switch, and the other end into the HDMI IN port of the capture card. Then, connect your computer to the capture card.


